Beautiful Card Designs Made Easy

August 31, 2012

Here's the card ...

This is the card that was in my mind yesterday for the using the  Cut, Fold, Tuck  dies that  Nery sent to me.

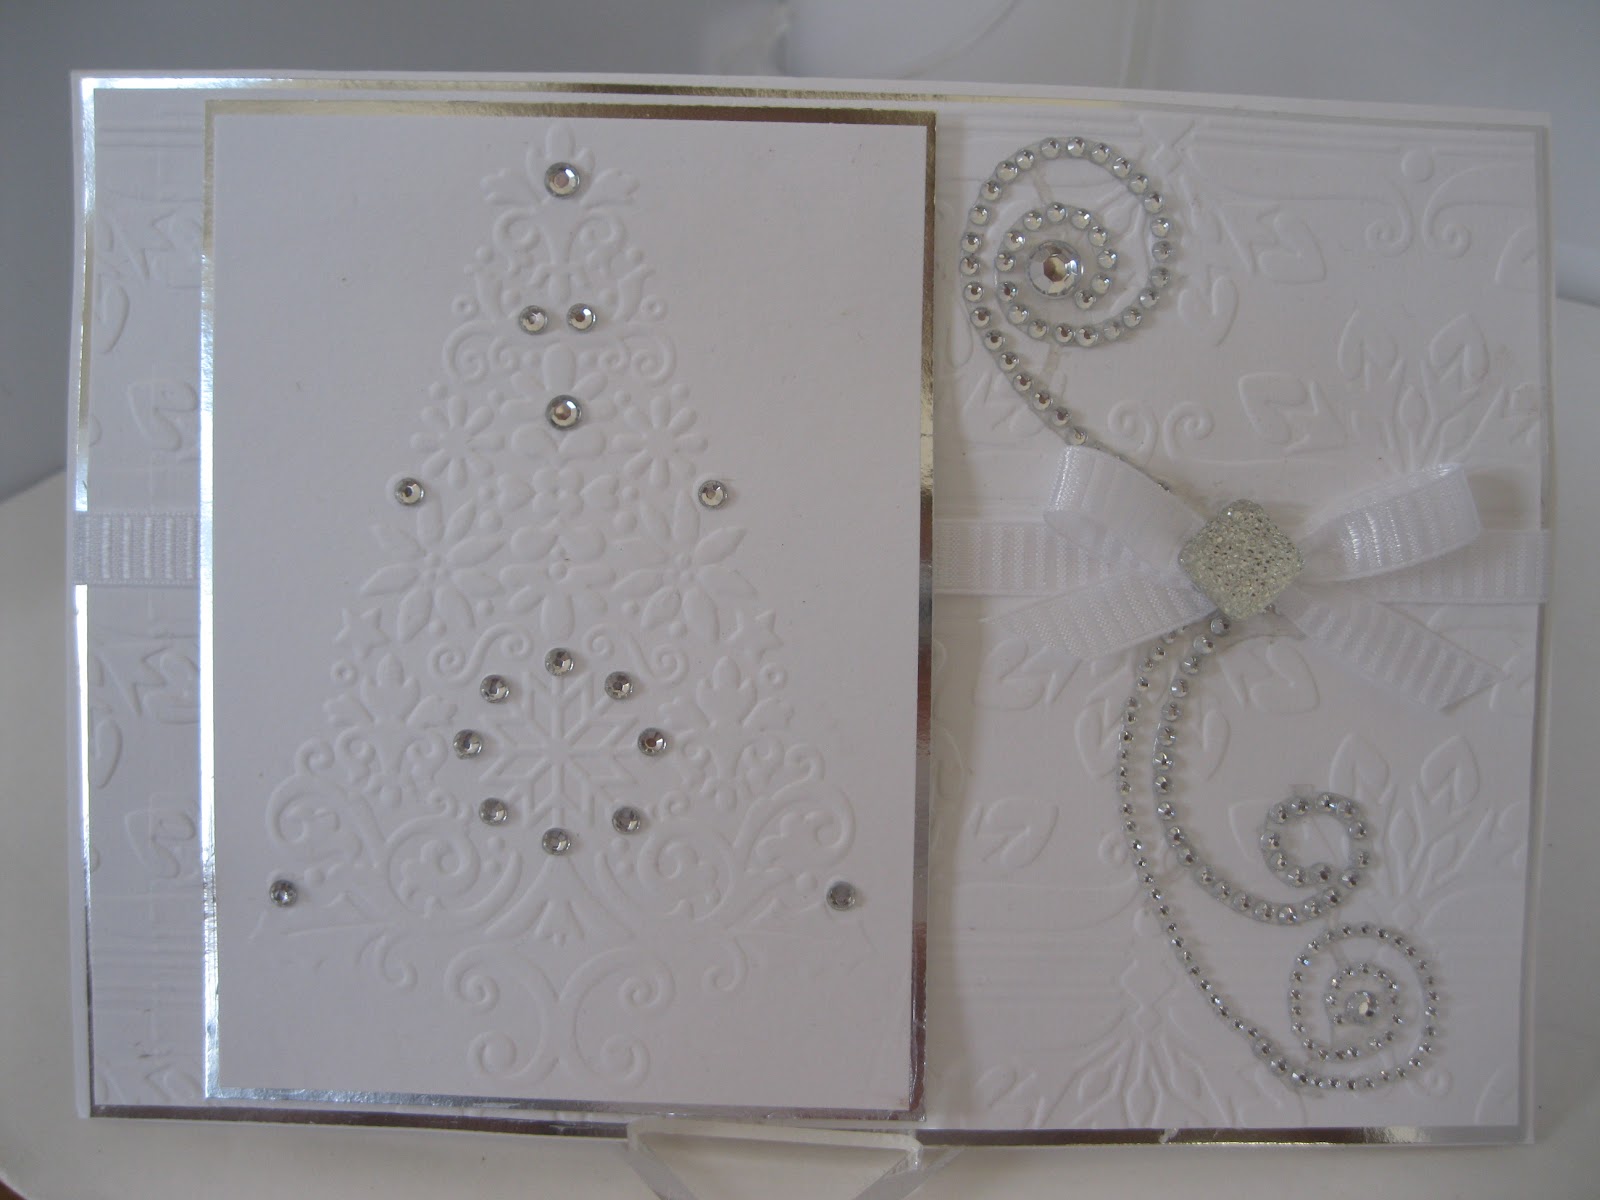
The photo has turned  out a bit dark  but the card itself is really lovely with  all the  Want2Scrap Diamante on it.

The  Decorative Hatpin  was created by me  and the pins ... complete with end protectors are from the  Sparkles Group  

You can also get the pins with a charm loop on the end now and that is extra special.

To get a discount on your purchases add the code CGDIS5 at the checkout.

This is the effect close up and you can see that all the elements to the  Cut, Fold, Tuck dies have been layered up.

The one used here is the  Floral Burst

I have used foam pads in between each layer to give height and added a gemstone to the centre part.

The background has been embsosed and the lacy border is from the Persian Accents.

I have pierced around the edge of the card and used mounting tape in between these layers too.
And this is how I have created a stand for  the back of the card to enable it to stand freely ... and eliminate the need for an insert.
You can do this with many of the dies that you may have ... Labels or in this case I have just used the Scalloped Rectangles in two different sizes.
 
It is very easy to do and makes all your cards free standing without any fuss.... but having said that I like the look of the card stand that   Marie-Louise  is using for the cards on her blog.  Pop over and take a look ... it's gorgeous.
 
I found several designs for the stands on Ebay ... and so I just had to order one .... well you do don't you ????
 
Hugs xx


August 30, 2012

Cut, Fold, Tuck ...

A little while ago I was asked by a visitor to my YouTube channel if I had any of the Cut, Fold, Tuck dies from Spellbinders.

I had to say that sadly "No I haven't" and then she asked  if  I  would  accept one  as a Thank You from her for the videos that I have done.

Her name is Nery and I gratefully accepted her very kind offer.  I gave her my snail mail address and Nery said she would pop one in the post for me.

Well this morning I got my  parcel with  not  one  but .... all  FIVE  of the  dies in the package.  I am overwhelmed by Nerys' generosity and  thanked her  profusely for  the gift.

I will be using these on some cards very soon..... even in a video.

I cut some  Pink  Silver Polka  Dot card out straight away and  did all the  folding and tucking to see the effect I got.

And they  are really lovely.  The card will be made soon but at the  moment I am just playing and  enjoying the dies.
 
I am going to  cut some  from double  sided paper and then once  they are cut  they can be layered up for a  really pretty look to the card.
 

I think this would look extra special in a White on White card with some beautiful white organza ribbon .... oh Yes!! I can see it in my minds eye right now.
Off to play .... see you tomorrow!
 
Hugs xx


August 29, 2012

Christmas Decoration

This is the  Christmas Decoration  I was working on while it  poured down yesterday.

The shape I used was the  Spellbinder  Octagons and Scalloped Octagons  and they  are  from  Save On Hobbies

There are many shapes that can be used for this project and I  will try some with the Diamonds too.

I have added some of the Want2Scrap "Bling" and some  lovely  feathers that I  had in my "Stash"

The video page is on the website and if you are not fed up with  Christmas stuff yet ... then maybe you would like to view it.

Spellbinders Christmas Decoration   is only a short one so I won't keep you for long.

I have made them in different colours and used some Poinsettia flowers that I took apart and added German Glass Glitter to before putting them back together.

Hugs xx

August 28, 2012

Traditional Colours ...

I thought I would try a  Christmas card in the traditional  colours for this one ... but I still couldn't resist the urge to  add the "Bling"

The backing paper was a freebie with my monthly magazine subscription and the Poinsettia  was a cheap buy that I took apart and added  German  Glass  Glitter before re-assembling.

I added a silver  spacer behind the red pearly Brad  for the centre, and behind that I used just the outside part of the  Anenome Flower

The border is from the   Lattice Accents  and the swirl is  from the  Belle Rose both from Spellbinders.

I have also added in some wire strands with red beads on them behind the flower.

The  Floral Ovals  have been stamped with the verse and added with foam pads to another oval which has been rotated, and Seam Binding  has been used to make the triple layered bow.

In all the rain that we have had for this Bank Holiday Monday I have made a vidoe instead on a very pretty Christmas Decoration and I will add that tomorrow.... and hope that you will like it.

Hugs xx 


August 27, 2012

Heirloom Ornament


 I love this card and it is another using the self adhesive pearls to stud the shape.

These are the 72 count  LeCreme from Want2Scrap  and the Finesse Swirls are on either side if the Heirloom Ornament  from Spellbinders.

I have used the largest die to cut an aperutre in the card and then it has  been embossed.

I have  matted it onto some striped paper ... and then layered that onto some neutral card.

The sentiment  stamp is one I have had for a long time and it is from the Glitter Girls

I have added a small organza bow to the top of the ornament and added an "A" frame to the back to make it stand.

Gosh!! ...  am I working on these Christmas Cards ....

Hugs xx


August 26, 2012

Oh! Christmas Tree...

This  card was  created using  the 2010 Holiday Tree that I got from Save On Hobbies  and it makes a very pretty card for that special time of year.

It uses the  Baby  Blue and  Dark Blue Pearls  from  Want2Scrap  to stud the  tree.

I have used the different sizes around the middle shape and added it to the the largest shape with Pinflair Glue Gel to give it height.

The largest and smallest shapes in the dies have been sparkled with Glamour Dust.... and the background has been run through a Snowflake embossing folder.

To the Floral Ovals I have add a  Cloud Effect  as a backdrop to the trees. The ribbon ia Navy Blue and the two stars are wooden ones that have been dabbed in glue and then sparkled with the Glamour Dust. 

This is going in my pile of cards ready to send at Christmas.

Hugs xx

August 25, 2012

Cream Christmas Card

Today I have made no less than eight Christmas cards and most of them are for our  family and friends.

I am really into cream  for this years theme and I think it looks very elegant.

I have added texture to the background with an embosiing folder and then inked the edges with Antique Linen.

I have used a lot of    Pearly "Bling" on these cards and it is from  Want2Scrap 

I have added it to the Labels 20 and the Fancy Tags 3 shapes and added a swirl at the bottom leading from the Poinsettia.

I took this flower apart and added some Glamour Dust to it then re-assembled it.  The swirly leaf shapes behind it are from  Damask Accents.

are you ready for the Bank Holiday and not letting all this really sunny weather get you down ..... Joke !!!! It has forecast rain as usual and it will be another wet and soggy Bank Holiday in the UK.

But it won't spoil my trip to the craft show on Sunday and I will be buying some new crafting goodies.

Hugs xx

August 24, 2012

Scalloped Card ....

I used the Scalloped Squares to make this card and the image is  from  CD from PolkaDoodles

I coloured  her  in with  Spectrum Noir  pens  and then  framed  her  and added  Diamante  from Want2Scrap   around the edge.

This ribbon  is  more of the  free stuff that came  wrapped  around a  pair of pyjamas that  I bought.

Being a  frugal crafter  I just can't  throw things like  this away.

And with the adddition of the sparkly button centre it looks very good.  I always love a "freebie" wherever it comes from.

Here  is a selection  of dies that  are in at  the moment at  Save on Hobbies   and there are new ones coming in soon.

Well worth a look for some really good bargains and the prices are amazing.

Over the next few weeks I will be adding some of these to my cards.

I will of course tell you which particular Spellbinders are the ones that I have used.

I am really looking forward to playing with these in the coming weeks and I have lots of ideas buzzing around this head.

But at the moment my "Film Crew" is taking me out for an Early Bird meal and he is getting  impatient to go .... so Bye For now ... back tomorrow.

Hugs xx

August 23, 2012

Spellbinder Flowers

I love to add  flowers to  my  cards  and  this  one is no  exception.

The only difference to  this one  is that these  are cut   Spiral Blossom 3  from Spellbinders, and they are Felt Flowers

Sometimes the felt doesn't always cut on the first pass through your die cutting machine ... but not to worry just alter the position on the plates a little and run it through again.

The flowers it produces is well worth the effort with the cutting.

This  felt was  not  expensive  and I  got mine from  Dunelm Mill.  They have some very pretty colours and this is three shades of the pink that they had.

To the centre of each flower I have  glued a flat backed pearl and the swirly leaves are  cut from the Damask Accents.

The backing paper is from the Floriography CD from My Craft Studio and it has a filigree pattern down one side.  I have accentuated this with a  Sakura  Quickie  Glue  pen and some very fine glitter.

There is real lace along the left edge and I got it from a craft show .... and this Sunday I will be going to the same show in Leigh and I am so looking forward to it.

To see  if there is  craft show in  your area click the link to Sincerely Yours Shows   as they run shows all over the  UK and  they will not  disappoint  you.

Anyway back to the card ....  This has faux gems along the right edge and once again I have added in the Hatpin for effect.

Hugs xx


August 22, 2012

Spellbinders Perisan Accents

I love this colour .. it is so fresh and I think it makes a very pretty card.  It never fails to please me and the backing paper for this card is from the Floriogrpahy CD from My Craft Studio.

The lacy effect for  this card is  the  Persian Accents  from  Spellbinders... and   I have added four of them ... all off set along the front panel.
Then  along  the outer edge  I have used  Cosmic  Shimmer  Glue  to create the  Faux Pearls.

Around  the sentiment  panel I have  wrapped some  Organza  ribbon  and on  to the  bow  I have added a  Vintage  button.

Through this I  have add  sparkly  Decorative  Hatpin  that  can  later  be worn as a  Lapel  pin  by  my  recipient.

The flowers   are all from  the  Bitty Blossoms  with the  Foliage  leaves  tucked in  behind... and both die sets are  from  Spellbinders.

It is a  larger card and I  have made the  "A"  frame to allow the  card to stand  by itself

Hugs xx

August 21, 2012

Spellbinders Moroccan Accents


This is quite a large card  (8" Square)  and  the white panel on the right of the card  has been embossed to give detail.

The  backing paper, on the left   has been filled with  the Micro Glass Beads  which,  after I had  added the front panel  and the border,   was a waste  of  time  ...  coz you can't  see  'em.
The border effect is created with the  Moroccan Accents  and I have added it around all four sides.

The background for the sentiment panel is  Romantic Rectangles  that  I have made that  into a square,  and a lovely swirl of Diamante from  Want2Scrap   runs  alongside  the  verse

The flowers are all created from the smallest part to the  Anenome Flower  and a little piece of the Card Candi  from  Craftwork Cards  has been added   to the centre of  each one.

The backing paper and verse are from the Floriograpghy CD from My Craft Studio and it has some of the most gorgeous papers I have used.

I have added in a  Decorative Hatpin which makes a very pretty removable gift.

The Hatpins,  (which come complete with end protectors)  and the beads are all from the Sparkles Group  where you can get a discount by adding in the code   CGDIS5   at the checkout.

Hugs xx


August 20, 2012

21 in Pink

This  card  is  one  that  I was  asked  to make a while ago for one  of those  Special  Birthdays  that we like to celebrate.  The request was for it to be in  Pink  and  White with  flowers.

The card  is just an  A4 folded  in half  with  a smaller  pink  panel cut to  leave a  thin border  around the  edge.   The next white layer has been embossed to give a lovely detailed pattern on the card and that again is  slightly  smaller than the  pink layer.

The blooms at the bottom  of the card are  made from a mixture of  four of the borders  cut in pink card, from the  Moroccan Accents and  a  Spiral Blossom 1  cut in white ... and each has a Pearl Brad added to the centres.
I made the  four borders  into two Rosette flowers and used some leaves from the Foliage set of dies.

All the leaves  have been inked very lightly with Victorian Velvet... and the  21 was  hand drawn and cut  then sprinkled with   pink glitter.

But  the card  that was left after  cutting the  borders to make the  flowers was far too  pretty to throw away.

So I added  it in layers  to the  left of the  card  and topped it  along the spine  edge  with some  polka dot  ribbon from my  "Stash"  and added a  small pearl to each of the points.

The  butterfly is a  Martha Stewart  punch and the trail ... and  is from   Want2Scrap 

The small pearls in the top right corner add the finishing touch ... and the card was very much appreciated when handed over.

Hugs xx


August 18, 2012

Just one more ...

I have one more  Christmas card to show you and  then I  am not  making any more for a few weeks.

This one has the  aperture removed with the  largest of the Heirloom Baubles  and the centre filled with some more of the pretty  stripy paper.

I have then cut another  Heirloom  bauble and covered it with Micro Glass Beads  which adds  lots of texture to the shape ... you can just make them out  if you enlarge the picture.

I buy mine in pots  from  Creative Studios  and there are lots of other goodies too.

The beautiful Diamante strip on the front of the Bauble is from Want2Scrap   along  with the Swirl on each side of the aperture....  on the right hand corner.

I have matted it all onto some silver mirror card

The little sentiments are from a set I bought many years ago from   The Glitter Girls  and they are all wood mounted.

So I am having a free weekend this week.  

Today  we are going to visit some friends on their Canal boat and going for a sail through some locks on the canal near "Botany Bay"

We will be having a spot of lunch on the way and I just hope it is not raining....

Then next Sunday the 26th ... I am going to the Sincerely Yours Craft Show  in Leigh.

I've got my pennies all saved up and a list of what I want ... and I can't wait

Hugs xx

August 17, 2012

Pink Christmas

Who says that Christmas cards have to red and green???

 I have gone for some of the pastel colours for this years card and this one is using Spellbinders for the decoration.

I have used the  Floral Ovals  in white and  inked the edges with the  lovely pink Victorian Velvet  around the  verse and  added pink ribbon down the centre  of the card.

The  background is  embossed and  layered  onto some  of the pink card that has been used to create the Snowflakes  which are from Spellbinders.

I have used  several  layers to them  and  added a little gemstone star to the centre of each one

I added the Want2Scrap Swirl to fill the lower corner.  All it needs is an insert and there's another one in the pot ...

Hugs xx

August 16, 2012

More cards for Christmas ...

I seem to be in the swing of making Christmas cards at the moment and over the last few days I have made several.

This one started off as something else but ended up as a Christmas card .... don't ask me why coz I haven't a clue.

But I had the verse in my folder and I thought it was very nice  ... so here it is.

It has the  obligatory  Want2Scrap    embellishments   on it and two different types of ribbon.

But I think it looks very pretty and will be going to somebody when the time comes.

This white one doesn't look as good in the photo but the embossed tree really stands out in the flesh.

And the Diamante is also from Want2Scrap.

I have matted the white card onto some silver mirror card and the base panel is embossed too.

So now I have eight cards made .... just need to do the insides now with a neat verse and then decide who gets what ...

And the dress form card that I made for my friends birthday yesterday ..... she loved it.

Hugs xx