Beautiful Card Designs Made Easy

September 25, 2015

Friday Freebie - 086

Hi Everybody,

I thought that today we would go with a yellow card as this is a colour I don't use all that much.

This is created with the Spellbinders  Interlocking Love from the Laced with Love collection

I have cut the solid panel twice and then added the patterned panel to the top

I inked through the die before removing the card and added satin ribbon around the panels before adding them to the base.

A single yellow rose adorns the bottom of the card and it is from Wild Orchid Crafts

If you would like to win this card then join the group of followers please and leave me a comment.

From those comments a name will be chosen and PLEASE add your full name ... and not just your first name as it gets very confusing when I have several people all with the same name.

You will have 48 hours to claim the card and the winner will be announced in tomorrows blog post

More tomorrow ...

Hugs xx

September 24, 2015

What's Cooking ?

Hi Everybody,

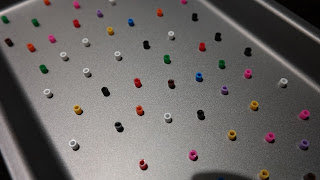
The other day I had a trip to Ikea  and while I was there I spotted these big tubs in the childrens department and they are filled with lots of bright plastic beads

It cot me £5 and there are literally hundreds of these beads in this tub.

So what am I going to do with them?
 I'm going to bake them !!

Pre heat your oven to 200 degrees (It needs to be hot) and while you wait you can space out the beads onto a non stick baking tray.


 They need to be separate with enough space between them because they are going to melt and you don't want them to run together.

Put them in the oven for ten minutes and then take a look at them. As they melt they sink into a doughnut shape.
 If yours are like that then they need to be left for a little longer until all the centre has run together and formed a dome.

Once they are ready take them out of your oven and allow them to cool down for a few minutes
I eased mine from the non stick baking tray with a wooden spatula
And there you have a whole bunch of flat backed dots ready to add to your cards.

There are ten different colours of beads in the tub and I think it is a bargain

If you like to add enamel dots to your cards then these are so cheap you can add loads of them

And when you eventually use up all the beads ... in the year dot ... keep the container for storage

Happy cooking !!

More tomorrow ...

Hugs xx


September 23, 2015

More Backgrounds

Hi Everybody,

While I  was playing the other weekend I made several backgrounds with either Brusho Crystals or Distress Inks

I showed you at the end of last week the ones with the Brushos and so here are the ones made with the Distress Inks

The colour combination for this one is Picked Raspberry, Mustard Seed and Peacock Feathers

The flowers on all the cards are from Wild Orchid Crafts and the little velvet butterflies are from my "Stash"

The sentiment is the same on all the cards too and has been stamped in black and clear embossed
 This one is Walnut Stain,  Vintage Photo and Spiced Marmalade

Each card has a Hat Pin in the floral display and to get the size I have simply folded an A4 piece of card in half and then cut it in half

You will get two cards which ever way you fold it and the folds will be at the top so that they will stand perfectly for you

On this card I use Picked Raspberry and Peacock Feathers but I added in some gold to make the difference

Three pretty cards and added to the three "Thank You" cards from the other day, together with the envelopes to fit,  would make a really nice gift for someone to use throughout the year ... and Christmas is on the way !!    Need I say more ??

More tomorrow ...

Hugs xx

September 22, 2015

Tuesday Tutorial - Spellbinders Alphabet

Hi Everybody,

Alphabets can be used in lots of different ways apart from the obvious. We just need to think outside the box and see what else we can come up with to make sure we really get our monies worth from this ever useful die set
Spellbinders Supplies:

Other Supplies:
With die #7 from Matting Basics A cut two in white and create a hinged card 
 (Die #1 is always the smallest)
From a bright coloured background and #7 from Matting Basics B cut one panel 
(I used Brusho Crystals - Ultra Marine for my background)
Cut another white panel from #6 Matting Basics A and this is the one we will work on
Space out the Alphabet letters of your choice, face down in a random fashion, onto the correct side of your card and cut and emboss them though your machine
Then remove them from the card but keep the letters for another projects
Also keep the tiny pieces that are part of any of the letters that you have used  like the "O" or the triangle from the "A"
Once you have the dies removed then emboss the panel in any folder that you have available. I used the Bricks and Bark 
Place foam pads around the open spaces to support the card and also add pieces of foam to the back of the pieces that you saved from the previous step.  
Remove the backing from the pads and place it onto the bright background you have leaving a small border around the edge
Replace any of the pieces that you saved from the letters that you cut
Stamp in black and clear heat emboss the sentiment and add some strips of the background card around it then add foam pads to the back of it

I chose to use white enamel dots and I coloured them with a marker pen to match my card. 
They dried mottled which fitted in perfectly with my background. 
Add them randomly to the card

Designers Tip:

Another way to use the panel with the cut out letters is as a stencil and simply ink through the card to create another type of background for your cards

More tomorrow ...

Hugs xx


September 21, 2015

Box for a Box ...

Hi Everybody,

If you have seen the new videos I have added recently then I am sure you have been wondering how you are going to give this to your recipient

No matter how hard you squeeze you will never get this into an envelope

So I have been busy with a ruler and pencil working out the measurements for a box to put your box into and this is the result ...  Create a Gift Box

In the video I give you the option to leave the box plain and all I have done to it is added some of the extra flowers that I had left over from  making the  Spellbinders Pop Up Box  

I think that this would make a really pretty gift for anyone and it would need to be hand given as it won't fair very well in the post.

But it must be for some one special or you wouldn't be going to these lengths to make it.

This plain variation can be used with either of the pop up boxes that I made
But being me I wanted more so on this one I  have added in  some pattern to the panels and lid

I have dressed  it up with some of the same flowers used in the making of the  Pop Up Box  and this is the version created without using any dies to make it

The flowers on this one are from Wild Orchid Crafts and I have trailed them from the lid down the side of the box.

I have used  dies in the decoration for the outer box and  I have used   Interlocking Love  for the side panels and Majesty for the lid  and then I have lined them with Acetate

Both variations are so pretty once completed and both are easy to do.

The die will save you the bother of measuring as it cuts it out perfectly each and every time but if you can't get the die for whatever reason then you can still get the look yourself without one.

So there you have several links to products I have used and there are three tutorials here also. Click the links to go to the pages and I will also add them to the Video Tutorials tab at the top of the blog

More tomorrow ...

Hugs xx