Beautiful Card Designs Made Easy

June 11, 2016

Todays Winner ...

Hi Everybody,

It's been pouring down here this morning when I went to my Slimming club and happy to say that I have lost 2 lbs this week ...That's the 2 lbs I put on last week !!!! Oh well ... swings and roundabouts

So we have now done the draw for yesterdays Friday Freebie and the name chosen at random is yur s

Elizabeth Harborne 

Please email me with your postal address to 
christina@card-making-magic.com
and the card will be on it's way to you 

I hope you will like it when it arrives and please let me know when you have it.

I have some more good things coming up for the next week staring the week off with another International Ambassadors Blog Hop.
The Tuesday Tutorial will give you another idea for using some Spellbinders dies and next Fridays freebie is a really bright and flowery water coloured card.
On Thursday I have a new video for you with the Bokeh Effect using water colours and inks

Please join me for the coming week 

More tomorrow ...

Hugs xx

June 10, 2016

Friday Freebie 122

Hi everybody,

Todays card is in a  pretty shade of blue and was offered earlier this year and went unclaimed so here it is again for somebody to love it.

It has many layers and was featured in a video for Majestic Labels Eight

It is a really pretty card and I am sure that you would be delighted with it .

So if you would like to have this card then all you need to do is leave me a comment at the bottom of the page.

Then my "Film Crew" (aka Griff)  will choose a name at random  from the comments and the winner will be in tomorrows blog post.  Please come back to check if it is you as I have no way to chase you up about the card.

More tomorrow ...

Hugs xx

June 09, 2016

Brusho Flowers ...

Hi Everybody,

The video on YouTube today is once again using the Brusho Crystal Colours.

This one is simply called Brusho Flower and for this I have used a stamp and die set from Heartfelt Creations

This particular set has been around for quite some time but it is available on Amazon and the link is below the blog post

I have layered all the different sized petals together to create a really full flower and then added a little glitter ball from WOC to the centre.

It blends well with the diamante flourish from Want2Scrap  and the card is quite pretty. The addition of some Guipure lace  from Wild Orchid Crafts adds that extra touch and I used very little of it ... so a metre goes a long way

More tomorrow ...

Hugs xx

June 08, 2016

Water Colour Wednesday - Good Times

Hi Everybody,

A really simple card today using  Spectrum Noir AquaTints - Pretty Pastels

I have just done a soft wash of the pale blue in the background for the sky

I coloured the bike and butterflies with pink and that basically is all I did with Aqua Tints

I use some well watered down black for the ground and added in my sequins.

The stamp is from Clearly Besotted and is called Good Times 2 

Then I stamped and embossed the sentiment to complete the card.  I used craft foam behind the panel to add it to my card base which is an A2 top folded one.

More tomorrow ...

Hugs xx


June 07, 2016

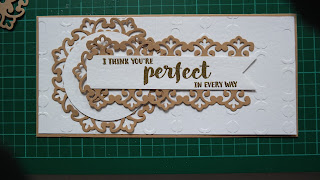
Tuesday Tutorial - Another idea with Parisian Dies

Hi Everybody,

This is the second visit to Parisian Accents and Motifs as this is such a pretty dies set and can be used in lots of ways.  
The first one was added on the 26th April with   Parisian Accents and Motifs 
  If you don't have this particular set then you can try this idea with any of the ones you do have and get a really good result.
Spellbinders Supplies:
Other Supplies:
Instructions:
With an A4 piece of Kraft card score and fold it in half and with the fold at the top trim the card down to  4 1/4 x 8 1/2" to create a long base
Cut a white mat that is slightly smaller than the base card and emboss this panel then add it flat to the base card
Cut the large shape from the Motifs
Cut two of the border strips and the largest die from the Accents all in Kraft Card
Stamp and heat emboss the sentiment of your choice onto some white card and trim to a banner shape on one end.

Arrange the border strips around the banner and glue in place.
Cut the shape from the Accents set into two pieces and arrange one of them at the end of the banner shape as shown in the photo
Add foam tape to the back of this assembled piece
With foam pads add the largest shape to the left of the card front and cut a size of circle that will sit in the middle in white
Add your banner piece to the top adding more foam pads to the right side to balance the banner out.
Dot with pearls to match your design and a pearl flourish  for an added touch

Don't forget to visit the  Tuesday Tutorials Page  barbecue ALL the videos are listed there for you to click any time you want

More tomorrow ...

Hugs xx