Beautiful Card Designs Made Easy

November 09, 2013

Baby Card Tutorial ...

Hi Everybody,

This cute card is ideal and is so easy to make and in the video we will create our own template to be saved and used over and over again.

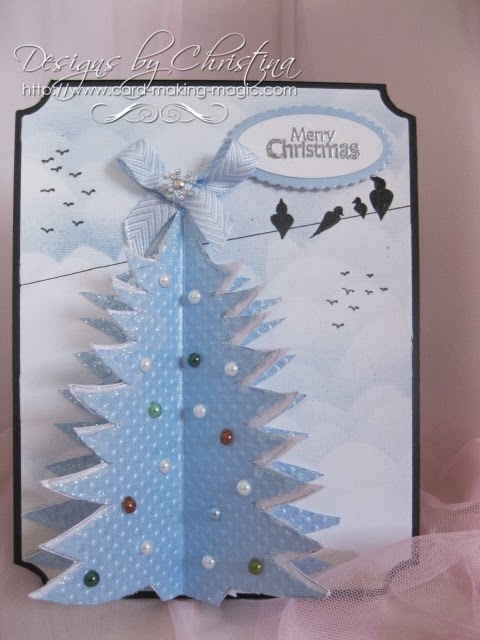
It is all hand cut and there is not a die cut in sight ... so anybody can make it easily.

If you have lots of invites to baby showers to make then this would be ideal ... or as a card to welcome a new baby into the world.

Every part of this card to the left is hand cut and the video takes you step by step through it all so you can get the look you want.

I hope you enjoy it and the finished card will fit into standard size envelope so no extra postage costs either.

More tomorrow ...

Hugs xx


November 08, 2013

Parchment Front ...

 Hi Everybody,

Elements from three sets of dies have been used to produce this pretty card.

But the focal point to it has been cut from Parchment.

I have used Parchment Paper from AnnaMarie Designs  and it is a really good quality.

I added it to the A4 embossing folder Ornate Butterflies from Crafters Companion  

Once the base card was created with layers of white and lilac I cut the parchment in half, and cut the shaped panel for the front.
I used the other half and cut out just two of the butterflies and then decoupaged them onto the main panel

The verse is stamped and heat embossed in silver and add to Labels Thirty Three.

The butterfly has a pearly body and trail cut from "Bling" from Want2Scrap


A really pretty and easy to produce card

More tomorrow ...

Hugs xx


November 07, 2013

How about a Birthday card ...

Hi Everybody,

I thought I would move away from Christmas for a little while and add this pretty birthday card.

It is a 7" square and has lots of layers using the Grand Squares ... and I have added it to my Etsy Shop

The filigree panel is from Adorning Squares and the flower corsage ha been added to one of the ovals shapes and then added to the panel.

The ribbon is a beautiful satin and tied in a large bow with a pearl and silver centre to cover the knot.

The inside has been embossed with the new Ornate Butterflies Folder from Crafters Companion

It is an A4 folder and I really like these bigger folders.

The pearls have been added around the edge of the card and the inside and  they are from Want2Scrap 


The pretty organza butterflies I already had in my "Stash"  and the "Happy Birthday" sentiment, which has been heat embossed in silver,  is one that most of us have

The flowers are from Wild Orchid Crafts and they have been sparkled up with Glamour Dust.  I added a white feather to the display as well as a lovely pink pearl hatpin.

More tomorrow...

Hugs xx

November 06, 2013

Baby Cards ...

Hi Everybody,

I thought I would go back to making some baby cards this time.

I have Grand daughters in their twenties whose friends are now of that age where they think about starting a family.

So now I have cards ready for them to give when the time comes.


This image is Mulberry Wood from  Crafters Companion

I have made the puppy look different  each time by changing the colors.

The addition of the ribbon also alters the look of the card and of course it wouldn't be me if I didn't add in some "Bling"


Here I have taken just one of the pearl flourishes
from Want2Scrap and cut it up between the three cards.


A little goes a long way 

More tomorrow ...

Hugs xx

November 05, 2013

Look at those ears ...

Hi Everybody,

Todays card was one I made as a Design Team member for Spectrum Noir and of course the subject was coloring the soon to be released stamps of Bebunni.

Those stamps are now on sale  from Crafters Companion and they are delightful.

But because of this card I was asked to show how I got the ears outside of the frame as many people may not know how to get the look.


 And so a video was created to show the technique and it is now available to view on the Spectrum Noir Blog

It is very easy technique and yet can bring to life all the little characters that you may have in stamp or digital format.

If you are new to card making then please give it a try ... you will be delighted with your results.


And if you are a seasoned card maker and know all about how to do it .... then sorry I don't mean to teach you how to suck eggs... if you know what I mean.

More tomorrow ...

Hugs xx

November 04, 2013

Coloring Holly ...

Hi Everybody,

Todays card is another for Christmas  ( talk about stating the obvious ....) but the focal point is the subject of a video tutorial.

I was asked  if I would  show how to color in Holly especially with Christmas being well on it's way.

The Spectrum Noir colors used are ...
 DG2, DR4, DR6, IG7+Blender,  DG2, DG4, TN3, EB3, EB5

For this card I have colored and cut out the second image and decoupaged it onto the card.

The stripes in the ribbon are created with the blender pen.

The image is from the CD "The Next Big Thing" from Just Inklined ... but sadly it is no longer available ...unless you can find a  copy on Ebay.

So here it is and it will show you how to get the look that I have created here.


I hope you enjoy the tutorial and there are more on the way .... just as soon as my "Film Crew" has watched the Formula 1 ....

More tomorrow ...

Hugs xx

November 03, 2013

Blue Foiled Card

Hi Everybody,

Today I am sharing two cards that I made using the beautiful foiled card from Hunkydory

It is foiled with silver and it is much nicer in real life than the picture shows.

The blue ribbon is from my "Stash" as are the two snowflake brads that are in the centre of each knot.

Apart from the Diamante around the sentiment there is no other embellishments as the card does it all for you.

Both cards are created in the  Hinged Card   style and both are lined and decorated inside.

The sentiments are from JustRite Stampers and are from the Holiday Sentiments set... and heat embossed in silver

The Diamante  to match the Labels One is from Want2Scrap

More tomorrow ...

Hugs xx


November 02, 2013

Let it Snow ...

Hi Everybody,

I don't know about you but I am well into the swing of Christmas Cards.

This is very early for me as I am usually on the last minute rush bus ....

However now that I have made a start I can't seem to stop and I will be adding some  Christmas Cards to my Etsy shop in plenty of time for buyers to send them on.

This one is all on the white theme and there are quite a few layers to this one.

The satin ribbon is from Mei Flower  with a large pearl cluster in the centre.

But the beautiful embossing is from one of the new folders at Crafters Companion 

This one is Picnic Plaid and it is gorgeous and you can see it more on the inside picture of the card .

It has to be one of my all time favorites.


The simple sentiment is from JustRite Stampers and is one of the many ...

Fancy Holiday Sentiments
and I bought mine from the craft show.


More tomorrow ...

Hugs xx


November 01, 2013

Silver and White ...

Etsy 
Hi Everybody,

I had to show you this card  which is staying with the Christmas Theme for a little while.

This is using the most gorgeous foiled card from Hunkydory and was another craft show buy.

If you live in the North West of England then they have a shop that sells all manner of wonderful items in Preston and is well worth a visit.

The card itself is silver foiled and full of Christmas Baubles.

I have added it to some silver mirror card and cut out the frame from the mirror card too

The white Roses are from Wild Orchid Crafts and they have the addition of Glamour Dust to make them sparkle.

The sentiment is from the Sentimentals stamp range from Crafters Companion

The beautiful white satin ribbon  from  Mei Flower  has been tied in a double bow with a large pearl and Diamante centre.

More tomorrow ...


Hugs xx


October 31, 2013

Matting Basics A & B

Hi Everybody,

I like to add layers to my cards but sometimes my straight lines are not straight.

So for me the answer was to invest in the Matting Basics that would help me to get a beautiful finish to my designs.

Now you may wonder why you would need two sets of dies that look exactly the same ... yes ?

I know they look the same but there is a difference in the two sets and the video will explain to you the difference and why you may want to get both.

The ones I have shown are the 5 x 7 set  ...but Spellbinders also do an A2 set and a Curved Matting Basics

I find this set so useful especially when I want to create the Hinged Card style ... and the link will take you through to the website tutorial until I add it here to the blog pages.


It is not a long video but I hope it will in some way help you to make that decision of which to buy and even if you need them at all.  

I know I do as I like to have a really neat and professional look to all my cards.

More tomorrow ...

Hugs xx


October 30, 2013

Gold Elements ...

Hi Everybody,

I have used the coffee coloured Centura Pearl  from Crafters Companion on this card and mixed it with white.

There's not a lot of extras on this card ... just the single rose from Wild Orchid Crafts   and the pearls "Bling" from Want2Scrap 

The white satin ribbon is from Mei Flower and it makes lovely bows.

There are lots of layers and each layer has been raised with foam pads.
The embossing folder is an M-Bossabilities from Spellbinders and this is the Whimsical Floral.

These folders are usable on both sides and the other side will be different and so you get twice as much for your money.

The inside is lined with ribbon around the layers and the pearls added to enhance the ribbon.

More tomorrow ...

Hugs xx


October 29, 2013

A fun card for Christmas ...

Hi Everybody,

Todays card is also the subject of a video tutorial and is just a fun way to make some Christmas cards.

It is also one that older children may enjoy making for their own friends and it will keep them quiet for a little while.

I had a lovely email off a lady in America who told me that she had made cards similar to this when she was first married ... over 50 years ago .... as they couldn't afford to buy Christmas cards
She said she bought some  card and some glitter and made them to give to family and friends ... and she thanked me so much for giving her the memory of that time in her life.

I was very humbled and wrote back to thank her for the lovely email.

It  makes what I do so much more worthwhile to get an email like that from a complete stranger.

The one that was most peoples favorite was the blue one.

I created the cloudy sky with Distress inks and the birds on the wire  was a little  fun idea that  I learned from Barbara Gray of Clarity Stamp


Update  on the Voile ... Lots of you have responded with information on where to get the voile so here are some of them...

  • Pauline gets hers from a shop called Charlies in Shrewsbury  
  • Margaret has suggested Dumhelm Mill or the market stalls.
  • Ann has named Fleetwood Market for Voile and Lace trim
I promise I will get the website address of the Voile people at the next craft show I visit but if you go to any organised by Sincerely Yours then look out for them there 

 More tomorrow ...

 Hugs xx

October 28, 2013

Causing A Stir ....

Hi Everybody,

Yesterday I added a video to YouTube and it has caused a bit of a stir.

It is showing how I added the pretty Voile to my cards and this is the card featured in the tutorial.

Since then I have had several emails from people asking me where I got the Voile from.

Now you know I got it from a craft show that I went to a few weeks ago.

But the thing is I don't know the name of the manufacturer ... all I know is it was cheap and a bargain.

I am so sorry and I will try to do better next time .... I am now stood in the corner with the Dunces Hat firmly fixed on my head ... and looking very sheepish !!

But what I will do is with the next "Give Away" I will add some to the list of prizes so that whoever wins it will be able to try it for themselves.  Is that a good trade off ??


It is a very pretty and delicate addition to your cards and if you have some then this is the way that I use it on my designs.

 More tomorrow ...

 Hugs xx

October 27, 2013

Centura Pearl

Hi Everybody,

This pretty card has been made with one of the 3-D embossing folders from Spellbinders and I have used Centura Pearl  Snow White  from Crafters Companion

This folder is the Fancy Framed Labels Eighteen and I have used Labels Eighteen to go with it.

I have also added in the matching Labels Eighteen "Bling" from Want2Scrap  for a coordinated look.

The ribbon is and Ivory Satin from my  "stash" and I have tied it in a single bow and added the flower centre to cover the knot.
The flowers are a mixture of Roses, Cherry Blossoms, Sweetheart Blossoms and Iris.

They have been sparkled with Glamour Dust.

I have also added in some small teardrop pearls around the corsage.

Then I decided to add some pearls along the ribbon to tie everything together.


The card is very pretty but the photo does not give the full effect of the pearly card.


More tomorrow ...

Hugs xx