Beautiful Card Designs Made Easy

November 30, 2015

Using the "Misti" Stamping Tool (Video Tutorial)

Hi Everybody,

Today I am adding a new video tutorial and it is done with the  MISTI 

That stands for the Most Incredible Stamping Tool Invented and if you like to stamp and need some help with it then this is the tool for you.

It does not come cheap but it will aid you to improve your stamping in all different kinds of ways and over the next few weeks I will endeavour to show you some of the things that I have done with mine
For this tutorial I have started off with an Ombre Effect background using Momento Dye Ink in Angel Pink, Lulu Lavender and Summer Sky

The colours are very pale but give a lovely washed out look to my background.

I searched through my stamps to fine any small butterfly stamps that I had and they are from various sources.


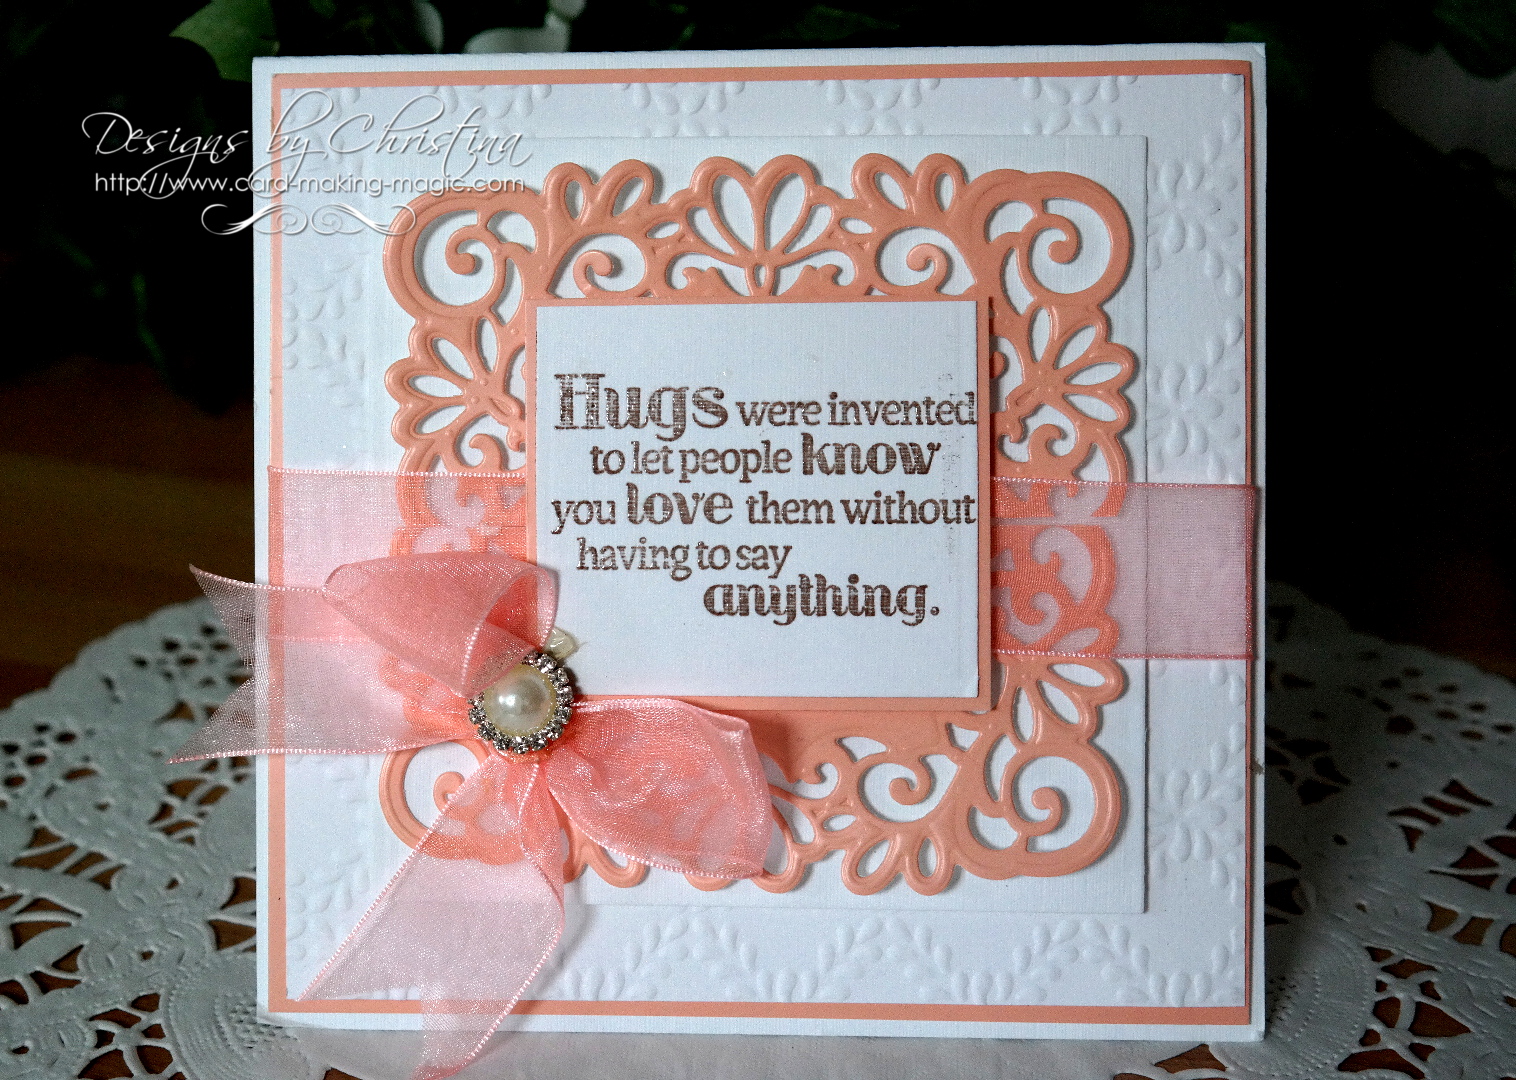
But the sentiments are from Sheena Douglass range of stamps from  Crafters Companion

The Diamanté Flourish is called Finesse from Want2Scrap and I have cut it to give me the pieces that I needed on my card

This and other videos can be found permanently in the Video Tutorials  in the title bar and there are lots for you to view plus don't forget the Tuesday Tutorial as a new one is added each week

More tomorrow ...

Hugs xx

November 29, 2015

Glitter Christmas Card (Video Tutorial)

Hi Everybody,

Over the last few days we have been very busy adding in some new videos that I hope you will enjoy.

The first one is creating your own Glitter Card to be used on any of your designs for a lovely sparkly effect.

On this card I have used some gold glitter and stayed with the traditional colours that people like for the season.

The background has been embossed with the 8x8 folder  Star of Wonder   from Crafters Companion

The stamp is also from Crafters Companion and my glitter is from Glitter Magic  where you will find some really pretty colours


The red satin ribbon is from Mei Flower  and I have tied it into a double bow.

The flower centre is from Wild Orchid Crafts and I think this is another card that can go into the box of cards ready to send out this year.

Please check out the vidoes in the the Video Tutorials section in the titles bar as there are now many in there and the list is growing weekly

More tomorrow ...

Hugs xx

November 28, 2015

FF Card Winner ...

Hi Everybody,

Gosh it's wet and windy here today and just the weather to be in the warmth at home.  Griff is glued to the telly as it is Formula One weekend and so I have some free time to do as I please.

The draw for the Teal card was done a little while ago and the winner of this pretty card this week is you ...

Gwendolyn Giles

would you email me  your postal address please to 
christina@card-making-magic.com
and the card will be on its way to you.

Please let me know when it arrives with you and I hope you will like it.

More tomorrow ...

Hugs xx

November 27, 2015

Friday Freebie 095

Hi Everybody,

There will be some new videos added to the blog and website next week with some pretty cards and so I hope you will pop back to view.

The card on offer today is in Teal and has beautiful foiled card in the background.

The label shape is surrounded by Diamanté and the flowers sit alongside it in blending shades.

The inside of this card is lined and it is ready to send to who ever you wish.

If you would like to own this one then all you have to do is leave me a comment at the bottom of the page.

In the morning a name will be drawn from the hat and the winner announced in the days blog post.

More tomorrow ...

Hugs xx


November 26, 2015

More with Alphabets ...

Hi Everybody,

Todays card is using the Alphabet dies that I have and this one is Donnas Alpha  from Spellbinders.

This can be done with any that you may have in your own crafting "Stash"

All you need to do is create your base card and one other layer from white card.

Mask off an area on the layer card and add ink to blend it out then remove your masking tape
Add in the word that you wish to spell so that it is half on the band of colour

Cut  it from the card... then add the cut letters to some double sided foam tape.

Emboss the lower part of the card and  add this panel flat to your base then place the raised letters back into the correct place.


Stamp and emboss your sentiment and add it to the card

Play with different words and colours to vary the look,

On the blue card I splashed some water on to the Distress Ink to bleach it out a little

Simple easy card and another way to get more for your money using dies that you may have had for quite some time.

More tomorrow ...

Hugs xx

November 25, 2015

Water Coloured Peonies ...

Hi Everybody,

Todays card is back to water colouring and this is the Peonies Scrolls Stamp from Altenew.

I bought mine from Make the Day Special and they have many dies and stamps sets that match each other.

It was lovely to sit and relax as I coloured the flowers and I used the Aqua Tints from Spectrum Noir to get the look

The finished card is 5x7" and I layered the panel onto some pale pink card.

I have used the die set   Peony Scrolls Die   to cut out several flowers and leaves, after they have been coloured and allowed to dry

I have used foam pads to layer on them onto my card front and it gives them varied heights so that some overlap others

The leaves are just tucked underneath each of the flower heads and again I used foam pads.

The sentiment is a chipboard one from Want2Scrap but I wanted to make it more glamorous so I added some gold foil  to it with the Heidi Swapp Minc Machine 

I have only had the new Minc Machine a few days and I am still playing around with it to see what I can create but I will be sure to add some videos as soon as I can.  But it looks like a lot of fun to play with.

More tomorrow ...

Hugs xx

November 24, 2015

Tuesday Tutorial - Arched Window One

Hi Everybody,

Todays tutorial is using the Arched Window that could be suitable for any occasion. Wedding, Christening, Sympathy or Confirmation.  I have decided to use mine for this Christmas card and apart from a little painting it was very easy to do.

 Spellbinders Supplies:
Other Supplies:
Instructions:
Create a base card by simply folding an A4 piece of white card in half along the short side and then cutting it in half.  This will create two bases for you to use.
Cut another panel slightly smaller than the base card and emboss it with a brick effect pattern
Lightly rub a blender over the raised areas with a pale ink to accentuate the bricks ... I used Antique Linen
From the Arches die #3 and #4 cut them together to create the frame 
From the thin strip cut two or three to create the bars on the window.
(Please remember that die #1 is always the smallest)
Keep the small centre panel for another project
With any stamps that you have in your "Stash" create a little scene but make sure that it will fit inside the frame that you have just cut. 
I used a tree for mine and water coloured around it with Broken China and Black Soot.
Once it was dry I used a glue pen and dotted around the picture then sprinkled it with glitter
Create the window and add as many bars across as you like ... or leave them out altogether if you prefer.  I then added some Acetate to the back and trimmed it to fit the frame.
Add foam pads around the frame and carefully add it over your little scene and trim if needed
Add more foam pads to the back for more dimension
Wrap the twine around the bottom of the window frame and add in a couple of miniature bells
I stamped my sentiment in black and then heat emboss it with clear powder onto a strip of parchment 
Add the brick embossed panel to your base card and place the window in the position you prefer
Wrap the sentiment around the panel securing it on the back 
Add all to the base card and embellish as you like
On the card at the top of the page I used cream pearls and on the card at the bottom of the page I used white ribbon and Diamanté snowflakes
But both are really pretty cards
There is another idea using this die set for a Wedding Card

More tomorrow ...

Hugs xx

November 23, 2015

Christmas in Blue

Hi Everybody,

Todays card is another non traditional coloured Christmas card and this time it is in a pretty baby blue.

It is very simply made and is a 5x7 " size

I have layered the blue with a thin layer of black and then onto white card and the patterned layer is  Grate Effect   from Spellbinders

The card is from  Papermill Direct  and it is all 240- 260 gsm.

There are some lovely colours to choose from and this is the card I use mostly for my base cards

The flowers are from Wild Orchid Crafts and they have some really lovely Christmas sprays on their website at present

I have added some clear glitter stands to the petals for a sparkly look

The sentiment has been stamped onto a strip of parchment from AnnaMarie Designs  in black and heat embossed in glossy clear embossing powder from Wow.

You will find some beautiful spotty and striped card on  AnnaMaries  website so it's well worth a browse around

I have used pearls in the cross sections of the pattern and also to edge the parchment and I am very pleased with the result

More tomorrow ...

Hugs xx


November 22, 2015

Christmas in Pink ...

Hi Everybody,

Just because it is a Christmas Card doesn't mean it has to be in traditional colours.

For this one I have used a pretty shade of pink card from  Papermill Direct   and added in a large white Poinsettia

The flowers are from  Wild Orchid Crafts and I have sprinkled them with some pink glitter strands

The dies are  Spellbinders Grate Effect  for the background and I have simply glued it flat to a piece of white card. Then layered them onto the pink base card.

The oval in pink is the Victorian Bow  and I have added hat with foam tape.  The sentiment has been stamped and heat embossed onto parchment and the strimmed to fit the front.

Each side of it has been dressed with Diamanté strips from Want2Scrap

The Flourish Trim  is a really useful small die and I have cut it twice and added to each side of the parchment strip.

So I wonder who will get this card from the Griffiths household at Christmas !!

More tomorrow ...

Hugs xx


November 21, 2015

Todays Card Winner ...

Hi Everybody,

Do you have any snow in your area today? We don't here .. not a flake though it is cold.  But I have to say the sun is shining and it looks very fresh.  I am going to play with Isabella later today for a few hours and really looking forward to it.

The draw for the peach and white card has been done and this weeks name is ...

Sue MacFall
so if you could email me please at
christina@card-making-magic.com
I will post the card off to you straight away.
I hope you will like it when it arrives and please let me know that you have the card.

Have a lovely weekend everybody 

More tomorrow ...

Hugs xx

November 20, 2015

Friday Freebie 094

Hi Everybody,

Todays card is created in Peach and White with some pretty matching organza ribbon from Mei Flower

The peach background is the large die Heirloom Rectangle that I have cut down to create the square

All the layers have been added with foam in between to give height and dimension to the card

The sentiment is from Crafters Companion and I have stamped it in brown and heat embossed it with clear powder, then added it to a peach mat

The embossing folder is sadly no longer available to buy,  but you can use any that you have in your own collection to give added texture to the background layer

If this is a card that you would like to win then all you need to do is leave me a comment at the bottom of the post and then come back tomorrow to see if your name has been chosen as the winner.

More tomorrow ...

Hugs xx

November 19, 2015

Thank You Cards ...

Hi Everybody,

Here is an idea for a really inexpensive boxed gift set to give to some one and all it will cost you is a bit of ink, some card and a little time.

But think of the joy that some one will get when you give them this  as a gift for any occasion.

I made them in one batch session and they are all alike apart from the colours.

I used Distress Inks and the flower stamp from Spellbinders is called  My Friend

The sentiment is from My Favorite Things  and  there are four stamps on the sheet called Grand Greetings 

I have stamped them in Black and then  heat embossed it with clear powder for a shiny effect  ... and this is less messy than embossing with black powder.

I used a new tool called the MISTI   ... Most Incredible Stamping Tool Invented  ... and it is a fabulous new toy.

I am in the process of putting together some video tutorials on the new Misti to show you some of the things you can do with this tool.

It is not cheap and it flies out of suppliers the minute it is back in stock so you need to be quick if you want one.

At the moment Oyster Stamps are taking pre orders for deliveries of the  MISTI   later this month so click the link to go to their website and take a look for yourself

I have made a box to hold the cards and included the envelopes to go with them and you could even include the stamps too for your recipient to send the cards to others

 I think this is a very useful as well as pretty gift to give

More tomorrow ...

Hugs xx

November 18, 2015

2-4-1 Christmas Card (Video Tutorial)

Hi Everybody,

Todays card is a little special and will take some measuring from you to get it centred

It is well worth the effort if you do and you will get two cards for one by using the positive and  negative of the die cut

Let the video show you how I did this and then maybe you would like to try it for yourself.


This is the second card and it is really pretty with the diamanté studded around it and I am really pleased with the way both have turned out.

Make them in different colours and send them to your special friends this year.  I used Faded Jeans Distress Inks as it blends so well

The letters I have used are from Donnas' Alphas from Spellbinders and I have had this set for a long time.

I am trying to re use the older dies as I know that many of you may have them and if you do then we may as well make use of them.

The background to the second card is Grate Effect  and it makes the loveliest back drop to the words.

You can use any alphabets  that you have as they will work using the same method.

These two are created using Spellbinders Font One Uppercase and it is a finer font than the other.

The colour is Salty Ocean and I have used a Splodge Mat  to help me blend my inks ... and this company now do many stencils that you can blend with
This the same die set and the card on the left has been made into a shaker card.

The stamp set was free with Simply Cards and Papercrafts  and it has proved to be really useful 

So there you have some pretty ideas to make some of your cards and with an alphabet you can add any name or occasion that you wish.

More tomorrow ...

Hugs xx


November 17, 2015

Tuesday Tutorial - One Word Wonder

Hi Everybody,

Todays card is just a little bit of fun and shows you that you don't need a lot of dies to be creative. This one uses just one word but the effect is quite good and the sentiment says it all.

Spellbinders Supplies:
Other Supplies:
  • Distress Inks - Salty Ocean, Victorian Velvet, Milled Lavender
  • Black/ White Card from Papermill Direct
  • Baked Ikea Dots
Instructions:
Cut a panel of smooth white card to about 4 1/4 x 5 1/2" and create your blended effect with Blenders to get a pretty finish.   Other colors will give you another look so use any Distress Inks that are in your "Stash"
With the die "Hello" from the phrases set cut it as many times as you need in white to fill the front of your inked panel. 
I added mine at an angle and cut  up the words as I needed to fill the gaps along the sides. When you are happy with the position glue them in place and trim off the overhang to neaten the edges
With the same die cut the word again in black card and I have also cut it in craft foam and glued the two together for a thicker look
Stamp any appropriate sentiment onto black card and heat emboss in white.
Trim the end into a little banner shape
Add your word panel to some black card and leave the tiniest of borders around the edge. Add it to a white  Hinged Style  base card
Add in the banner,  with foam pads underneath to raise it up, where you want it to sit on your card and  glue in place the black Hello over one of the white ones
Highlight with some black dots for a really simple card.

More tomorrow ...

Hugs xx 

November 16, 2015

International Ambassadors Informal Blog Hop - Woodland Collection

Hi Everybody,

It's that time of the month  for the International Ambassadors to host another informal Blog Hop and we hope you will hop along with us again this month.

We have chosen Spellbinders  Woodland Collection 
this month and there are some really cute dies in this set to help you make some beautiful cards.

I have used several dies from the whole collection and worked them all together to build up the scene for my card

First I have used the Woodland Owl   and added large Googly Eyes to the shape, and I have him sitting on the Wreath

At the bottom of the card I have added in some of the Mushrooms  and added in some of the Grass

I  placed a couple of large Leaves  behind after inking them through the die. And the embossing folder behind the scene is Bricks and Bark folder also from Spellbinders

Start here in the UK with me and then pop over to visit

Linda Lucas  in Australia
Yvonne van der Grijp   in the Netherlands
Christine Emberson   back in the UK

All these ladies are so talented and they will have some wonderful designs to share with you. They will be happy to see you and please leave them a comment to let them know that you visited.

And if you have come to visit from one of the others then a big Hello and Welcome to you I hope you will pop back regularly

Happy Hopping !!

More tomorrow ...

Hugs xx