Beautiful Card Designs Made Easy

October 19, 2021

More Crazy Birds

Hi Everybody,

Quite a few of you seem to have the same Crazy Birds set as me and I wonder how many other discoveries will there be at the backs of drawers and cupboards as you try to dig them out again. And how many of you will go on and make some new cards once you have them out in the open air again.

I am guilty of  sometimes seeing something and buying it only to realise that I don't really know what I am doing, and don't really like what I have created with it.

So to the back of the drawer it goes and remains there for  few years until I find it again and decide to give it another try.

But these Bird Crazy sets are not amongst that section and I did enjoy all the cards I made with them. 

Many of them went to friends and family for birthdays and others went to people for them to use as they liked. 

Once again I have added it to the Spotty folder but the actual background to this bird is created by hand with inks and a fine liner pen.

For these cards I have used some of the items from the additions die sets and added them to a stamped background .
There really is so much that you can do with these birds and they are a lot of fun to play with.

They suit any occasion, gender or age group.
And if you are adventurous enough you can add all sorts of hand drawn items to them to make them more personal for your recipients.

The sunglasses are simply Glossy Accents and the towels are rolled up patterned paper tucked under an added on extra wing.

More tomorrow ...

Hugs xx

October 18, 2021

Bird Crazy ...

  Hi Everybody,

Now here are some stamps that I haven't used for a long time and they are the Bird Crazy Stamps from Tim Holtz. 

They made such fun cards when they came out a few years ago, and there where six individual birds for you to colour.

You could also get matching dies for them and other sets that would cut things like hats, glasses, and other items that you may like to dress your birds in. You could also get sentiments to go with the stamps too.

But like everything else things move on, and they got relegated to the back of the drawer.

Never the less I thought it would be good to revisit them and stamp up some cards with them to make Birthday cards which are always a popular addition to my charity shop boxes.. 

For both of these cards I have used the new Card Making Magic Spotty background embossing folder (which will be with you soon) and I can't tell you how much I enjoy this simple folder. 

To show you some looks you can get with this folder I have inked up both sides of the folder to show you the difference. 

I have used the same ink, but one is the embossed side and the other is the debossed side. 
Both make a fabulous backdrop to your cards and I especially like them with added flowers. 

Just a little fun look for your recipients and they make excellent male cards that you can send for any occasion

And they are just some of a few sets that I have found in my supplies that I haven't used in such a long time, and I have made a promise to my self to use them a bit more often, rather than buying more new ones. 

More tomorrow ...

Hugs xx

October 16, 2021

Winner

 Hi Everybody,

These weekends roll up far too quick and before we know it Christmas will be with us again. So this weeks offering is very appropriate for those who still have cards to make for family and friends. I have a box that I am going to pack up and take to the Charity shop and they are all Christmas themed. 

I have done the draw for the gift and the name this week is

Lyn Nash

Please.can you email me your postal address to

christina@card-making-magic.com

and I will get it in the post to you straight away. Please let me know when you have it xsafely and I hope you will enjoy playing with it.

More tomorrow …

Hugs xxx

October 15, 2021

Friday Freebie - Festive Kit Die and Stamp Set

 Hi Everybody,

This week sees the return of this 33 piece Festive Kit  which can het you inspired for Christmas. There is an A4 stamp set and a beautiful Tonic die that  says
Have a Merry Christmas 

I am sure you will have some fun playing with this set and it can be yours for just one comment in the box under this post.

All I ask of you is that you leave me your
 FULL NAME 
that way it is easier to identify the winner each week.

You will need to come back and check if it is your name shown over the weekend ad the winner and then you will have 72 hours in which to claim the pack,

Just add your comment once, and it wont show up until it has been moderated so there is no need to ad it twice or more. I am happy to send the pack to you wherever you live and it doesn't matter if you have won before.

More tomorrow ...

Hugs xx


October 13, 2021

Floral Card

Hi Everybody,

This card is a mixture of techniques and brands but I think it looks really pretty. 

I have used a Gelli Plate and  Arteza Acrylic paints to get the background and then die cut it and added it to an embossed background.

The flowers are the yellow ones from Altenew and are a mixture of the new monthly kit and the Just Jasmine stamps and stencils that I have coloured pink and I have done a little surgery on the flowers

It is a lovely mixture of flowers and the colours compliment each other also.

I have enjoyed playing with this months Altenew kit and I look forward to the next one coming through my letterbox.

This card features the Just Jasmine set alone but I have again coloured them pink with Arteza paints

The paints are metallic to give a lovely soft sheen to the flowers and they blend so easily on the water colour paper also from Arteza.

The background to this is another Altenew product called Herringbone Stamp and I have shown you this one before when I coloured it in.

To this one I hade added a parchment die cut as the backdrop and it layered onto a circle die cut that has been offset on the card front.

The stamp gives a lovely effect even if it is not coloured and it sets the flowers off really well.

More tomorrow ...

Hugs xx

October 12, 2021

Ink Swiped Background

Hi Everybody,

Todays card has been created with an Ink Swiped Background. 

I used a pad of yellow ink and simply swiped it down the card leaving splotches of the ink along it. 

Then I cut a Mandala shape out of parchment and added it off centre to the card front..

The flowers are from Altenew and are some from the monthly subscription kit Project Life, called Hello Beautiful.

There are so many ways that this kit can be used and I am happy that I subscribed to it each month.

 I will be using this one a lot more, colouring my flowers in different mediums.

Altogether I think this is a pretty card and it was so easy to make. 

The background is unique and just a simple swipe of the ink pad. Then just allow it to dry blotchy for a novel look.

More tomorrow .
..
Hugs xx

October 11, 2021

TwoFer

Hi Everybody,

Don't you just love getting a Twofer whenever you are card making. And in case you don't know what that is it means two cards for the price of one.!!!

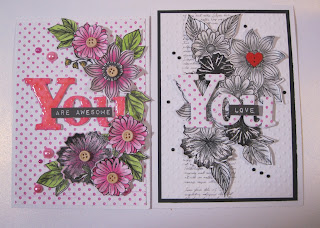
These two card where just such an event and yet they look totally different. 

Each uses the same dies and embossing folder. The same inks and both are 5x7"  cards with the fold at the top

So let me tell you what I did to get these looks.

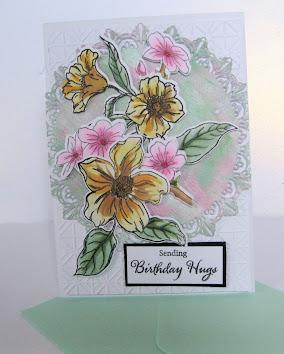
 First I created the base cards and a white mat to go on top.

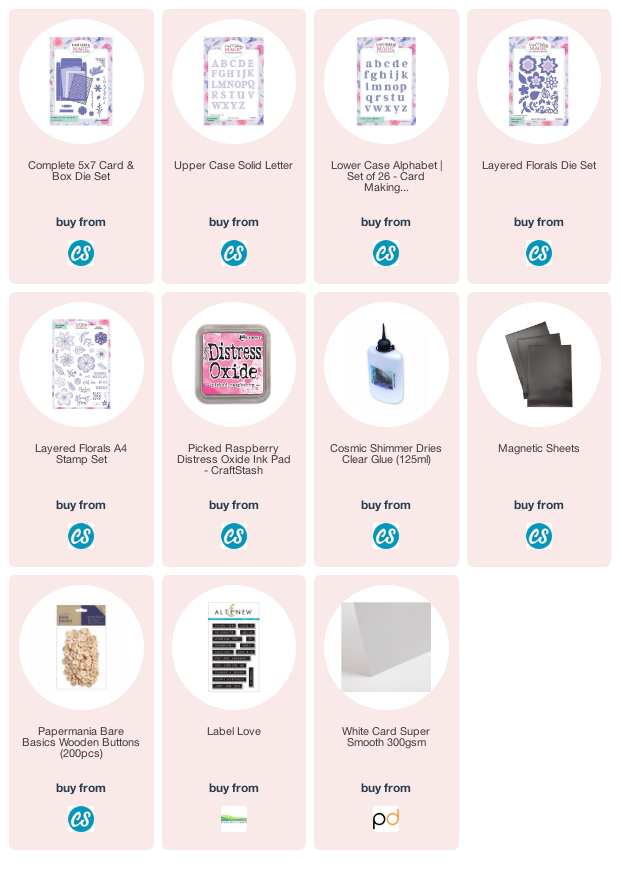
For this white mat I inked up the debossed side of my embossing folder and ran it through the machine to add the pink spots to my card panel.

(This  Spotty Embossing Folder is one that will be in a new collection coming soon, and I love it) 

I used the upper and lower case from the Alphabet sets and cut out the word YOU into the centre of this panel and put the actual  spotty words to one side. Add this to the base card

Cut the same word several times from white card and stack them up. I coloured the top letters with pink ink.

The flowers  and leaves where stamped and cut lots of times to give me as many as I needed, and some of them I coloured with markers. The others I placed to one side for now.

I added the coloured word into the cut out word on my panel and arranged the flower and leaves around it and to the centre of the flowers I added small wooden buttons, and dotted the rest of the panel with pink pearls

I added Glossy Accents to the word YOU and left it over night to dry

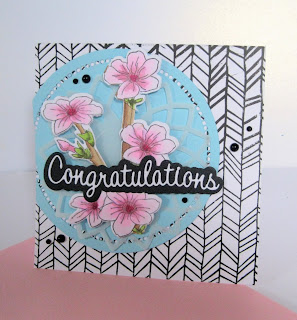
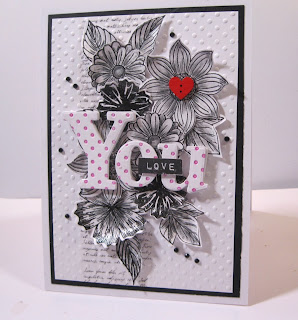
For this card I embossed my spotty panel and added it to some black card and then onto my base card.

These flowers have been coloured with an ordinary pencil and I used a paper stump to smooth it out. They have been added to the embossed layer with glue and foam pads

The spotty letters  have been layered onto more white ones to add dimension and added to the top of the flowers. 

I dotted some black pearls around this cards and the little red heart just adds the finishing touch.

The little sub sentiments for both cards are from Altenews Label Love

I really love the look of both of these cards and there was no waste from making them either. 
So a win win situation 

More tomorrow ...

Hugs xx

October 09, 2021

Winner

 Hi Everybody 

Another weekend is here again and I hope you have some good things planned. There is another display in the Firework competition tonight and Vickie and I have made arrangements to go down and watch.We will be taking Isabella with us, and of course Ruby and Dougal. This time we are going to go down by tram as the parking was really difficult last time. We are hoping it won’t rain when we go down and at the moment it’s not too cold. Hi 

I have done the draw for yesterday’s offering and the name this week is 

Denise Ann Stocks

Would you email me with your postal address please to christina@card-making-magic.com

and I will get it in the post to you straight away. Please let me know that you have it safely and I really hope you will enjoy playing with it.

More tomorrow …

Hugs xx

October 08, 2021

Friday Freebie - Peony Panel Die

Hi Everybody,

Here is another chance for you to win this lovely die set from Card Making Magic, I still have some more yet to give away. 

It is a four piece die set and a fabulous magazine that is full of ideas and inspiration for you.

So if you don't win this week then be sure to come back and try in another week coz you never know when you will be lucky.

And all you have to do is leave me a comment at the end of this post but be sure to add your

FULL NAME

If you don't add your full name then your comment will not be included in the draw. 

Having done that what next ???? Well you need to be sure to come back and see if your name is listed as the winner. It will be in a blog post over the weekend and then you will have 72 hours in which to claim it.

I am happy to send the pack to you wherever you live, at my expense, and it doesn't matter if you have won before in the past, you can still try again. 

I am not asking much ... just your full name in return for a lovely give away that can be all yours

More tomorrow ...

Hugs xx
 

October 07, 2021

Designer Card Fronts - Half Scallop

Hi Everybody,

For todays card I have used the larger A5 Complete Card and Box Die Set and teamed it with one of the Designer Card Fronts.

This is the Half Scallop and is just a little out of the ordinary for your designs. It is available at Craft Stash, as are all my other collections 

I have created a card with a different type of opening ... just for the fun of it.

The video will show you how I made it and I hope you like the end result, and it fits inside its own box really neatly. 

I think adding in the box, or envelope that matches your card always makes it that little bit special that your recipient is sure to appreciate.


It is not hard to do but make sure you have enough matching card if you are going to make the box.
And if you cut too many flowers and leaves they can always be kept for another project in the future. 

The pretty blue card is from Papermill Direct and it is some I use a lot, especially Baby Boy cards as it is so complimentary to lots of other colours too.

More tomorrow ...

Hugs xx