Beautiful Card Designs Made Easy

Showing posts with label Mei Flower. Show all posts

January 17, 2017

Tuesday Tutorial - Ovals & Rectangles

Hi Everybody,

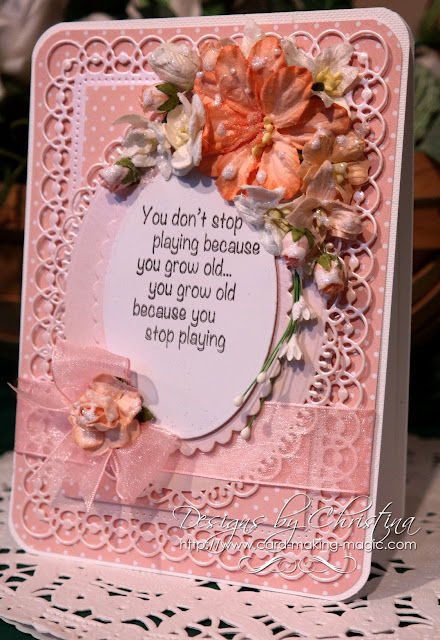
I thought for todays card I would dress it up with some pretty peach coloured flowers and use some of the older Spellbinders die sets. This card is a 5x7 and I have used the dies that will create a card that size without any measuring from me.
Spellbinders Supplies:
Other Supplies:
Create a base card with the largest die #7 from Matting Basics A
Hand cut another layer, with peach patterned card, to leave a really thin border around the edge
Round the corners
With the largest dies from the Ovals and rectangles sets cut panels in plain peach coloured card
Add foam tape to the back of each of these panels
With the ovals cut a scalloped layer in peach.
Stamp and heat emboss a verse onto white card and cut with the oval to match the scalloped one
Layer together with foam pads between the layers
Layer everything together and wrap with ribbon before adding to the card base
Add the oval sentiment to the top 
Choose a selection of flowers in peach and white varying the styles and sizes
Add these to the top right of the card. I use a hot glue gun to add my flowers as I don't want them to fall off the card once given
Dot the flowers with glue and sprinkle with glitter to finish

More tomorrow ...

Hugs xx

January 10, 2017

Tuesday Tutorial-Sapphire Basic Set A

Hi Everybody,

This little starter set of small dies are designed to be used with the Sapphire, but they can be used in any of the small die cutting machines that are on the market.  

These little machines are so handy to keep on your work top to cut sentiments, tags or even some flowers. They take up no space at all but are just as strong as the bigger die cutters

You may have been lucky enough to get your Sapphire from C&C and this is the set of dies that came with the machine at that time. That machine is exclusive to C&C but the Prizm is the same concept and both are by Spellbinders
So here is a really quick and simple card idea for those little dies

Spellbinders Supplies:

Other Supplies:

Cut two panels with die #7 from Matting Basics A and create a hinged card
With die #7 from Matting Basics B cut another panel in dotty blue card
With die #6 from Matting Baiscs A cut another white panel and emboss in the folder that you have
(Please remember that die #1 is always the smallest)
Add the embossed panel to the dotty card with foam pads between the layers
Cut all the square dies together to create two frames and the other pieces as you need
Stamp your sentiment onto the small oval and layer it onto the tag die
Add the tag with foam pads to the embossed panel
Add ribbon through the loops on the tag and secure behind the panel
Layer up the frames to overlap each other with foam pads were needed
Layer up the butterflies along the body line and add the flourish as the butterfly trail
Add all this to the base card

More tomorrow ...

Hugs xx


January 03, 2017

Tuesday Tutorial - Floral Trellis

Hi Everybody,

This is the first tutorial to start off the New Year and I thought we would make this one in lilac and add those beautiful flowers to it.  I even used the same die to create the box and I have many tutorials on boxes of different shapes and sizes on Card Making Magic
Spellbinders Supplies:

Other Supplies:

With white card create top folded base card measuring 41/4 x 6"
With the Dotty card create another mat slightly smaller to leave a thin border around the edges
With both oarts to the Trellis die cut one panel in white and add small pieces of foam tape around the edges and onto the floral parts 
Add this to the Dotty card and trim around the edges
Wrap these panels with ribbon and add to the base card with foam pads
With the sentiment die cut twice in white and once in silver glitter card and layer them together with the silver glitter card on the top 
Add this to the  trellis just above the ribbon 
Tie a neat bow and add to the ribbon
Dress with flowers as you like and sprinkle them with glitter.
Use the inner portion of the Trellis die to make the panel in the top of the box and line with acetate
Use the Dotty card for the lid and white card for the box base
Dress with flowers to match the card if desired.

More tomorrow ...

Hugs


December 20, 2016

Tuesday Tutorial - Botanical Medallion

Hi Everybody,

This die is part of the large 6" square set called Botanical Medallion but I have used just die #2 to get my card. We sometimes forget that the smaller dies can be used individually and still create a really good focal point.
Spellbinders Supplies:
Other Supplies:
Instructions:
With die #8 from Matting Basics A cut two panels in cream and create the base card.
With die #8 from Matting Basics B cut another panel in pink
(Die #1 is always the smallest)
Add texture to the pink layer by embossing in any folder that you have.
With die #2 from Botanical Medallion cut it four times in cream and ink through the die with pink ink before removing the card from the die
Add small pieces of foam pads to the floral part of each piece
Add these evenly spaced to the embossed layer and wrap the middle with pink ribbon.
Use foam tape to add this to the base card with the fold at the top
Stamp with Versamark and heat emboss in white a sentiment of your choice
Cut to size and trim one end into a banner shape
Glue the bow in place and add the flowers twined with pearl string to the centre
Tuck the sentiment into the flowers and sprinkle them with glitter

A card for any occasion just alter the sentiment and the colours.
More tomorrow ...

Hugs xx

December 06, 2016

Tuesday Tutorial - Romantic Vine

Hi Everybody,

Todays card is in a really pretty shade of pale green and I ahve teamed it with crisp white.
 The card itself is easy to make and is quite effective once it is finished.
 The tiny spots of pink just give it that little lift and it could be for any occasion that you wanted.
Spellbinders Supplies:
Other Supplies:
With die #7 from Matting Basics A cut two panels in white and create a hinged card
With die #7 from Matting Basics B cut another panel in green  and emboss in any folder that you have
With die #6 from Matting Basics a cut another panel in white and emboss this also
(Die #1 is always the smallest)
With the two embossed panels remove a#bout an inch from the white one so that it will create a channel
Add foam tape to the back of each piece
Thread some ribbon though a piece of lace that will wrap around the bottom panel and secure in place then add both of these pieces to the green layer
Cut the flowers and leaves that you need and inkt through the die before removing the card to give the shade portion on the flower
Add these across the open channel in your card just adding glue to the parts that will touch the main panel
Cut the sentiment several times and glue them together for extra strength and position the words across the card front

Alter the sentiment, colours or dies for an different look but keeping the basic method the same

More tomorrow ...

Hugs xx

December 02, 2016

Friday Freebie 147

Hi Everybody,

This turquoise card is a 6" square and has several layers on it all separated with foam pads for dimension

It is wrapped with satin ribbon and a large Thank You added to the panels

If this is a card that you would like to have then all you need to do is leave me a comment and then pop back tomorrow to see if your name is shown as the winner.

I am happy to post the card to you wherever you live and then you can either re use and send it to some one or keep it for your self.

Many of you have done me a great honour by actually keeping the card that you won and framing it to hang on your wall. WOW !! what a compliment that is xxx

More tomorrow ...

Hugs xx


November 30, 2016

Water Colour Wednesday-Lazy Rabbit

Hi Everybody,

This lazy rabbit just lying around is from the CD The Next Big Thing from Just Inklined

And every time I use this CD I have to tell you that it is no longer available

You may be able to find a copy if you search for it.

And if you already have it then take another look at the fantastic characters on there

It is such a good collection of all sorts from sports to florals and I use it regularly throughout the year for all occasions.

This one has been  water coloured a long time ago with Distress Inks and then mounted onto pink card.

It could do equally well for male and female cards ... obviously not with pink !!! 
 But I think this is such a cute rabbit and sat with the carrot was perfect for a friend who was retiring.  Best job in the World !!

More tomorrow ...

Hugs xx 

November 22, 2016

Tuesday Tutorial - Floral Affair

Hi Everybody,

This pretty card in lilac and white is a really simple layered card. The deep purple ribbon sets it all off nicely but there are no flowers on this one ... which is a bit of change as you know how I love to add my flowers.
Spellbinders Supplies:

Other Supplies:
Instructions:
With die #7 from Matting Basics A cut two pieces in white and Create A Hinged Card
With #7 from Matting Baiscs B cut a panel in lilac
With =6 from Matting Basics A cut another panels in white and emboss in any folder that you have
(Please remember that die #1 is always the smallest)
Cut the largest Floral Affair die in white a couple of times and glue them together. 
This just adds extra strength to the piece
Cut the fligree heart shape in lilac ... twice
Cut the Classic Heart die that fits under the filigree piece in white ... twice
Layer them together to create two hearts and add foam pads underneath
Assemble your card by adhering the embossed white card to the lilac layer 
Add the Floral Affair die cuts to the panel and wrap all of these with the ribbon 
Add them to the base card
Position the hearts as you like them 
Cut the sentiment several times and glue together then add across the hearts

Vary the colours and the sentiment for another occasion if you wish

More tomorrow ...

Hugs xx


November 15, 2016

Tuesday Tutorial - Labels 47 Decorative Elements

Hi Everybody,

This really pretty card is created with well established Spellbinders dies and all the intricate work is done for you by the die. All you need to do is layer it all together for a lovely effect that can be for any occasion.
Spellbinders Supplies:

Other Supplies:
Instructions:
With die #7 from Matting Basics A cut two in white and create a hinged card
With die #7 from Matting Basics B cut another layer in yellow
With die =1 from Decorative Elements cut six panels in white and add them to the yellow panel 
(Die =1 is always the smallest)
Cut #3 from the filigree die in white twice (one is for the inside)
With =5 from Labels 47 cut two panels in yellow
With #2 from the Decorative Elements cut two in white
Stamp and emboss your sentiment and cut it out with die  #4 from Labels 47
From the Bitty Blossoms create the flowers in yellow and cut the leaves in green 
Roll them up and this video  Spellbinders Blossoms   will help you if they are a new concept to you 
Layer up the other die cuts with foam pads where needed and wrap with yellow ribbon before adding it to the base card
Add in the sentiment with foam pads.
Arrange the flowers as you like them
Add a bow to the front of the card and place the centrepiece over the knot.
Line the inside with the other die cuts to compliment the front

More tomorrow ... 

Hugs xx


November 14, 2016

International Ambassadors Informal Blog Hop

Hi Everybody,

Are you ready for another blog hop with some of the International Ambassadors?  
For this month we chose for our theme the approaching holiday season to make anything but a card
My choice was to use a die by a designer that is new to Spellbinders Marisa Job.

Marisa does beautiful work and I have been a follower of her for a long time.
But this is the "Surprise Me Box"  and it is part of her Special Occasions Collection 
It makes the most adorable little Crackers for your table and not just for Christmas. 
Imagine these all set out with your own colour scheme and each with a little gift tucked inside for your guests. 
They are not very big but they do make a statement and they are very easy to make. 
You will be able to get two from one sheet of A4 card.

I stamped plain white card with a snowflake pattern and then cut them out. 
I wrapped them with matching ribbon and added one of the little tags in the set stamped with a Christmas greeting.

I added in some leaves and a glitter star and they are ready to add to my table. I made quite a few ... but I can't tell you what is inside the Surprise Me Box !!
Why don't you pop over and see what my colleagues have designed for you to see ...

Linda Lucas    Australia
Yvonne van de Grijp  Netherlands

You are sure to be delighted with their designs. and don't forget to leave us all a comment to say that you have been to visit.

More tomorrow ...

Hugs xx

November 11, 2016

Friday Freebie 144

Hi Everybody,

So here we are with another Friday and the card this week is in peach and white

It is a 5x7 and the flower blend with the colour scheme beautifully.

What isn't shown on the photo is the hatpin that has been pushed into the flowers on the left and that really finishes the card off to perfection

I am sure that whoever wins this one will be pleased with the result.

Would you like this card to be on its way to you? Then all you need to do is leave me a comment at the end of the post and from those comments a name will be drawn and announced in tomorrows blog post.

You will need to come back and check if it is you and then email me with your postal address and the card will be on its way to you.

More tomorrow ...

Hugs xx

November 04, 2016

Friday Freebie 143

Hi Everybody,

My apologies for the poor quality of the photo but don't let that out you off because the card is really pretty.

It is in shades of pale pink and lemon teamed with white and I have added a hatpin into the floral display.

The finished size is A2 and I have used the Labels Eight for the layers.

Do you think you would like this card? Well if you do all you need to do is leave me a comment at the end of the post

From those comments a name will be chosen and announced in the blog post tomorrow.  So you will need to come back and see if you are the winner

You will have till Wednesday to claim the card and then it will be gone to someone else.

Good luck to all and I am happy to send the card wherever you are in the world.  And boy have my cards gone to some far away places over the years.

More tomorrow ...

Hugs xx


November 01, 2016

Tuesday Tutorial - Labels Forty

Hi Everybody,

This is a colour that I don't use very much but each time I do I like the card and say to my self ... "Use this more often...." So here we have a 5x7 sized card in pale lemon and white and it is really easy to create.
Spellbinders Supplies:
Other Supplies:
Instructions:
With die #7 from Matting Basics A cut two pieces in white and create a base card. Leave to one side
With #7 from Matting Basics B cut another layer in yellow
With #6 from Matting Basics A cut one more layer in white and emboss this piece and add these two layers together
(Please remember that die #1 is always the smallest)
With dies #4 and =5 from Labels Forty cut the layers in yellow
With dies #3 and #4 cut these layers in white and emboss with a different pattern 
Layer each size onto the corresponding plain layer with foam pads between 
 and add them all together on top of the larger layers from the previous step
Wrap all layers with ribbon and add a double bow
Add them all to the base card 
Glue the pretty centre piece onto the knot in the bow

More tomorrow ...

Hugs xx