Beautiful Card Designs Made Easy

January 16, 2015

Friday Freebie 042

Hi Everybody,

This red card is quite a large square and is created from the Crafters Companion  Create a Card range and there are several patterns for you to choose from

This one has the addition of red pearl flourishes from Want2Scrap to  highlight the sentiment

The flowers are from Wild Orchid Crafts and they are a mixture of Roses, Chrysanthemums, Poppy and Cherry Blossom

Into that mix I have added in the  spray of red holly berries and green leaves from   AnnaMarie Designs

If you would like to win this card then all you need to do is leave me a comment at the bottom of the post.

A name will be chosen in the morning and added to a blog post ... so if you enter then don't forget to come back and check to see if you are the winner

More tomorrow ...

Hugs xx

January 15, 2015

Card from the show ...

Hi Everybody,

Here I am home again safe and sound after completing a very enjoyable three shows on Create and Craft TV

Thank you so much for watching and also for the emails that some of you sent in to the studio.  It sure is good to know that you are there.

If you won one of the cards I hope you got them safely and they aren't too squashed in the post.

This card is one that was featured on the shows and it uses the Shady Allure Folder along with Oval Majesty, Labels Forty Three.

You will need to be patient to buy these dies as they have only just been released at CHA in California and Create and Craft have the exclusivity on some of them for three weeks

After that they will be available through your own supplier and they are well worth waiting for

The little sentiment is available now and was shown on a previous C&C show by myself ... Sentiments One   ... simply cut them out and add them to your card

The flowers on this card and the Dazzler on the bow  are all from   Wild Orchid Crafts 

The Diamanté Flourish is from Want2Scrap  and adds that touch of luxury to this very pretty card.

More tomorrow ...

Hugs xx


January 14, 2015

Dare to Dream

Hi Everybody,

I am due to be back on Create and Craft today at 8am 12 noon and 5pm ... please come and join me if you have some spare time

A few days ago we had a non red Valentines Day one and todays card uses red for an  ... "Any day kind of card !! "

It is quite a versatile colour and I used it for the base of the card then layered it with cream.

But the paper for the next layer was a little too gaudy for what I wanted to use and so I diffused it with a piece of parchment that I embossed and added with brads in each corner.

The framework is from the Spellbinders Regal Frame   and the central oval is from  Fleur De Elegance

The roses are from Wild Orchid Crafts  and I have mixed them with some tiny rosebuds.

The ribbon trim is netting and I have tied it in a bow with a central dazzler to hide the knot.

The verse is from a set created by Lili of the Valley  and has some really lovely sentiments on the sheet ... click the link to see the set

Whenever I make this style of  Hinged card   I use the 5x7 Matting Basics A & B sets   and I will tell you when I have used a different size.

More tomorrow ...

Hugs xx


January 13, 2015

Mix & Match your Spellbinders ...

Hi Everybody,


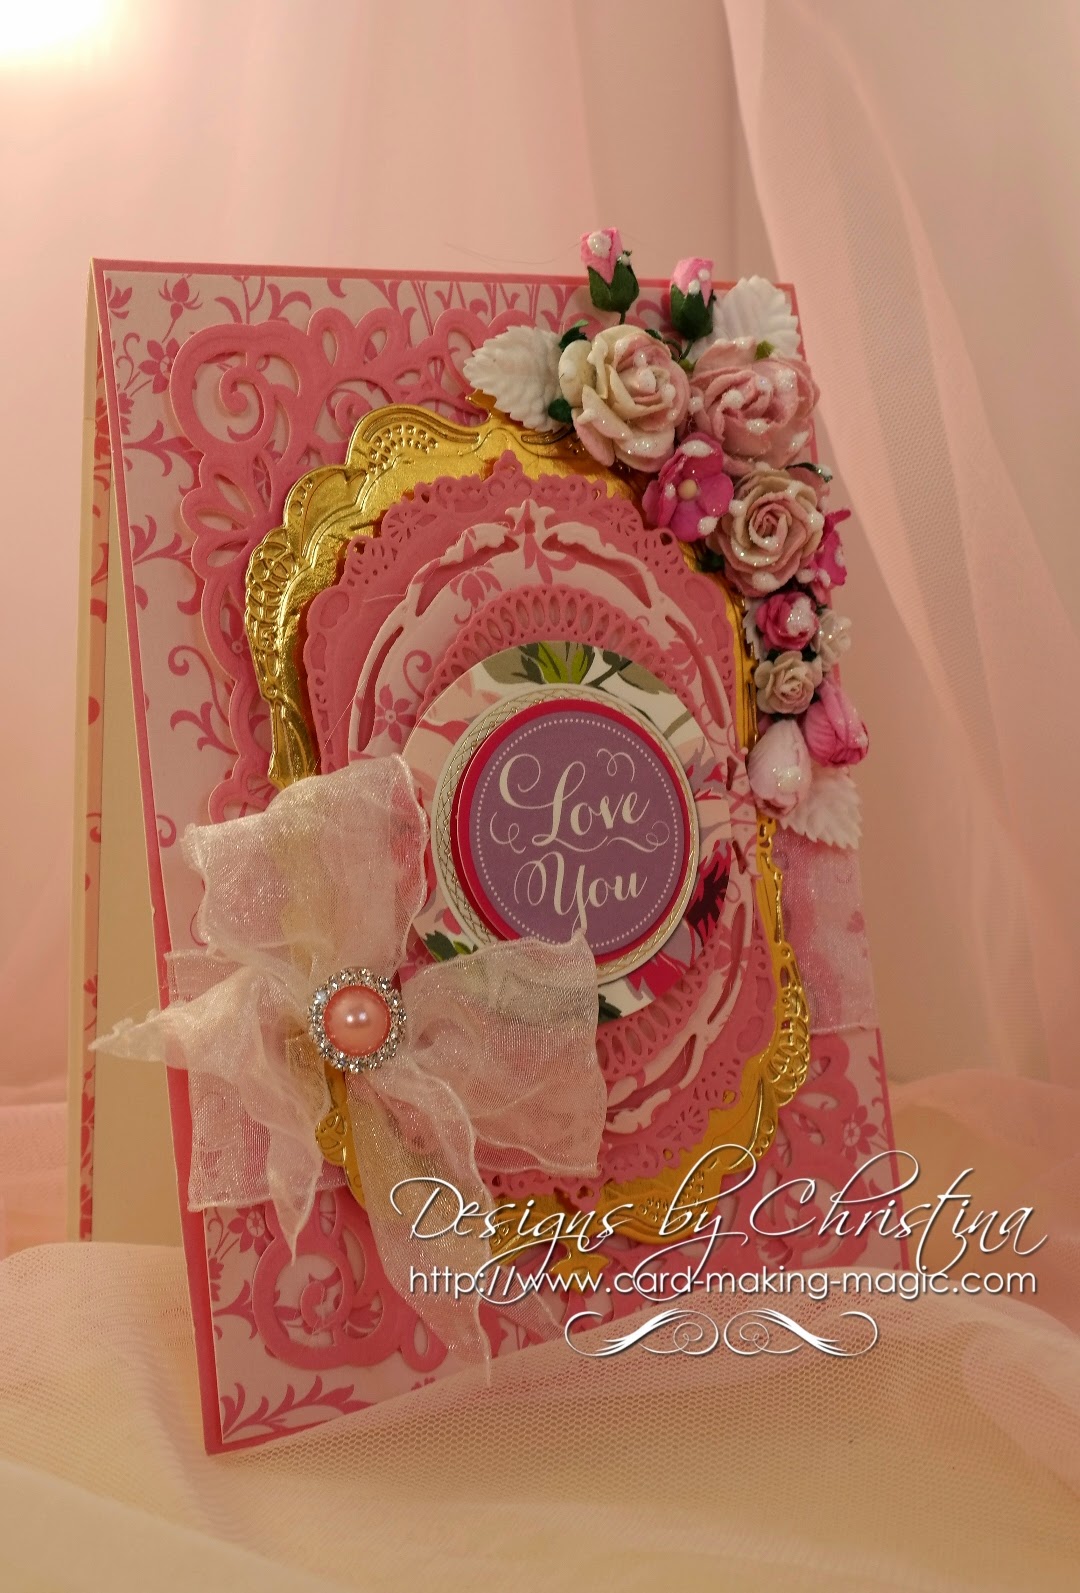
Todays card is a real mixture of dies all put together to make one design, and the only point I am trying to make is that any Spellbinders will go with any other.

The dies in your sets are in various sizes and Spellbinders number them with number one (#1) being the smallest and using that numbering these are the dies I have used.

So for the base I started with #7 from each set of 5x7 Matting Basics  A & B  and #6 from A and layered up the pink patterned card and I have also lined the inside of the card with some cream

Then I used  #3  Heirloom Rectangle  for the next layer in pink.

The lovely Gold layer  is #5 Gold Labels Four and then topped again in pink with the next size #4  in the same set.

From the patterned  paper I cut the largest  #7 from Opulent Ovals   and then  topped that with  #2 from Elegant Ovals

The central sentiment circle is simply a bought topper that I stuck in the middle.

The flowers are from Wild Orchid Crafts   and if you are new to cardmaking then WOC do a fabulous line in starter packs  to get you going

I have used Roses, Rosebuds, Tulips, Sweetheart Blossoms, Cosmos Daisies and white leaves.

I like to add some sparkle to my flowers and I use the Iridescent Glitter from Glitter Magic  ... it is the one called Chameleon that is my favorite as it blends with any color scheme you are using.

Now I was in  a hurry to take this photo and so I did not allow the glue to dry on the flowers once I had sprinkled on the glitter ... but it does dry  clear and flat and all you are left with is the sparkle on the blooms ... Promise !!

All being well I should be back on yout TV screens tomorrow with three shows on Create and Craft. They are scheduled for 8am 12 noon and 5pm so I hope you will join me and maybe send in your emails 

And finally a little reminder to Pearl Hudson ... Can you email me your address please so that I can send you the card ... christina@card-making-magic.com

More tomorrow ...

Hugs xx


January 12, 2015

Pringle Tub ...

Hi Everybody,

As promised earlier this week here is the tutorial to alter those Pringles tubs you have all been collecting

This is the one I made for Isabella and I filled it with chocolate coins for her ... and she loved it.

So here are the instructions for the
Altered Art Treasure Box

In the video I decided to go for a different color scheme and decided on Lilac.

And I lined the box too for an extra special touch.

You may notice some differences between the finished box in the video and the one pictured here.

That is because I couldn't leave things alone and had to add in more finishing touches before I was happy.

So now it is time for you to get out all those tubs you have been saving and start making them really pretty.  The flowers are from Wild Orchid Crafts

I have added the video to a  page on my website ...  Card Making Magic so you will need to click the link at the top of the page to view the tutorial

More tomorrow ...

Hugs xx