Welcome to the first day of the Spellbinders Winter CHA 2015 Sneak Peak and my first attempt at showcasing for this wonderful team
The beautiful template that I am featuring is the Imperial Square and it is one of many being released at the Craft and Hobby Association for 2015 You will have the chance to win this at the bottom of the page. The sentiment has been cut in silver from Sentiments One
My first project was created as a beautiful silver and white Congratulations Card that would be ideal for wedding day and the die is a pleasure to work with

- SKU-021 Imperial Square
- S2-082 Sentiments One - Congratulations
- LF-126 Grand Squares (Retired)
- GC-001 Grand Calibur Die Cutting and Embossing machine
Cross Promotional Partners
- Want2Scrap 72ct White Pearls
Other Products
- White Hammered card
- Silver Mirror Card
- White Organza Ribbon
- Heart hatpins
- Foam tape
Instructions

Cut two Grand Square #6 from white cardstock and emboss both peices keeping one for later
Hand cut a silver layer to fit in between these two layers to form the base.
Mat and layer the embossed white and silver card together

Cut and Emboss the entire Imperial Square die set with white card stock
Using foam tape layer this with a slightly larger piece of silver card
 From the four smallest dies cut each one four times in silver
 Then onto the silver and white embossed layers add the four largest ones into each of the corners
 Next take your silver and filigree layer and add it to this panels making sure it is centred and level
 With the four smaller corners add them to a white centre shape securing with glue on the back.
Add this panel to the card front with foam tape for dimension.
 Wrap all these layers with white ribbon and they can now be added to the base layer and the ribbon workings will be hidden in between these layer.
Cut Congratulations from Sentiments One and add it to white card

Using the centre part of the Imperial Square die set cut the word panel and then trim to fit the centre of your card.
 Take the second piece of white embossed card and add it to the inside of the card to line it
I have also cut another Imperial Square and trimmed it down to fit as a pocket inside the card
Glue three sides leaving the top part open and into this slip a label shape that can be used as a greeting or for your signature.
When you are adding words to your label a good tip is to use a ruler and the grid lines on your cutting mat to help you get them straight and line them up equally on either side of your card
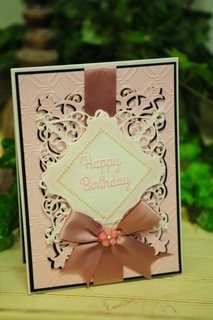 And here is a second card using the same die in another way and this will be featured in a later post complete with instructions on how to make it
For you chance to win click HERE fill out the entry form and submit ... Good Luck (The link is only open for 48 hours)
(This link is now closed)
For the Official Contest Rules click HERE
Questions ? Contest Questions (No entries will be accepted at this email address)
To see other projects and for more chances to win please visit Debbie Olson at Thinking Inking to start this brand new "Give Away"
Add this panel to the card front with foam tape for dimension.
Cut Congratulations from Sentiments One and add it to white card
Using the centre part of the Imperial Square die set cut the word panel and then trim to fit the centre of your card.
I have also cut another Imperial Square and trimmed it down to fit as a pocket inside the card
Glue three sides leaving the top part open and into this slip a label shape that can be used as a greeting or for your signature.
A Designers Note...
When you are adding words to your label a good tip is to use a ruler and the grid lines on your cutting mat to help you get them straight and line them up equally on either side of your card
(This link is now closed)
For the Official Contest Rules click HERE
Questions ? Contest Questions (No entries will be accepted at this email address)
To see other projects and for more chances to win please visit Debbie Olson at Thinking Inking to start this brand new "Give Away"
More tomorrow ...
Hugs xx


