Beautiful Card Designs Made Easy

June 26, 2015

Friday Freebie 065

Hi Everybody,

After the ten blue cards I offered in last weeks freebie I thought I would go back to pink with flowers, ribbon and pearls for this Friday Freebie

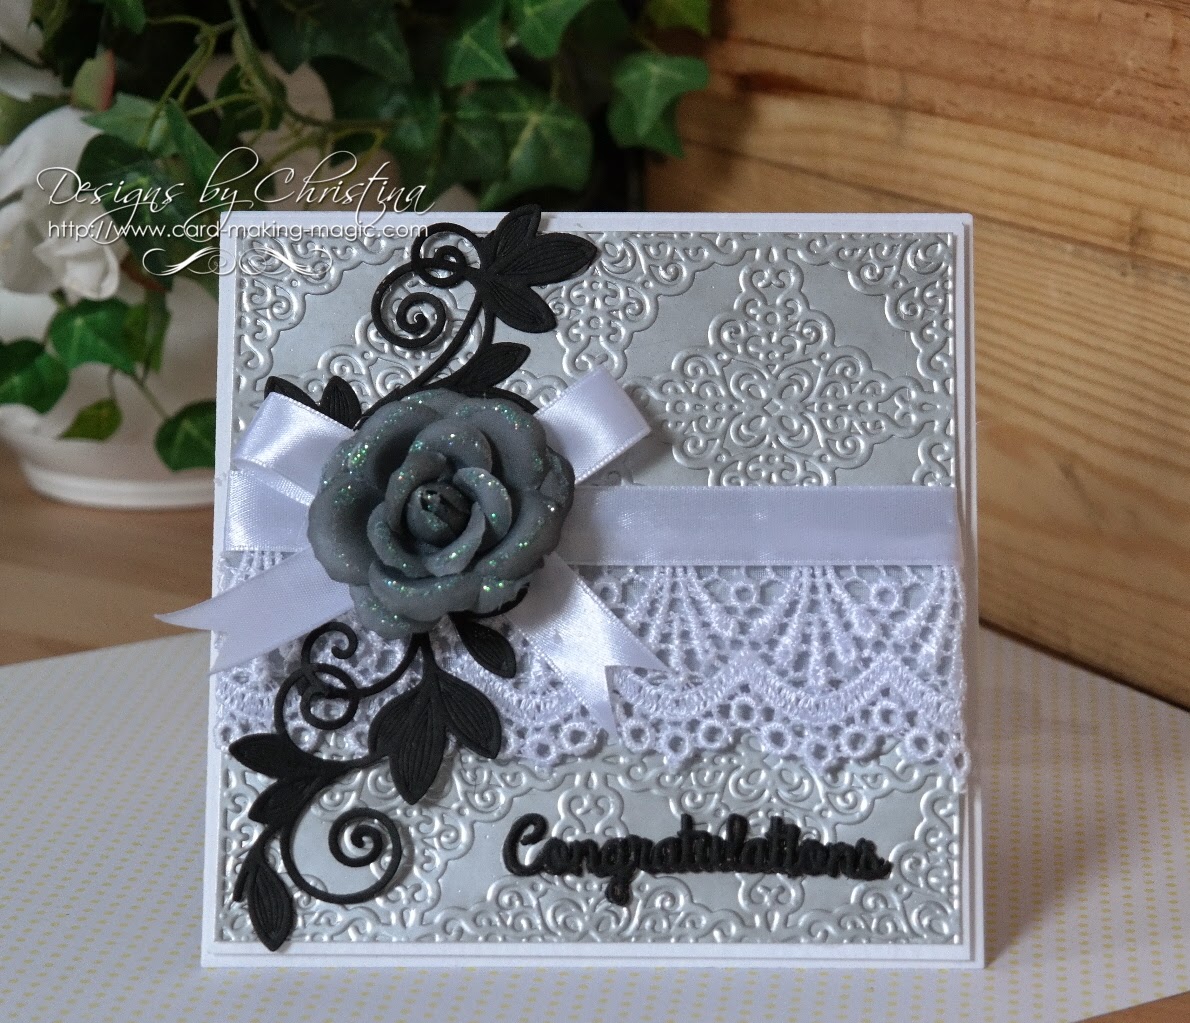
So this one is layered up and used  Tranquil Moments from Spellbinders and  Napa Valley   from Creative Expressions dies and I have used lots of foam tape to give the card dimension.

The background is Pink Centura Pearl card from Crafters Companion  that has been embossed and the inside is lined in the same card

The flowers are as always from Wild Orchid Crafts and are a selection of Roses, Tulips, Cherry Blossom and Cosmos Daisies

If you would like to own this card then please join the group of followers and leave me a comment to let me know that you have visited.

You will need to come back in the morning to see if your name is listed and then you will have 48 hours  in which to claim the card.

I need your full postal address please,  complete with Country and Zip/Postcode,  to be able to send you the card


More tomorrow ...

Hugs xx

June 25, 2015

Holiday Samples ...

Hi Everybody,

Here are a couple of my card samples that where shown on Create and Craft last week when Kim Hupke  was over from the US showing you the Holiday 2015 dies

These new dies are so pretty and can be used at any time of the year ... not just for Christmas.

This one is the Gingerbread Card front but these dies are exclusive to   C&C   for a few weeks ... and many of them sold out in the shows.

But they will be back again so keep a look out for them.

This was the Gingerbread House and I cut it twice and layered it on to Kraft card

The white card at the bottom is Glitter card and is sparkly white.

More tomorrow ...

Hugs xx

June 24, 2015

Craft Stash ...


Hi Everybody,

A little while ago I was asked to join the on line design team for Craft Stash. 

This is a new company that are bringing crafting supplies and goodies to the UK market.

They have brought out their own brand of dies called  Apple Blossom Dies  and I added a link to them in the right hand side bar for you to see

More dies will be added as they become available.

This card features the Ornate Heart  and it is very ornate.

I made the card in white with a deep blue and added in some matching ribbon and a diamante centre for the bow.

The base to the card is created with the  6x6  Matting Basics A&B  and the A4 embossing folder from Spellbinders

The sentiment is one that was free with Simply Cards and papercrafts magazine a few months ago

More tomorrow ...

Hugs xx


June 23, 2015

Tuesday Tutorial - Lace & Frills Birthday Card

Hi Everybody,

Do you have those moments when you need to make a card and you can't think what to do?  This pretty card is so easy to put together and takes no time at all.  I have used the large texture plate from Spellbinders and coupled it with an embossing folder. Very quick, very easy and very pretty too.

Spellbinders Supplies:

Other Supplies:

Wild Orchid Crafts -  Flowers, Lace
Mei Flower -  Ribbon,
Want2Scrap -  Pearls, 
Embossing powder

Instructions:

From the outer square #2 cut two panels in white for your base card and create a hinged card

Hand cut a slightly smaller panel in silver and another slightly smaller still in pink and emboss the top pink layer

Cut another piece of white card slightly smaller than the pink layer and this is the piece we are going to use.

Load a brayer  with the Cotton Candy Ink and roll it over the texture plate ensuring that it is all covered.

Lay the card flat on top of the plate and pass it though the Grand Calibur as an embossing sandwich 

Then quickly remove the card from the plate and while the ink is still wet sprinkle it with embossing powder and heat

The powder will stick to the wet ink  and give you a lovely effect. I used a sparkly powder.

With some sharp scissors,  or your craft knife, carefully trim around the pattern on one side and then trim again to fit the pink embossed panel from the previous step

Leave as much depth as you prefer to allow the embossed panel to show

Wrap these layers with ribbon and lace and place foam tape on the back to give dimension

Add to the silver card and the base card

Create your bow and add to the front in the position you like and add in flowers to the knot.  Add the sentiment of your choice and there you have a very pretty card for you to send with love.

Designers Tip:

Change the color and leave the panel complete for another look to this card.

Or if you are really pushed for time simply use the texture plate to emboss the silver card and miss out the other steps.

Your card will be just as lovely whichever you decide to do.

I hope you have enjoyed this tutorial 


More tomorrow ...

Hugs xx


June 22, 2015

Having fun ...

Hi Everybody,

You will have to forgive the abundance of water colored cards but I am having so much fun with these new Aqua Tints from Spectrum Noir that I can't stop

The stamps are all new too and I bought all of them from  Make The Day Special  and they are mostly stamps from Altenew

This one is called Sketchy Rose and it is lovely.  The sentiment is from Sentiments and Quotes  and there are lots on one stamp sheet

Along the bottom I have added some ribbon and lace and tied a little bow with satin ribbon from Mei Flower

The little pink pearls from Want2Scrap are dotted around the card ... but just a few.

The bows centrepiece is from Wild Orchid Crafts and matches in with the color scheme perfectly

I think it does me good every so often to step away from the style I am  used to and try something different.

 Brings a new freshness back to my crafting and then I am ready to come up with some new ideas to share

More tomorrow ...

Hugs xx