Beautiful Card Designs Made Easy

Showing posts with label Spellbinders. Show all posts

August 02, 2017

Finest Vintage from Die Cutting Essentials

Hi Everybody,

Tomorrow sees the new Die Cutting Essentials magazine on sale and this is issue 27.

The free gift this month is a beautiful die to create a wine bottle and glass that would suit both male and female cards

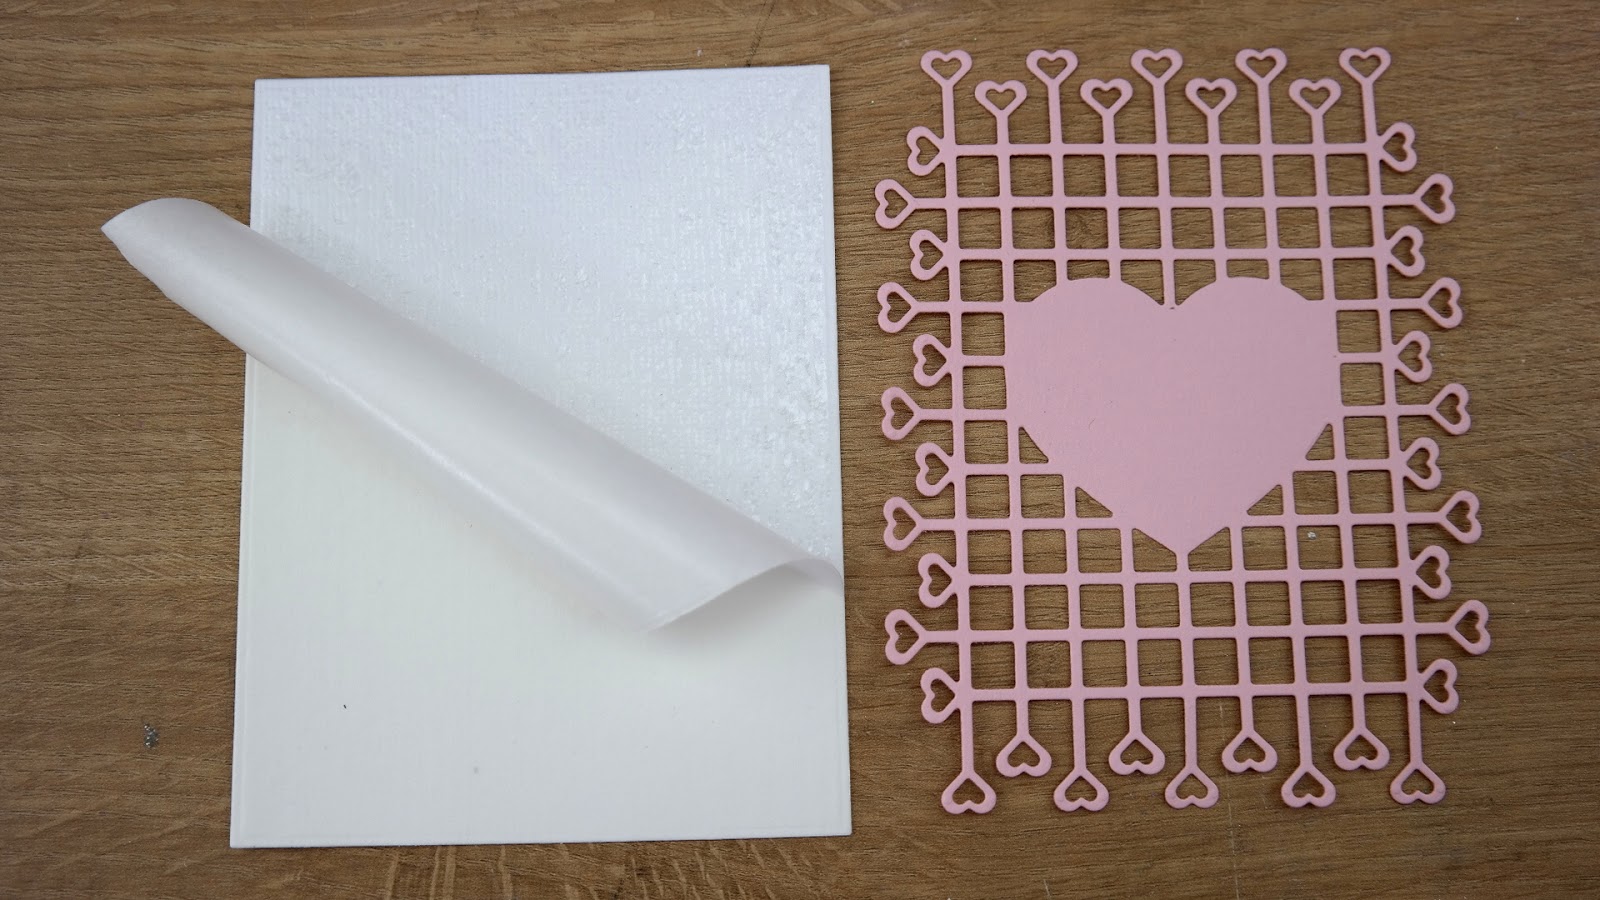
The card to the right uses the filigree part of the die as a stencil and I really like the look of this little card

The video to show you the making of a wine bottle shaped card is here ... 
Next week 10th August Simply Cards and Papercraft will be on sale and the free gift with that is Lavish Labels and that set perfectly compliments the bottle with this gift.

One of the die cut labels can be seen on the bottle on this card and there are several stamps to help you personalise the card also

So look out for the magazines on the shelves in selected supermarkets and crafts stores

And have fun playing with the gofts to make cards for the wine lovers in your family

More tomorrow ...

Hugs xx

August 01, 2017

Tuesday Tutorial - Spellbinders Trailing Hearts

Hi Everybody,

This pretty card is created with only two dies from Spellbinders and a little bit of glitter to add some sparkle. Very quick and easy to do and with a few flowers I think it is very effective
Spellbinders Supplies:
  • S5-314 Trailing Hearts
  • S5-131 A2 Matting Basics A
  • PL-001 Platinum Die Cutting Machine
Other Supplies:
  • Diamante Flourish from Want2Scrap
  • Tonic Nuvo Glitter
  • Flowers from Wild Orchid Crafts
  • Dymo Label Maker
Instructions:
With the largest die from Matting Basics A cut two panels in white to create the base card
Add double sided sticky sheet to another piece and cut this to the same size
With Trailing Hearts cut one piece in pink 
And add this to the sticky sheet pressing down to adhere it all
With the silver glitter sprinkle some to the double sided sheet making sure to press it into all the open spaces in the die cut
Add foam pads to the back and add it to the base card
Trim to leave a small border around the edge
 Cut three Hearts from the smaller filigree piece and stack them together for thickness
Add to the centre part of the pink die cut
Dress with flowers as you like 
From the Diamante Flourish cut several pieces to add behind the flowers.
(I kept them attached to the carrier sheet and simply glued that in place)
Create a sentiment with the Label Maker and add to the  stacked Hearts

More tomorrow ...

Hugs xx


July 27, 2017

New Pretty Quick Dies ...

Hi Everybody,

I have been really busy this week with some of the newest dies from Craft Stash. These are part of their Pretty Quick range and these will be on sale TOMORROW on the Craft Stash website.

But these videos will give you a preview of what there is and some ideas of what you can do with them.  I am showing you one card from each collection.

The first one is this Pretty Quick Stained Glass Robin   and in the video I have given you several ideas that you may like to try.

This one is my favorite and I simply used the die cut, done in gold card, as it is and added it to some white card with a Distress Ink effect added

I then coloured behind the Robin with alcohol markers and then added another gold die cut over the top.
For the video  Pretty Quick Stained Glass Wise Men   I used the die cut as a stencil to create a soft pastel card.

But the card shown here is how to keep them simple and easy to make .. no techniques just gold die cuts and white card for an elegant look to your Christmas card

This was the one I created from making a stamp with the die
with the Pretty Quick Stained Glass Candle

This is a soft water colour and I really liked this one once it was done.

I shall keep this one to send to someone over the Christmas period

And last but not least for this card I  used the
 Pretty Quick Stained Glass Angel  to create this card with a stencilled background

So there you have four videos to view and the dies will be on sale tomorrow .. Friday ... with Craft Stash

More tomorrow ...

Hugs xx


July 21, 2017

Friday Freebie 28

Hi Everybody,

Here we are again with another Shabby Chic card on offer

This one is a Birthday card and the inside is lined.

It is a lilac and lemon colour way and the photo does it no justice at all.

It really is much better in the hand and I don't think you will be disappointed with it

If this is a card that you would like to have then all you need to do is leave me a comment at the end of the post.

Tomorrow a name will be chosen at random from those comment s and announced in the blog post
So as I always say if you add your name then be sure to come back and check if it is you who has won the card.

More tomorrow ...

Hugs xx

July 18, 2017

Tuesday Tutorial - Spellbinders Venice Lace

Hi Everybody,

The card I made for todays tutorial features one of the new dies from Becca Feeken who is a designer for Spellbinders. This is her beautiful Venice Lace Collection and it is so intricate and elegant.
I didn't have card in the shade of pink that I wanted so I used Picked Raspberry to blend white card for my backgrounds and flowers
Spellbinders Supplies:
  • S5-131 A2 Matting BasicsA
  • S5-311 Emmaline  Venice Lace
  • S4-792 Cinch and Go Venice Lace flowers
  • PL-001 Platinum Die Cutting Machine
Other Supplies:
  • Distress Ink from Craft Stash
  • Pearls from Want2Scrap
Instructions:
With the largest die from Matting basics A cut two pieces in white card 
Score down one of them by about half an inch 
Add glue along this small scored panel and add the two cards together to create the base
Cut another panel in white slightly smaller
With a blending tool ink over the panel with Pocked Raspberry to create an Ombre effect and leave to dry
With both parts to the Venice Lace Emmaline die cut one in white
Add mini foam pads to the back of each of the tiny flowers
Add to the Ombre panel
Cut as many flowers and leaves as you like and with Picked Raspberry ink through the die to the flowers before you remove the card
Shape the petal with a ball tool to give dimension
Assemble the flower with a Brad and off set the petals as you go
Stamp a sentiment of your choice and sketch a black line around it
Cut out into a banner shape and add larger foam pads to the back
Assemble the pieces by adding the Ombre Vnice Lace panel to the base card
Add the sentiment where you would like it and arrange your flower and leaves to the left side of it
Add a pearl to each of the flower centres in the Venice Lace

More tomorrow ...

Hugs xx

July 14, 2017

Friday Freebie 27 - Shabby Chic

Hi Everybody,

Here is another of my Shabby Chic cards

This one is in pink and blue and has lots going on with it.

It is not lined but never the less it is a pretty card that you may like to have in your collection.

So if you would like this card then all you need to do is leave me a comment.

From those comments a name will be drawn at random and announced in tomorrows blog post.

So if you add your name then you will need to come back and check if it is you

More tomorrow ...

Hugs xx


July 11, 2017

Tuesday Tutorial - Imperial Square

Hi Everybody,

Todays card is really pretty in pink and white and shows the versatility of turning a square die into something other than it's intended. Use any embossing folder that you have to add some texture to the card.
Spellbinders Supplies:
  • S6-021 Imperial Square
  • S6-001 5x7 Matting Basics A
  • S6-002 5x7 Matting Baiscs B
  • S2-082 Happy Birthday 
  • SEL-006 Embossing Folder
  • PL-001 Platinum Machine 
Other Supplies:
  • Papermill Direct Card
  • Craft Stash Foam sheets
  • Cosmic Shimmer Glue
  • Mei Flower Ribbon
  • Wild Orchid Crafts Dazzler
Instructions:
With Matting Basics A die #7 cut two pieces in white for the base card
With Matting Basics B die #7 cut one piece in black
With die #6 from the A set  cut one in pink and emboss this piece in any folder that you have
With the largest die from Imperial Square cut two pieces in black and pink
Cut these two in half  trim to fit the front of the layers from the previous step
And layer them one on top of the other to leave a shadow effect
Add foam pads to the back of these panels and add to the embossed layers
Wrap with pink ribbon to cover the join and secure on the back of the card.
Add these layers to the base card
Cut  the corner pieces and the centre piece in white and add a corner to each side panel 
Ink through the die to the centre piece in pale pink

Add foam pads to the back 
Add at an angle to the centre of the card and add the Happy Birthday sentiment to the middle of the panel .
Add a bow with the same pink ribbon and place a centre piece to cover the knot.

More tomorrow ...

Hugs xx

July 07, 2017

Friday Freebie 026

Hi Everybody,

This really pretty Shabby Chic card is the one on offer this week and it is in lovely shades of lilac and lemon.

There is a mixture of flowers all sparkled up and they surround a picture frame.

I really love this card and it is much better in the hand.

So if you would like to win this one then all you need to do is leave me a comment at the end of the post.

I really must stress that you come back tomorrow to check is it is your name that is shown as you will need to email me with your details if it is.

Sadly the pretty Owl card form last week has not been claimed and so I will offer it again at a later date.

I am giving you 72 hours to claim it so I think that is more than fair.

After that time it will be too late and it will go to someone else at another time

More tomorrow ...

Hugs xx

July 04, 2017

Tuesday Tutorial - Spellbinders Milan Medallion

Hi Everybody,

A really quick and easy card today that you can achieve with any embossing folder in your collection.
I have used the Doily Art from Spellbinders but sadly it is no longer on their website though you can fine it if you search for it.
Spellbinders Supplies:
  • S6-099 Milan Medallion
  • S4-114 Standard Circles
  • S4-115 Scalloped Circles
  • SCF-003 Doily Art Embossing Folder
  • PL-001 Platinum Die Cutting Machine
Other Supplies:
  • Flower/Lace/ Leaves from Wild Orchid Crafts
  • Glitter from Glitter Magic
  • Sentiment from Lily of the Valley
  • Card from Papermill Direct
Instructions:
With Matting Basics A cut two of the largest die in dark blue card and create the base
With Matting Basics B cut one layer in white from the largest die
Hand cut a piece of blue Mirror card to fir the white layer and leave a small border around the edge.
Emboss the mirror Card in the folder
With #2 from the Milan Medallion cut two layers in the dark blue card and stack together
Stamp and heat emboss the sentiment and cut out with the plain die
Cut a Scalloped circle and layer together
Glue together the Mirror Card and the white panel and wrap with the lace before adding to the base card
Dress with roses in two sizes and two shades of blue
Add the circle sentiment to the card front
Sparkle the flowers with glitter

More tomorrow ...

Hugs xx


June 27, 2017

Tuesday Tutorial - Combining Spellbinders

Hi Everybody,

For todays card I am going back to some of the older dies that you may have in your collection and I am combining several sets to produce my design.  I have used a pretty lilac and white colour scheme and added in the flowers.
Spellbinders Supplies:
  • S6-001 5x7 Matting Basics A
  • S6-002 5x7 Matting Basics B
  • S6-012 5x7 Mystical Embrace
  • S4-647 Labels 56 Deco Elements
  • S4-646 Labels 56
  • S4-328 Foliage
  • SEL-009 Chicken Wire EF
  • S1-026 Flying Bugs
  • PL-001 Platinum Die Cutting Machine
Other Supplies:
  • Flowers from Wild Orchid Crafts
  • Glitter from Glitter Magic
  • Card from Papermill Direct
Instructions:
With die #7 from Matting Basics A cut two pieces in white card to create the base
With die #7 from Matting Basic B cut a layer in lilac and emboss this layer with a 5x7 folder
With the largest die in Mystical Embrace cut a layer in white
With die #3 from the Deco Elements cut one in white
And with die #4 from the [plain label;s cut one more in white and emboss the top layer
Stamp and emboss a sentiment
Cut tow butterflies from Flying Bugs
Cut several large leaves from Foliage
Select the flowers to match your colour scheme. 
I have used from the left ...
Roses in two sizes, Rosebuds, Cherry Blossom and Lily
Add the layers to the card with foam pads between the layers
Arrange the flowers and sprinkle with glitter
Add pearls as preferred

More tomorrow ...

Hugs xx