Beautiful Card Designs Made Easy

June 27, 2016

Pretty Balloons ...

Hi Everybody,

So today I am adding in an extra YouTube video using those Brusho Crystal Colours  again for a fun effect

You will need some oval dies as well as the Brushos and some water coloured card.

I used some silver thread as the strings to my balloons but you could always draw them onto the card if you preferred

And to create the shine I used Glossy Accents.

The Video tutorial is called Oval Balloons and Glossy Accents  and it takes you step by step through the process to create these cards.

It's really easy to do and the longest part is waiting for the Glossy Accents to dry.

Don't be tempted to speed up the process with your heat tool though or you will spoil the effect.

Patience is a virtue !!
.
I hope you will give this try and there is another fun idea coming up on  my YouTube channel Thursday 30th June

More tomorrow ...

Hugs xx


June 26, 2016

Altered Box - Stage 2

Hi Everybody,

Last week I told you about a box that I have found in my garage

I sanded it all down and added in a coat of Gesso and that completed Stage One


I have now moved on to the next stage.

For this I have coated it all in Deep Teal acrylic paint and allowed it to dry.

My plan was to give it another coat but as it dried it was all streaky and it looked amazing and so I decided to leave it as it was.

Once the paint was completely dry I took some Gilding wax in Pewter and with a soft cloth I rubbed it into the grain of the wood

I wanted to maintain the streaky look and so I add the wax in long strokes to both the inside and out
I buffed all the wax up to a soft gleam with a cloth and once the light catches it it looks lovely and I am very happy with it so far 

I still don't know what I will use it for yet but I am enjoying the process.


More tomorrow ...

Hugs xx


June 25, 2016

Todays Winner,

Hi Everybody,

Today the sun is shining and it is lovely to sit outside. I wish it would last for a few weeks now so that at least we can feel that we have had some summer.

My eldest Granddaughter is coming home for a  two week visit from her work experience in Australia later in July and so I am hoping for some good weather then, and maybe we can have a BBQ for all the family.

The draw has been done for yesterdays pink card and the name chosen at random this week it you ...

Isabel Gunter 
could you please let me have your postal address to
christina@card-making-magic.com
and the card will be on its way to you straight away

Please let me know when it arrives with you and I hope that you will like it.

More tomorrow ...

Hugs xx

June 24, 2016

Friday Freebie 124

Hi Everybody,

This week the card on offer is the pink one featured in a Tuesday Tutorial - Mary Border Strip

The card is 5x7 and it has a birthday verse inside it

Maybe this is a card that you would like to have and can make use of.

If it is then all you need to do is leave me a comment at the end of the post.

From those comments a name will be drawn at random and notified on the blog in the morning.

It would be really nice if you would join the band of followers too and comeback regularly to see what is happening.

If you add your comment then you will need to come back to check if it is your name that is added to the Saturday blog post.

More tomorrow ...

Hugs xx


June 23, 2016

Creating a Chalk Background ...

Hi Everybody,


Many of us have pastel chalks in our crafting stash and they have been there for ever.  They just never seem to run out.

Or maybe you don't use them much these days preferring other mediums to create your designs.

Well I thought I would put them to good use and make a card using them for my background and make a little video in the process

It has gone "Live" today on YouTube
Create a Background with Chalk

This is the card that is in the video but here is another that was done with the same chalks just a different colour
The chalks I have used are "Siesta" but I have had them so long I don't remember where I git them from so shop around for the best price

You can also buy a fixative in a spray that will stop the chalk from rubbing off the card but I find I get them same result with a cheap hairspray ... so save your self a bit of cash !!

The results are very pale but that just adds to the beauty of the card and I quite like both of these

I have added the links at the bottom of the page for you to see what the products are but shop around for the chalks and get the best set you can afford ... depending on how much you think that you will use them.

I also have a page on my website    Using Chalks    that can show you other ways in which to put chalks to good use.

More tomorrow ...

Hugs xx

June 22, 2016

Water Colour Wednesday - Altenew Persian Motifs

Hi Everybody,

The lovely stamp is from Altenew and is the Persian Motifs.

I used the new Zig Clean Colour Real Brush Pens that I bought last week.

This card is an A2 size
                             

I coloured the flowers on water coloured card and then used the matching die to cut them out.

I bought both of mine from Sevenhills Crafts  which is a UK company

The pens are a pleasure to work with and the colour spreads really well because they have " Real Brush" ends.

Over the top of the colour I added in Wink of Stella clear glitter pen and that adds the sheen that you can see in the picture.


The second card is a 5x7 and I have used Grate Effect from Spellbinders for the background and both are bright and cheerful cards

More tomorrow ...
 Hugs xx


June 21, 2016

Tuesday Tutorial - Arched Swallowtail

Hi Everybody,

For todays tutorial I am featuring some of the new dies from Becca Feeken.  These are all beautiful and designed as part of Beccas wedding theme. But they can be used for any occasion and give you really intricate cards.
Spellbinders Supplies:

Other Supplies:
Instructions:
With die #7 from Matting Basics A cut two panels and create a hinged card 
With die =7 from Matting Basics B cut one panel in silver card
With #6 from Matting Basics A cut another white panel and emboss in any folder that you have
With dies #3 and #4 cut the largest in silver and the smallest in white card
With the largest Tag from the Deco Swallowtails cut a panel in silver.
Layer all these panels with foam pads in between
Using the Thank you from the words set cut it in black and again in foam and add the two together.

Assemble your card by adding the layers to the base card and then add the tag on top with foam tape
Add in a double white bow and add the glittery centre to cover the knot 
Decorate with white flowers and green leaves and add glitter for extra sparkle

More tomorrow ...

Hugs xx

June 20, 2016

Altered Box - Stage One

Hi Everybody,

After clearing out the garage and getting rid of garbage I found this box tucked away at the back of a shelf.

It just called out to me ... "Don't throw me away ..." and so I brought it inside.


 It was really dirty but I knew that I wanted to do something with.

At this precise moment I don't know what I am going to do with it but I have the old brain whirring around with ideas


The first thing I have done with it is clean all the dust and cobwebs off and it is looking so much better already

I have sanded it all down to a nice smooth finish both outside and inside and then got rid of all the dust

I decided to add a coat of White Gesso to it all as a base for any other colour that I wanted to add but that is as far as I have got with it so far


It really is quite a sturdy box and once I get some ideas going for it I will get to work and show you bit by bit what I have done to it.

So watch this space

More tomorrow ...

Hugs xx

June 18, 2016

And the Winner is ...

Hi Everybody,

Well here I am early this morning and the sun is shining today. We are taking a trip up to Windermere later and enjoying a day out.  So I needed to get the draw done before I go and find a new home for the pink and turquoise card from yesterday.

A name has been chosen from those of you who left me a comment and the the winner is ...

Linda Simpson
can you please send me have your postal address to 
christina@card-making-magic.com
and the card will be on it's way to you straight away

Please let me know when it arrives with you and I hope that you will like it

More tomorrow ...

Hugs xx

June 17, 2016

Friday Freebie 123

Hi Everybody,

A really bright and cheerful card is on offer this week and this was created with water colours in a random application

It has lace and pearls around the upper part and is dotted with pink pearls.

In the bottom right corner is a metal embellishment and this ... the flowers, lace and the dove are all from Wild Orchid Crafts

The pearls are from Want2Scrap

The inside is lined on this card and it could suit many occasions as well as a "Just Because" card" or it could simply be framed as a wall decoration

If this is a card that you would like to have then leave me a comment at the bottom of the post.

A name will be chosen at random from the list and the winner announced in tomorrows blog post. Please come back and check if it is you who has won.

More tomorrow ...

Hugs xx


June 16, 2016

Bokeh Effect Card

Hi Everybody,

Todays little card is created with water colours and this is the Bokeh Effect.

Bokeh simply means blurred and it is a term used in photography when the light is blurred in a photograph

It is really easy to do and I have a video on  YouTube  that will show you how I made this card

I hope you will pop over to view it and then try this for yourself in different colours to vary the look.  And you will never get two that look the same no matter how hard you try

Bokeh Effect Card  can be done with any watercolours that you have and you are sure to like the result.  It will be trial and error for you until you find a really white ink that stays white as you stamp it.

The best one for me is the Colour Box Pigment Archival Ink called Frost White.

It is really juicy and great for heat embossing with as it stays wet for a long time.

So be careful you don't smudge it once you have used it  ... maybe dry it with your heat tool before you move onto the next step.

More tomorrow ...

Hugs xx


June 15, 2016

Water Colour Wednesday-Tilda & Edmund

Hi Everybody,

Today I have used another old stamp that I have had for quite some time.

I have coloured Tilda and Edmund with Gansai Tambi colours and made it into an A2 sized card. I used a white gel pen to add white spots to Tildas coat.

The background piece is from Tonic-Gold and is the Sunflower Array

I have layered it over some red spotty card from AnnaMarie Designs

The red pearls are from Want2Scrap 

The   Hello  sentiment is a die cut that I have cut three times in black card and glued the layers together

They have been covered with Glossy Accents to give them the shiny look  and added to the front.

Pretty little card for no special occasion at all ... Just to say Hello!!

More tomorrow ...

Hugs xx


June 14, 2016

Tuesday Tutorial - Labels 33 and Lonely Hearts

Hi Everybody,

The Lonely Hearts set was one of the dies introduced in the Laced With Love Collection by Spellbinders last year and it comes in two parts.  
Each can be used separately to cover different things that you may wish to do, or they can be coupled together to give you a complete panel to add to your cards
Spellbinders Supplies:
Other Supplies:
With die #8 from matting basics A cut two pieces and  create a hinged card
With #8 from the B set cut one panel in Ivory Card.
Hand cut in gold a panel that will sit between these two
(Please remember that die #1 is always the smallest)
With the inner patterned section of the Lonely Hearts die decide which side of the  Ivory panel you want the pattern to be and then die cut  ... no need to emboss at this stage 
Once cut add it to your folder and then emboss the panel. I used the Happy Birthday folder
Once it has been embossed the card may  have spread a little and you will need to trim it to fit on top of the gold panel that you have
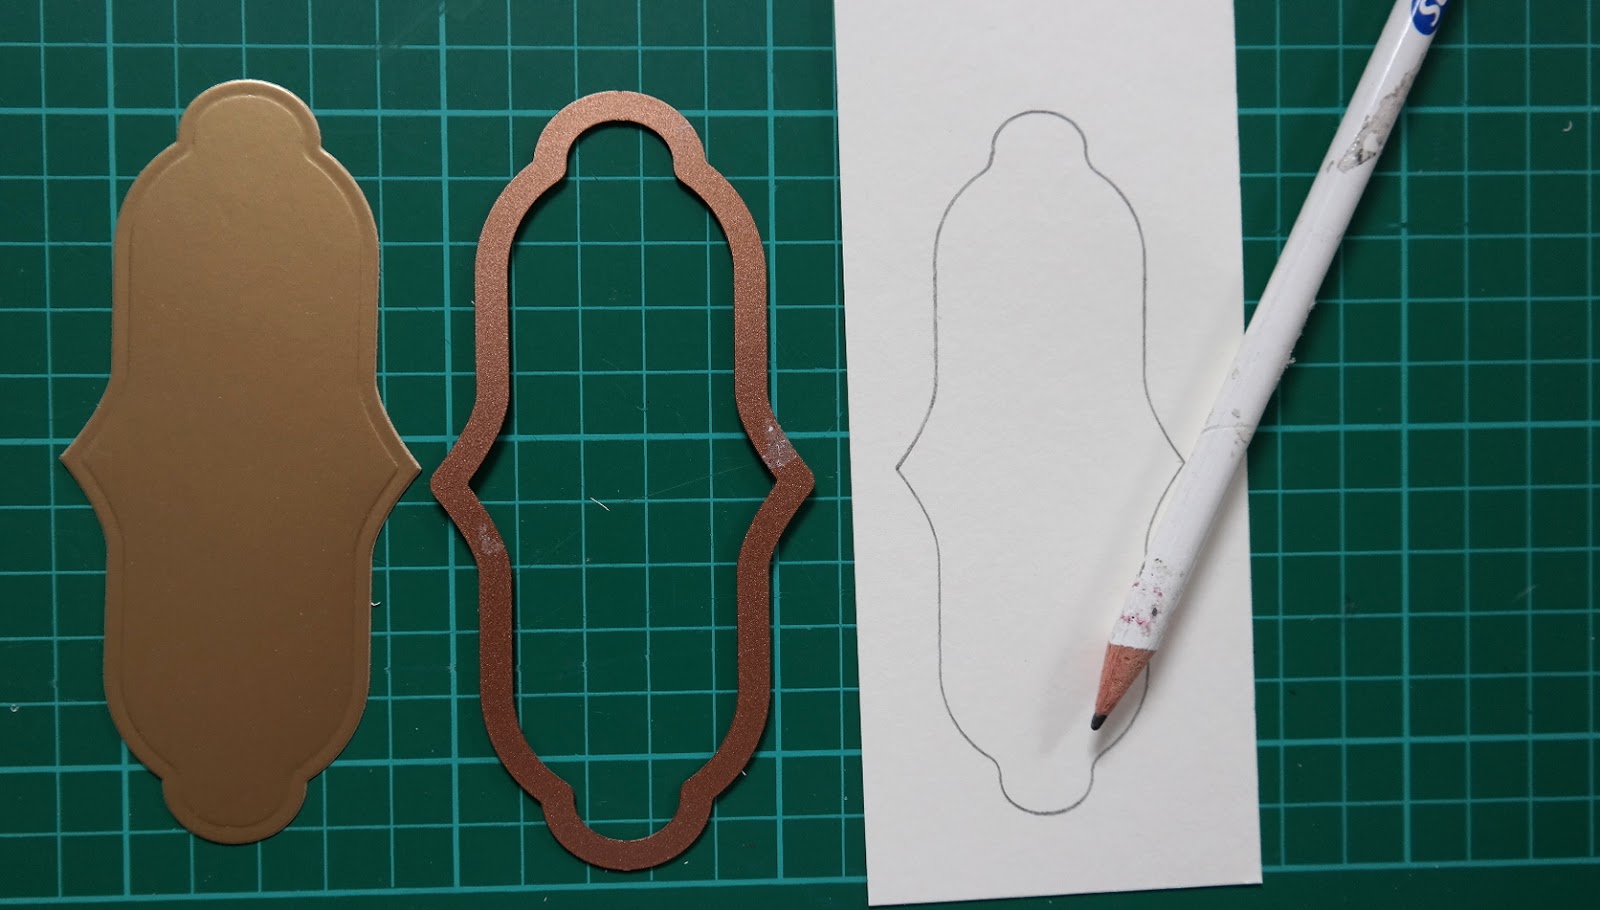
With die =4 cut one panel out in gold and then on some Ivory card draw on the inside of the die to create a smaller panel.
If you are not quite sure what to do the the video  Faux Nesties   will show you 
Add foam pads to the back of the die cut and embossed ivory layer and add it to the gold panel
Wrap both of these with cream ribbon and glue on the back then attach them to the base card with more foam pads  
Add the bow into the centre of the patterned panel as shown and add a pretty centre over the knot
Add the largest of the Label 33 to the plain side of the card front and layer with the smaller panel to leave a small border around the edge.
Vary the side where the patterned panel will be, vary the colour choices, add in different flowers, vary the sentiment and each time the card will be fresh and pleasing for you to send to your recipient

More tomorrow ...

Hugs xx