Beautiful Card Designs Made Easy

April 18, 2012

Triple Twisted Easel

Now that's a bit of a tongue twister on the quiet but the card isn't .... it's very easy to do and there are full instructions if you are new to this kind of fold.

The Triple Twisted Easel Card   has step by step instructions and you can add the twist in whichever way you want.
Have them all going one way,  or one of the easels straight while the others are turned.  But whatever you do the card will look different each time. 

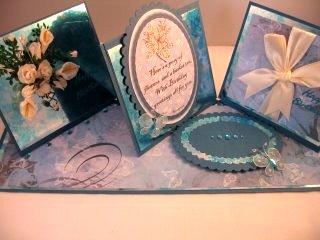
I have used Mirror card on my base and some lovely turquoise paper that was free with a magazine, and there is a mixture of flowers on one of the easels and some silk ribbon on the other side.

Spellbinder ovals have been used as the stop on this card and gemstones dotted aound the shape.  You can just make out the small organza butterfly resting on the base.

Another version tomorrow

Hugs xx


April 17, 2012

Triple Easel Card

Now after a few days of creating Easel cards in several different variations we are starting to get a little more daring.

This one is the Triple Easel Card  and now we are getting adventurous.

This one is very pretty in pink and the flowers on this are from   Wild Orchid Crafts  and they are trailed down the card to act as a stop for the easel.

The leaves are from the Ash Branch punch from  L-Em

A lovely wide organza organza ribbon is tied in a bow.

Once again I have featured the Butterfly from Marianne Creatables, with a large oval gemstone for the body

The lovely sentiment is from     ClarityStamp  and is one of many that are on the website.

Another variation tomorrow.

Hugs xx


April 16, 2012

Double Twisted Easel

To continue with the making of Easel cards this one is the   Double Twisted Easel 

Again if you are a seasoned cardmaker then my apologies for the basics, but not everybody knows how to create these different folds and it is for those folk that I add these steps.

 These cards were made quite a long time ago and it is interesting for me to see how I have progressed in card making.

I don't make them quite the same anymore and my flowers are much more elaborate these days.

But the Spellbinders are still in use although now I have learned how to make them work harder too.

But the method to making the card is the same whatever standard you are at.

I really don't remember where the flowers are from but I tell you what.... I am glad I have none left as they seem so flat and boring.

The image though is still in use and is one of the adorable Tilda characters and she  has been coloured in with Promarkers.

More tomorrow with the Triple Easel Card

Hugs xx

April 15, 2012

Double Easel Card

The previous days have been about getting the look of Easel Cards and twisitng them as you go along.

So today is the turn of the Double Easel Card  ...  which is just as easy but a little more interesting.
,
I have used a large die cut Butterfly from Marianne Createables and some hot pink ribbon with butterflies in it to match.
Self adhesive pearls create the butterfly trail and a template from Bassill Basics was used to get it correct

Using a template  to get the effect will help you to place the pearls or gems neatly in the position that you want them.

The Easel stops have been created from the sentiments to suit the occasion and thay are raised onto foam pads so that they will keep the easel open.

Tomorrow the same card will be Twisted for yet another look.

Hugs xx


April 14, 2012

Twisted Easel Card

Here is the Twisted variation on yesterdays card and this is just as easy to do with very little effort.

The butterfly is a large die cut shape, from Marianne Creatables,  and it has been sprayed with Spray and Sparkle from                         Crafters Companion
The flowers are from my "Stash" and they have also had a light spraying,  and Card Candi added to the centres

The Scalloped Oval is cut from Spellbinders and around the edge I have wrapped some silver twine.

The papers are some that I designed and they are there for you to use on the webiste. The link will take you to the page if you would like to try some   Free Backing Papers

Tomorrow is the turn of the Double Easel Card

Hugs xx

April 13, 2012

Easel Card

This week I thought I would go back to basics with a card fold that is very popular,  and one that is very easy for those new to cardmaking. 

Then over the week I will show all the ways  to make this card ... right up to the four variation.

The image is from  the Back to Nature CD from  Polka Doodles  and it has been decoupaged on to the front of the easel.


So this is the Easel Card in it's simplest form.  It can be made to any size you like by just folding the card in half and then folding one of those halves in half again.   The link is to a short video tutorial. 

If you are a seasoned cardmaker then you will know exactly what to do to get this look, so I apologise if it seems I am being too basic.

But there are new starters to this hobby everyday and they don't know where to start.

I get emails from lots of people asking me to start at the begining and that is what I try to do, and they can find many many projects and card folds at   Card Making Magic

The flowers on this card are from my "Stash" but the metal spacer centres are from The Hobby House   and they have been attached with Pearl Brads.

The Twisted Easel will be tomorrows card ...

Hugs xx

April 12, 2012

Blog Makeover ...

This is the first day of the new look to my Blog and  I am really delighted with it.

It is just how I pictured it would be and I want to say a big "Thank You" to Katie Price who has put in the work to create the look. 

I like all the elements that have been added staying with the theme of Flowers, Ribbons and Pearls and the page is clean and fresh.

Please feel free to grab the button to the Blog,  and I would be thrilled if you added it to your page.

All you need to do is right click  the link under the button that you would like and select all , copy  and paste it into your own blog page ..... Please ... Pretty Please!!

So at the moment I am happy to just gaze at it and tomorrow I will start adding some new stuff to the pages.

I hope you like the look and will come and visit more often... and if you are looking for a new look to your own Blog then check out    Priceless Design Studios  and let Katie help you come up with your own individual style.

Hugs


April 11, 2012

Cute Little Mouse

This character is from the Sugar Plum Daisy CD from Polka Doodles and is one of the many cute images on there.

The papers and sentiment are all from the same CD and have been layered up with Spellbinders

The flowers are from Wild Orchid Crafts and they are all added to the bottom of the card with some Pinflair Glue

But the interesting piece is the strip along the left hand side.

I cut some Spellbinder borders for another card and by carefully positioning the die  this is the  strip that was left over

Normally this is the bit that is just thrown away ... but I decided to add some yellow ribbon  wrapped  aound the shape and I think it makes a really neat addition to the card.

And as always ... being a Frugal crafter ... I can't throw anything away ... that's why my "Stash" is spilling out the door

The pearls around the edge of the card are all made with  Cosmic Shimmer  glue ... which is a cheaper alternative to the real thing.

Very shortly there is going to be a whole new look to the Blog.

I have been working with Katie Price and she has come up with a really beautiful design for my pages. It is all pink and flowery to match the title of the Blog and I am very pleased with the result.

Let me know what you think about it.

Hugs Christina xx


April 10, 2012

Patchwork Card

I hate to throw away pretty paper and I always think if it is big enough to make a flower then I will keep it... and I do make lots of flowers.  But this is a little different.

Making a  Patchwork Card  is really easy and will utilise more of those scraps.

There have been several ideas over the last few days to make use of them all and this is another.

The squares on this card are not very big, about 5cms,  but once added together they can look really effective.

The papers are from a CD from Funky Hand and the centre of the flowers is a brad.

The butterfly is acetate and the trail, and the Faux Stitching are created with a Sakura pen.

Try mimicking a real quilt when you make the card for a really special look.

But this is the simple and easy variation if you are new to cardmaking.


Hugs Christina xx

April 09, 2012

Mini - Envelopes

This mini-envelope is a really cute addition to your cards and will use up those odd bits of paper that you have left over.

It is created from different folds so it is best not to use a paper that is too thick or you will find it hard to fold as it is so small.

I have inked all the edges with Distress Inks and added a small velvet brad to the opening.... it doesn't actually keep it closed but it looks pretty.

Use the same papers as the rest of the card for a coordinated look.


And if you wanted too you could add a small message to pop inside the envelope for the recipient.
The small Roses in the centre of the flat flowers are from  Wild Orchid Crafts  and they just add that extra touch.

Hugs Christina xx

April 08, 2012

Paper Weaving

This little technique will use up all your left over strips of paper and as long as the colours blend then you can use any patterns that you have in your "Can't throw away" box .... Yep I have one of those too.

And although it says Paper Weaving  this can also work well with ribbons for a really pretty effect.

These papers and the Owl are from the  Papercraft Factory CD from Funky Hand and I have added
some Googly eyes to the character.


There are several collections of papers on the CD and they are suitable for any kind of card that you want to make.

You will also find downloads available on their website ... so they are yours instantly you have gone through the checkout.

Hugs Christina xx

April 07, 2012

Paper Pleating

This lovely technique has been around for years and another I learned as a child. I really don't remember where I got it from it's that long ago.

Paper Pleating  is easy to do and yet can look so pretty on a card, especailly if flowers are added too.

The flower centres are from Wild Orchid Crafts  and they have been added to some silk ones that I had in my "Stash" and had forgotten about.

Amazing what you find when you have a clear out!!

The Trellis edge is a Martha Stewart punch and the butterflies are peel offs.

This a card I made quite some time ago ... long before the Spellbinder days!!

Hugs Christina xx


April 06, 2012

Paper Lace

Not to be confused with the Punched Lace I added a couple of days ago..... oh no! this one is going to use up any Doilys that you may have lurking around at the bottom of your kitchen drawers.

Paper Lace  is an easy technique to create and yet still adds a very delicate look for all your cards.
Here it has been pleated along the edge of the card and all the workings have been covered by the white ribbon for a neat finish.

The image is from  LIli of the Valley  and is very cute. I have coloured the bear in with Promarkers.

The additional flowers are from  Wild Orchid Crafts. 

Hugs Christina xx


April 05, 2012

Paper Folded Shirt

This is an excellent addition to all your male themed cards and is very easy to make.

You can jazz up the   Paper Shirt any way you want and use it for lots of occasion.

The card open up and any sentiment or invitation can be added to the centre


One of the things I did was to make it into an dress shirt and put a dinner party invitation inside it.

You will find lots more ways to make use of this and it is one of the things I was taught as a child and have never forgotten.

Little did I know I would ever be adding it to some cards in the future.


Make them into Father Christmas outfits and let the kids use them as their cards for their school chums... and teach them how to make them too... it will keep them quiet for a while !

Hugs Christina xx

April 04, 2012

Punched Lace

Adding lace to your cards can make them look very feminine, but it can also cost money that you may not want to spend.

So how about putting all those punches that you have in your "Stash" to good use. 

They may be flowers, butterflies, stars, hearts, leaves or any others that you may have but they can all be used to create your own lace look very easily. 

This is created from a couple of scalloped strips and then all the punched shapes added in between.
Some have been sparkled up with Glamour Dust and the odd pearl added to the centre of the flowers.

The image is Maude and I introduced you to her a few weeks ago as one of the characters from the "Wrinklies" from Just Inklined 

I think she is just wonderful and such a delight to colour in with Prmarkers.

Hugs Christina xx