Beautiful Card Designs Made Easy

June 28, 2015

Batch Card Making

Hi Everybody,

Sometimes when you have a lot of cards to make it can be a good idea to make them in a batch

Here I have four card that are created in this way and it is a quick and easy way to work.

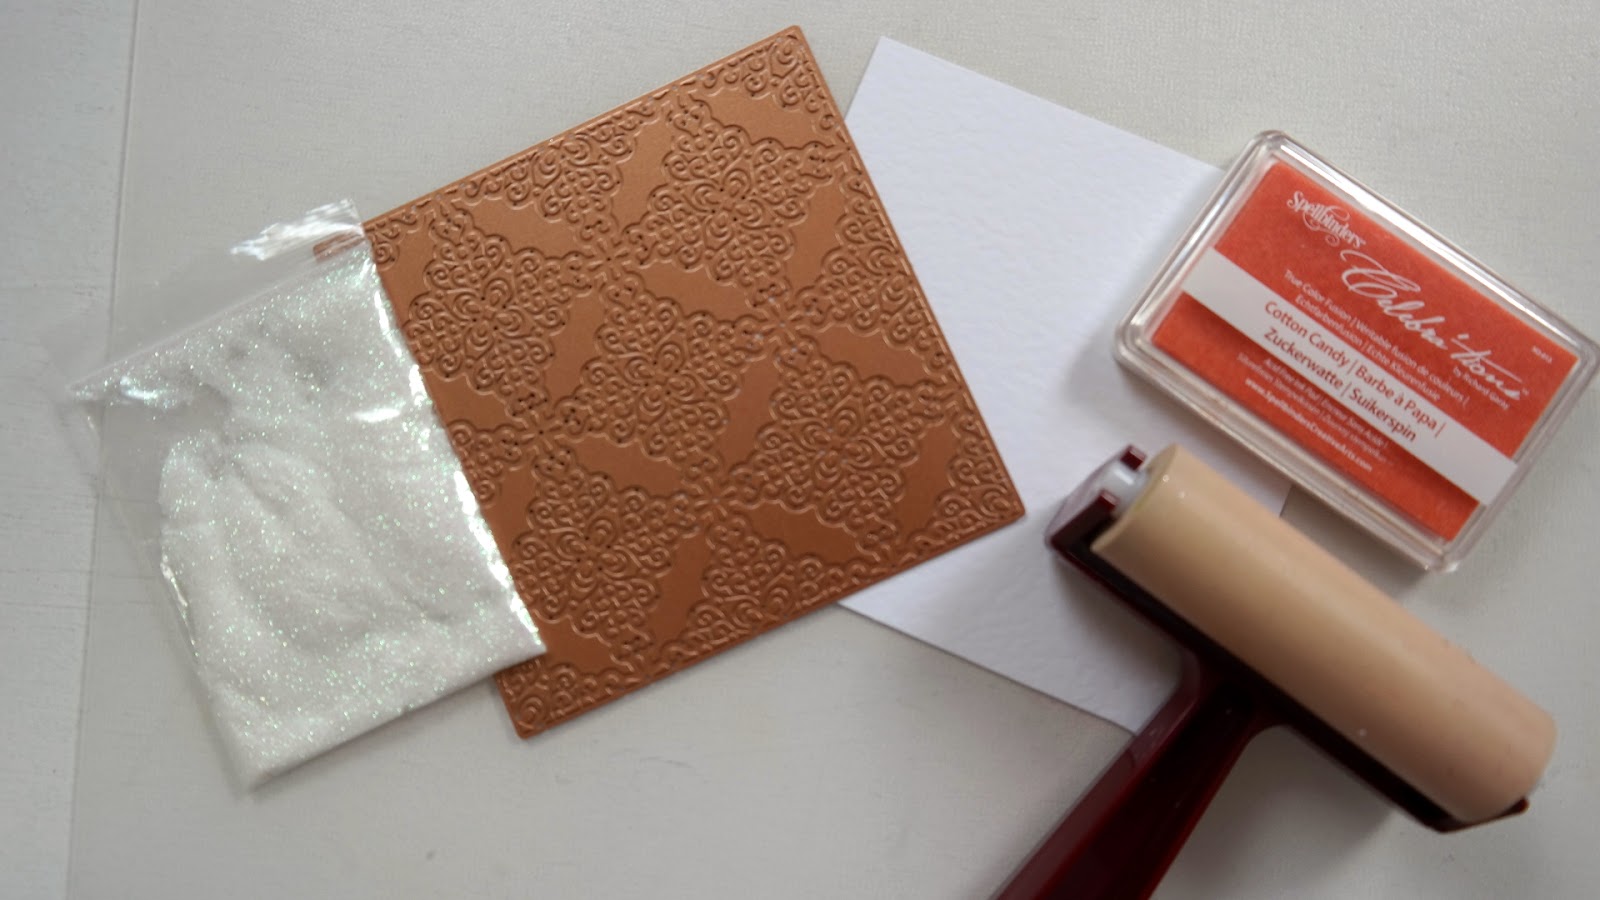
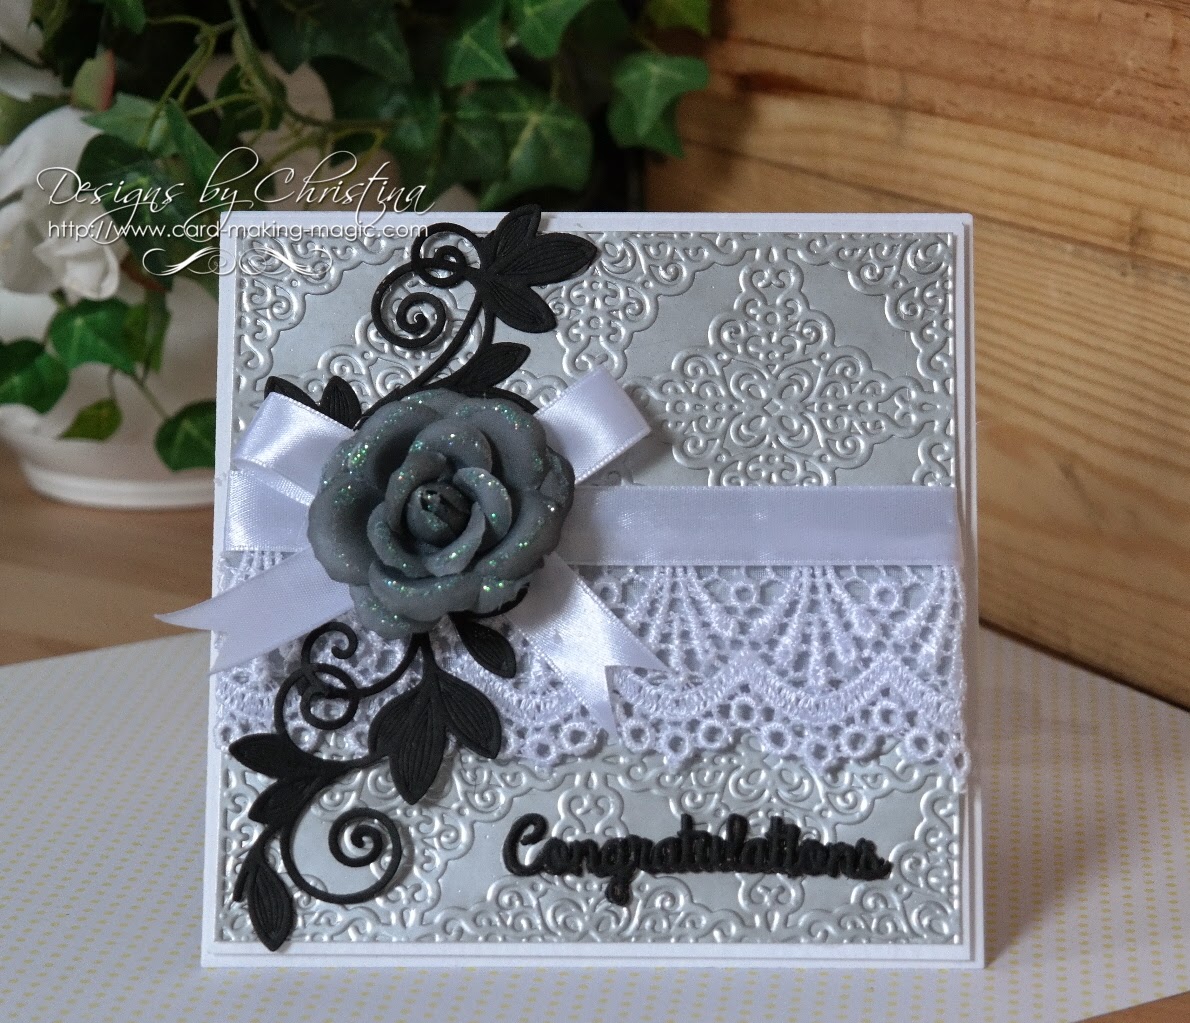
By that I mean do all the stamping ... all the die cutting ... all the embossing ... adding all the flowers from Wild Orchid Crafts  last and arranging them as you please

The first thing I did was stamp the sentiments on each of the cards.

They are part of a collection from  Make The Day Special 

MTDS is a UK based company but they have a lot the US stamps. This is where I have bought the stamps that I have been water coloring

Here is one of the new Avery Elle stamps called  Simply Said    and there all of these and more are on one sheet.  It matches the die that says  You   which I cut from Craft Foam and again in card.  I used double sided tape between the foam and card to glue them together.

I have created my base card and layers with  Pierced Rectangles from Spellbinders  and the smallest layer has been embossed with  Framed Canvas  and both are part of the  Celebrations Collection

Making cards in this way is excellent if you are making a batch of Thank You cards or invitations. Please click the links to view the products.

More tomorrow ...

Hugs xx


June 27, 2015

Another Winner ...

Hi Everybody,

Before I tell you the name of this weeks winner I would like to point you in the direction of the new addition to the top of the left hand side bar.  It is called  Inspiration and if you click the photo it will take you to a new page.

On that page I have added a short video to show you ... grouped all together... just some of the cards that have been made over the last few weeks. This is Griffs' idea and we thought that it may offer some ideas if you get stuck for ways to make your cards.

I will be adding a new video every few weeks and some of the cards have actually been tutorials ... here  or on Spellbinders Blog or on Card Making Magic ...  I hope you enjoy !!


So on to the winner of the Friday Freebie  Pink card from yesterday.  
The name drawn this week is you ...     


Ann Lauzon ...
would you email me please
christina@card-making-magic.com
with your full postal address and the card will be on its way to you.

~~~~~~~~~~~~~~~~~~~~~~~~~~~~~~

Please Read On

Before I go I have to tell you that three of the blue cards from the "Ten Cards For Ten Winners" have not been claimed and so I have re drawn three more winners to each get a Blue card from those offered on the 19th June. Those names are ...

Donna Sherman
Jayne Buckley
Sandra Smith 
please contact me at the email address above
You have 48 hours to claim the cards

I know I have said this before  and I don't want it to send like a rant .... but please if you are not going to come back and check for your name then please don't add it to the list.  I make the cards and I am happy to send them anywhere ... but I can't chase you for your address ... that is up to you. 

But if you don't check then you have taken away the chance for somebody else to win the offered prize. 

And last but not least ... the names are drawn at random and the winners notified in the Blog post. Some one, who has not been named as a winner, has left me her name, telephone number and address in the comments to have a card 

Please do not add personal information into the comment box contact me privately at the email address above if your name is shown as the winner.  I have deleted the comment with the personal info on it.

More tomorrow ...

Hugs xx

June 26, 2015

Friday Freebie 065

Hi Everybody,

After the ten blue cards I offered in last weeks freebie I thought I would go back to pink with flowers, ribbon and pearls for this Friday Freebie

So this one is layered up and used  Tranquil Moments from Spellbinders and  Napa Valley   from Creative Expressions dies and I have used lots of foam tape to give the card dimension.

The background is Pink Centura Pearl card from Crafters Companion  that has been embossed and the inside is lined in the same card

The flowers are as always from Wild Orchid Crafts and are a selection of Roses, Tulips, Cherry Blossom and Cosmos Daisies

If you would like to own this card then please join the group of followers and leave me a comment to let me know that you have visited.

You will need to come back in the morning to see if your name is listed and then you will have 48 hours  in which to claim the card.

I need your full postal address please,  complete with Country and Zip/Postcode,  to be able to send you the card


More tomorrow ...

Hugs xx

June 25, 2015

Holiday Samples ...

Hi Everybody,

Here are a couple of my card samples that where shown on Create and Craft last week when Kim Hupke  was over from the US showing you the Holiday 2015 dies

These new dies are so pretty and can be used at any time of the year ... not just for Christmas.

This one is the Gingerbread Card front but these dies are exclusive to   C&C   for a few weeks ... and many of them sold out in the shows.

But they will be back again so keep a look out for them.

This was the Gingerbread House and I cut it twice and layered it on to Kraft card

The white card at the bottom is Glitter card and is sparkly white.

More tomorrow ...

Hugs xx

June 24, 2015

Craft Stash ...


Hi Everybody,

A little while ago I was asked to join the on line design team for Craft Stash. 

This is a new company that are bringing crafting supplies and goodies to the UK market.

They have brought out their own brand of dies called  Apple Blossom Dies  and I added a link to them in the right hand side bar for you to see

More dies will be added as they become available.

This card features the Ornate Heart  and it is very ornate.

I made the card in white with a deep blue and added in some matching ribbon and a diamante centre for the bow.

The base to the card is created with the  6x6  Matting Basics A&B  and the A4 embossing folder from Spellbinders

The sentiment is one that was free with Simply Cards and papercrafts magazine a few months ago

More tomorrow ...

Hugs xx


June 23, 2015

Tuesday Tutorial - Lace & Frills Birthday Card

Hi Everybody,

Do you have those moments when you need to make a card and you can't think what to do?  This pretty card is so easy to put together and takes no time at all.  I have used the large texture plate from Spellbinders and coupled it with an embossing folder. Very quick, very easy and very pretty too.

Spellbinders Supplies:

Other Supplies:

Wild Orchid Crafts -  Flowers, Lace
Mei Flower -  Ribbon,
Want2Scrap -  Pearls, 
Embossing powder

Instructions:

From the outer square #2 cut two panels in white for your base card and create a hinged card

Hand cut a slightly smaller panel in silver and another slightly smaller still in pink and emboss the top pink layer

Cut another piece of white card slightly smaller than the pink layer and this is the piece we are going to use.

Load a brayer  with the Cotton Candy Ink and roll it over the texture plate ensuring that it is all covered.

Lay the card flat on top of the plate and pass it though the Grand Calibur as an embossing sandwich 

Then quickly remove the card from the plate and while the ink is still wet sprinkle it with embossing powder and heat

The powder will stick to the wet ink  and give you a lovely effect. I used a sparkly powder.

With some sharp scissors,  or your craft knife, carefully trim around the pattern on one side and then trim again to fit the pink embossed panel from the previous step

Leave as much depth as you prefer to allow the embossed panel to show

Wrap these layers with ribbon and lace and place foam tape on the back to give dimension

Add to the silver card and the base card

Create your bow and add to the front in the position you like and add in flowers to the knot.  Add the sentiment of your choice and there you have a very pretty card for you to send with love.

Designers Tip:

Change the color and leave the panel complete for another look to this card.

Or if you are really pushed for time simply use the texture plate to emboss the silver card and miss out the other steps.

Your card will be just as lovely whichever you decide to do.

I hope you have enjoyed this tutorial 


More tomorrow ...

Hugs xx


June 22, 2015

Having fun ...

Hi Everybody,

You will have to forgive the abundance of water colored cards but I am having so much fun with these new Aqua Tints from Spectrum Noir that I can't stop

The stamps are all new too and I bought all of them from  Make The Day Special  and they are mostly stamps from Altenew

This one is called Sketchy Rose and it is lovely.  The sentiment is from Sentiments and Quotes  and there are lots on one stamp sheet

Along the bottom I have added some ribbon and lace and tied a little bow with satin ribbon from Mei Flower

The little pink pearls from Want2Scrap are dotted around the card ... but just a few.

The bows centrepiece is from Wild Orchid Crafts and matches in with the color scheme perfectly

I think it does me good every so often to step away from the style I am  used to and try something different.

 Brings a new freshness back to my crafting and then I am ready to come up with some new ideas to share

More tomorrow ...

Hugs xx

June 21, 2015

One for the Men ...

Hi Everybody,

I am often asked for ideas to make cards for the men in our lives and being a frilly flowery kind of card maker I sometimes find it hard .... sorry guys !!  But pink and flowers maybe wouldn't suit many of you

This card uses the Sheena Douglass stamp set called  Destination   and is excellent for many occasions.

I colored it with the Spectrum Noir Aqua Tints   and you need very little to get a good result.

The sentiment stamp  is one of the Altenew  Sentiments and Quotes   and I have stamped it onto some Kraft card and layered it on to blue

The background to this piece uses the Caught In Crystal Technique   which has been around for a long time.

This is so effective and very easy to do that I had my Wednesday Class ladies try  it.

I will show you my ladies cards once they are made up as you need to leave it to dry for a good few hours.  I think a tutorial would be in order for this technique

I have layered the image on to blue card and then onto some Kraft card for a really lovely effect that should make any of the men in your life happy to receive.

More tomorrow ...

Hugs xx

June 20, 2015

Ten Blue Winners ...

Hi Everybody,

Thank you for such a great response to the Friday Freebie yesterday. I am very flattered that you would want one of my cards.

The names for the ten blue cards have been drawn and I hope you won't be blue when you get them delivered. They are all pretty cards and each is in cellophane to keep it clean.

So here is the list of names ... look carefully to see if your name is on it and you have 48 hours in which to claim your card.

Marilyn Virella
Betty McAllister
Debbie Busst
Dani
Christi
Mary O'Leary
Pharmacy Michelle
Lucy Spence
Patricia
Lisa ...

Please email me 
christina@card-making-magic.com
and the cards will be on their way to you.
I hope you like them when they arrive

More tomorrow ... 

Hugs xx

June 19, 2015

Ten Blue Cards - Ten Winners

Hi Everybody,

Last month in the Friday Freebie I gave away ten cards all in one go to ten individual winners.  They were all pink cards and this month I am giving away ten cards in BLUE  to ten more winners.  If you would like to win one of them then join the group of followers and leave me a comment


From those comments ten names will be picked at random and notified in tomorrows blog post.  The cards will be given at random so please don't select one ... it will be pot luck as to which one you will get. 

They are all different sizes and techniques and they are not finished on the insides. But they are all in cellophane bags to keep them clean and that it the reason that the picture is not clear ... soreee!!

More tomorrow ...

Hugs xx

June 18, 2015

Magazine Freebie ...

Hi Everybody,

Yesterday my monthly subscription of 
fell through the letterbox and the free gift this month was a beautiful Roses embossing folder.

And so out came the Spectrum Noir Pencils  to see what I could do.

I embossed a piece of parchment ... layering the parchment between copy paper to stop it splitting. I use the quite thick parchment from   AnnaMarie Designs

I colored it in on the raised side and I used the pinks and yellows from the Floral set and the greens from Nature and blended them as I went along

The parchment was attached to the base with little dots of Cosmic Shimmer Dress Clear and then I covered over the spots with the pearls.

But to be honest the Cosmic Shimmer dries so very clear that they didn't show up anyway under the parchment.

The base card was created with white  255gsm Hammered card from the Papermill Direct and using the  A2 Matting Basics A&B from Spellbinders

The addition of a little sentiment and the card is finished.

I enjoyed the coloring as I haven't used the pencils for quite some time and I ended up with a soft and pretty card that I am quite happy with ...  and the folder was F.R.E.E.

More tomorrow ...

Hugs xx

June 17, 2015

Another Watercolor Card ...

Hi Everybody,

So here I am again with another attempt at water coloring with  Spectrum Noir Aqua Tints

For this particular one I have used the Bright and Beautiful set and   Neena Classic Crest  and both products are from Crafters Companion

The stamps and sentiment are from Altenew and this is the Peony Scrolls.

It also has a matching   Peony Scrolls Die set  so cutting out the flowers is easy.

The sentiment is from many on one sheet of Sentiments and Quotes 

And while you are on their webpage have a look at some of the beautiful samples in the Gallery and you are sure to be inspired.

The card is created with  A2 Matting Basics A&B from Spellbinders as they gave me the size I wanted to use for my card and layers

I will be playing a lot more with these Aqua Tints and I really like the results.

More tomorrow ...

Hugs xx

June 16, 2015

Tuesday Tutorial - Labels Forty Six

Hi Everybody,

When it comes to collecting Spellbinders I have always said that if you are buying Labels dies then also look for one of the fancy ones that will work with them.  That way you know that they will work together and you will have lots of choices in how you make the card. 

For this card I have used Labels Forty Six to create the base of my card and the Decorative Elements to give me the layers I need to build it up.  I always use foam tape or pads in between the layers as this will  create shadows and depth and add more interest to any of your designs. 


Spellbinders Supplies:

Bakers Twine
Flower Charm
Pink Pearls 

Instructions:


With the #3 die from Decorative Elements cut two pieces in white for the base card. Score and fold one of them over by about 1" and glue the two together.  Place to one side as you work on the layers first.    (Please remember that #1 is always the smallest die)  


From Labels Forty Six and your chosen color cut one piece from die #6 and another from die #3 giving you two layers of different sizes

 
Cut a decorative layer from #2 and carefully open up the petals in the flowers around the edge and into the centre of each flower add a small pearl. 

Alternate these three layers together with foam pads in between to give height and wrap all of them with Bakers twine.  I added in a small charm to my card


I chose the "You're Invited"  from Sentiments Eight as this could be used for a really pretty Wedding Invitation.  So I inked up the die with Distress Inks and cleaned of the edges of the die with a cotton bud. Once it was cut and embossed I added foam tape,  cut to fit the back. 

When you have all the layers in place you can add them to the base card .... I kept the hinge to the top of the card. Add the sentiment and there you are a neat little card for any occasion.

More tomorrow ...

Hugs xx

June 15, 2015

International Ambassadors Informal Blog Hop

Hi Everybody,

Welcome to the sixth Informal Blog Hop from the International Ambassadors.

We have really been enjoying these Hops and it's lovely to see new people joining all the time.

For this one we decided to use the Victorian Garden Collection  and this is my card for this Hop

I chose to work with the Decorative Fancy Diamonds  and the matching plain set  Fancy Diamonds from Spellbinders as they are so pretty

I also dressed my card with flowers from the same collection and they are Flower Bundle which makes lots of pretty blooms for you to use.

Each of the other Ambassadors has made a card for you to see in our own individual styles ...  so why don't you pop along and visit each one of them.

Here are the links to the wonderful team for you to visit

Christine Emberson
Christina Griffiths  (You are here)
Linda Lucas 
Yvonne van der Grijp 

We are so happy if you  leave us a comment so that we know you have been and please join us again the next time we go hopping  around the world !!

More tomorrow ...

Hugs xx


June 14, 2015

Here's the Video ...

Hi Everybody,

The other day I showed you a pretty pink pearl card and I  promised you the video on the making of this card with   Oval Regalia.

We have bought a new lighting system and so hopefully the picture quality of the film will be better ...but I tell you it takes up so much room there won't be any space left for me

I am also including links in the description box under the video on my YouTube  channel for people to see the supplies I have used.

There are some slight differences in the card ... not in the way it is made but with the things I have added to it.

The blue one has lace on it and the flowers are a different arrangement on them but both are created the same way

But I think they are just as pretty as each other.

The video will take you through the steps I took to get the look and I hope you will enjoy it.

Make a cuppa, sit back, click the link, which will take you to a new page on my website Card Making Magic,and relax  Aaaahhhh !!


I am using the new Sapphire die cutting machine but unless you got yours from Create and Craft then you won't be able to get it any where else just yet as C&C have exclusivity  

It will be back on C&C as they sold out last time it was on.

If you managed to buy  one I am sure you will agree what a fantastic little machine it is and takes up next to no space on your work top.

More tomorrow ...

Hugs xx