Beautiful Card Designs Made Easy

April 30, 2012

I'm going to this wedding....

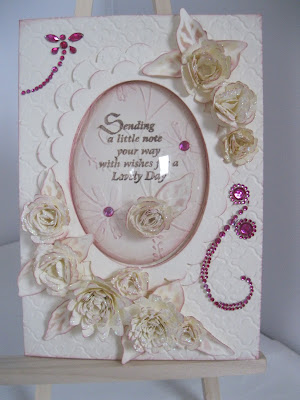
I have made several wedding cards over the last few weeks for other people but this is one that has been made for me to take to a wedding I am going to in June.

I kept this one rather sedate as I am also making one for the Grooms Mother to take ... and she wants hers to be elaborate  in a white on white colour scheme... so watch this space and I will show it to you when it is made.

This one is cream and once again the Bitty Blossoms have been used to create the flowers and the leaves.

The backgound does not show up very well in the photos.

But  both the card base and the box lid  have been embossed with the So Trendy M-bossabilities Folder

The panels behind the sentiment are two different sizes of the Fleur Di Lis Squares and the sentiment itself has been stamped onto cream, heat embossed in clear powder and cut with the Lacy Circles

The butterfly is a Martha Stewart punch and the trail is from Want2Scrap 

I am just hoping that the  weather will be kind on that day and no ...... I am not wearing a hat !!


Hugs xx


April 29, 2012

Cream and Gold

This is another wedding card I was asked to make and the remit for this was precise. It had to be cream and gold with flowers and a lacy look, and  a wediing day sentiment on the front.

The card had to be large,  but flat enough to go into an envelope ... as it was to be placed in a suitcase to be  taken abroad.
The names of the Spellbinders used will be  BOLD  so that you will be able to see what has been used to create this card.

This is what I did to make this card to an A4 size and I bought A4 envelopes to use with it.

I embossed all the base background layer with Butterfly Garden Grand Impressabilities and then layered it onto gold card.

I cut a piece of cream card and embossed it with Paisley Embossing Folder and the cut it into three pieces and added each one to some gold card. These three panel were equally spaced out on the Impressed base.

Gold and Cream organza ribbon was then wrapped around all these panels, a bow attached and a pearl added to the centre to the knot.  The lacy edge was placed under these panels and was created with the Persian Accents border.

I then added it  all to another piece of cream card that has piercing  around the edge and  layered them onto the cream base card.  The  largest Floral Oval  was cut in gold and the sentiment was stamped onto cream card, and  heat embossed in gold,  onto the second smallest  Lacy Circle

Because the flowers had to be kept reasonably flat I decided to make them with the Anenome Flower in the gold and add a pearl to the centre of each one.   I tucked the flourish and leaves from the Belle Rose underneath for a little extra decoration.

I also added the same flourish and flowers to the envelope to match the card.... and it was very well received by the lady who commisioned it.

Hugs xx


April 28, 2012

Wedding Card

I wanted to show you this card that I was asked to make for a wedding later in the year.

This card will be going all the way to Australia and I hope that the Bride and Groom like it when they eventually get it.

I wanted it to be really special and I took a long time to get everything correct.

I used a good quality white card for all the layers,  flowers and the matching box.

I added the  Ruffled Ribbon along the left hand side,  in white satin, and glued it with strong tape to an embossed panel that I surrounded with Diamante.

The border edges are from the Morrocan Accents.

All the flowers are created with Spellbinders Bitty Blossoms, Spiral Blossom 1 and Spiral Blossom 3 .

Each of the larger blooms has had a Diamante added to the centre and the petals are sparkled with Glamour Dust.

The names have been added to the Floral  Ovals .

The background is embossed with the Paisley M-Bossablities 


I created the box from Centura Pearl from   Crafters Companion   and it has a beautiful sheen to it.

I added acetate to the aperture and decorated with the same flowers and Diamante. 

The butterflies are  an added extra touch to the card and the box and in the last photo you will see that I added an extra trail to each of them.

So now I have fingers,  toes and eyes all crossed that the couple will like the card I made to celebrate their special day. 


Hugs xx

April 27, 2012

Frugal Crafting ...

Did you enjoy a chocolate egg over the Easter holiday? 
And did you then throw away all the acetate  packaging that the egg was in ????
 Big mistake.      I can't throw anything away and this is what I did with mine.

My husband says that I am a hoarder ... I prefer to say I am being cautious... as you never know when you may need it.     But this is how your "Stash" grows larger and larger !!

I made full use of the M-Bossablity folders that I have to decorate the backgrounds... and if you click the photo it will enlarge for you so that you can see the detail that these folders give. 

I have added another video to the Spellbinder Series of tutorials and this one is  Spellbinders Oval Frames

The link will take you to the page but I will also add it to the Tutorials on this Blog for future reference.

The dies used for the frames are the Classic Ovals and the Scalloped Classic Ovals

Both of these are very pretty cards that would be ideal as a Wedding card.

 Just add the Bride and Grooms names and the Wedding Date ... make a stunning box to put them in and away you go. 

I hope you enjoy the video ... it's only short so you won't have time to go to sleep.


Hugs  xx

Spellbinder Blossoms...

I have had lots of emails asking me about the flowers that have been added to my cards over the last few days and I promised several ladies that I would do a video on how I get the look.

There are many ways to create these beautiful blooms,  but this works for me and many people seem to like the result .... maybe it could work for you too.


So here is the link to the video and I hope you enjoy it.  Spellbinder Blossoms 
I will also add it to the Tutorials page for future reference.

Some of the previous cards show these sprays of flowers and the Altered Notebook from yesterday has a long trail of them along the notebooks cover.

I am sure that I will be adding more to my cards in the future as they certainly make an impact when they are added.

The added "Bling" is from  Want2Scrap  and this a self adhesive pearl in the flowers centre and a piece of the flourish for the butterfly trail.

Hugs xx