Beautiful Card Designs Made Easy

January 29, 2013

Jewel Box Saga ...Pt 4

Hi Everybody,

In the last stage I added all the patterns that I wanted on my jewel box and left it to dry.

Although not shown in the photo I have repeated the process on the two side doors and the lid.

Today I have been back to it and given everything a coat of clear satin finish varnish  and then left it to dry again.

That will protect everything from some wear and tear.

Tomorrow I will put it all back together and add all the "Bling" that I want to add.

So while I am waiting for it to dry I have been busy making some butterflies from flower petals, lace and beads.

They are about 7cms long but they are much prettier in real life than they look on the photo.

I can add these to cards or any project where a butterfly is needed.

This one has white feather added to the back of it and one small rosebud in the centre.

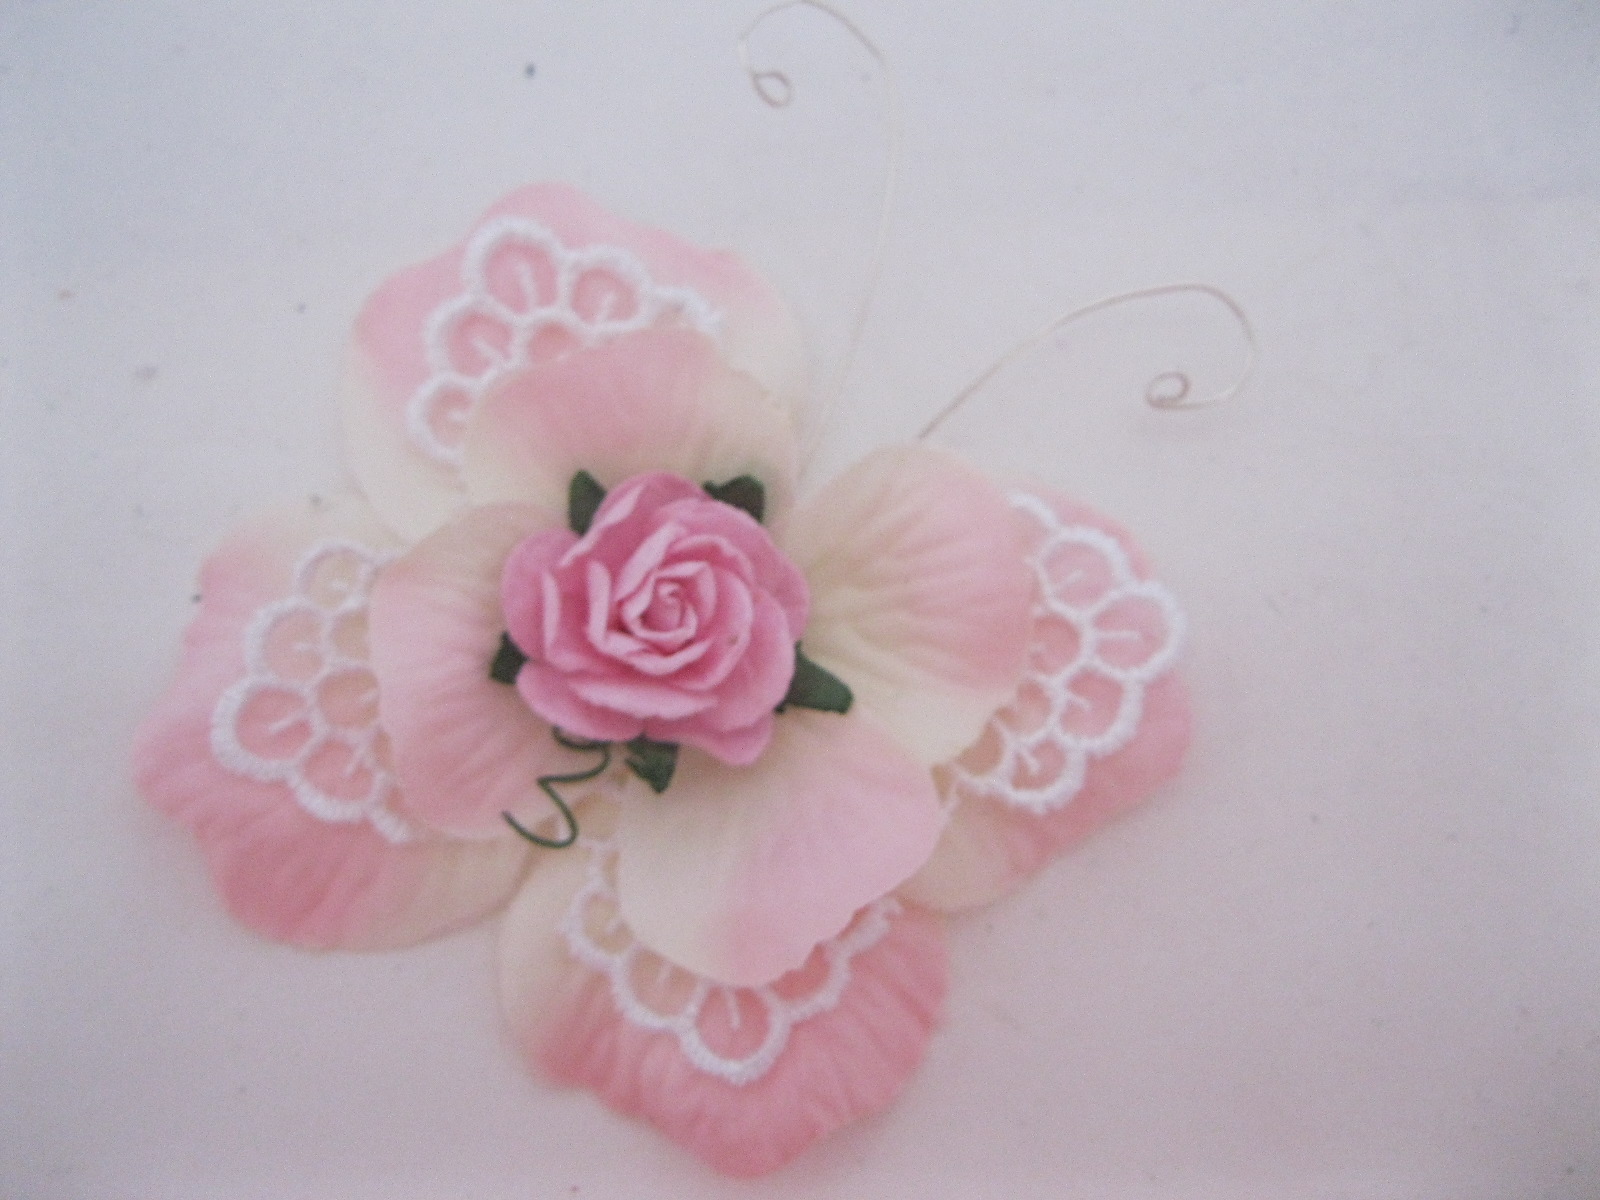
I have curled the antennae from some silver wire, and cut up a small piece of lace that I had in my stash.

It is a good way to use up all your odds and ends and here is a tutorial on how I got the look.

Making Butterflies  is the written instructions but I will have a video out soon.

Click to Enlarge all the photos
This one has the addition of a little sparkle to the wings and i think they look very pretty.

More on the jewel box saga tomorrow.

Hugs xx

January 28, 2013

Another Altered Art Project

Hi Everybody,

This is another Altered Art project and this is for my daughter ...(the one throwing away the jewel box ... how could she???)

Click to Enlarge the photos
She has an empty box that had some hair straighteners in it and because it was quite a large  she wants it  for storage in her bedroom.


This is what I have done to it and I hope she will like it when she gets it back.

I have kept it pink as the box itself  was in good condition.

But I have got the Spellbinders to work on the top of it in several layers.

The Spellbinders used will be  BOLD so that you will know what has been used.


I have added a base of Snow White Centura Pearl from Crafters Companion  to the lid.

I cut it with a fancy edge to be just a little smaller than the pink lid ... so that  it leaves a narrow border.

Then I have cut two of the Romantic Ovals in a matching pink card and laid them to cover the top.


I cut the Second smallest of the Grand  Decorative Ovals  in  the white and added it with foam pads.

Then a layer of  a plain oval in pink with the largest die from the Floral Ovals layered on top of that.

The Fancy Tags 3 has been cut in pink and white and layered to give a shadow effect and then the matching Pearls from Want2Scrap  are added.

I have used some beautiful pink flowers from Wild Orchid Crafts  and added Glamour Dust to the petals for extra sparkle.


The Decorative Hatpin  and the pins are from the Sparkles Group and if you add in the code CGDIS5  you will get an automatic discount at the checkout.

On the right hand side I have made a butterfly and used some more pearls to create the butterfly trail.

Small pearls have been added to the corners  and I think that this is a very pretty  addition to any bodies dressing table.

Hugs xx

January 27, 2013

Jewel Box Saga ... Pt 3

Hi Everybody,

Well this time the Give Away went off with out a hitch and both winners have claimed their prizes.  I am so pleased and I hope you will let us know how you find them .... honestly ... before we start to sell them

As for the Jewel Box ... well here we are with an update on it's progress.

So  far it has had two coats of white Acrylic inside and out and it looks much better.

The inner lining is a plush kind of material and so I followed Colleens'  advice and sprayed the material with some fabric paint.  (Thank you)

It's not perfect but it is better than the stained and faded beige that it was before.

It is a lovely rich blue and then once it was dry I glued some white lace around the edges.

I used the same technique that I used for the Miniature Dress Form  with the stamps and tissues and the video will show you how I got the look.


To make sure that I got the Flourishes pattern to position correctly I held the three loose drawers together with an elastic band.


I applied the "Slap It On" and  laid the tissue on top and pressed it in shape around the curves to the drawers.

Don't try to cut the tissue while it is wet ... leave it to dry and then with your craft knife carefully run it between the drawers to separate them.
I did the  same to the rest of the jewel box, back and front using the  Bubbles stamp  from  IndigoBlu

Then it time to step back and let it all dry before going any further.


Hope you like it so far ....

Hugs xx

January 26, 2013

Two Winners ...

Hi Everybody,

Today the names for the Blenders has been drawn randomly by InLinkz and as promised we have two lucky people to win this super useful tool.

I hope both winners will enjoy using them and that they will let us know how they get on with them.

Both ladies have been notified by email of their win.

And you both need to send me your snail mail address so that I can get your prizes in the post.


Email me:- christina@card-making-magic.com

So who I hear you asking has won ????

Congratulations ....The winners are ....


Carol Parker  and  Marion  Hinchcliffe


You will receive five Blenders complete with Foam Pads for Water Based Inks and Five Felt Pads for use with Alcohol Inks

More to Come ...

This week has seen us working really hard on producing more of these Blenders to sell.

Please remember that we are not some mass producing company out to make a huge profit .... No it's just my "Film Crew" and I working in a drafty garage trying to give you the best tools we can for the the best price.

 They are all hand cut and sanded by  Griff and the handles are screwed on so as to give you good service...  The last thing you want is for one of these to fall off as you are working with them.   So they are very well made.

And then the rest of the production is down to me and I finish them off ... add the foam ... and pack them up. And we have quite a few packs ready to go very soon.

So to keep the cost really good Griff has modified the handle on them.   They have been trialed and they are very easy to use.

You will still get five in a pack ... complete with a foam pad on each one to use with Water Based Inks.

I am also including five felt pads so that you can interchange them as you need and use them with Alcohol Inks.

As soon as they are available I will give you the link to the shop page .... and keep my fingers crossed that you will buy.

Hugs xx

January 25, 2013

Using Acetate...

graphic 8596180
Hi Everybody,

No Jewel Box today because all I am  going to do is give it another coat of white Acrylic paint and leave it to dry ... so more tomorrow.

Here is a card with a bevelled front made out of Acetate and it comes complete with a video tutorial too.

The Acetate I have used for this is from Crafters Companion

The Decorated Hatpin is another tutorial

The Hatpins I have used are 3" long and come complete with end protectors and they are from the Sparkles Group

They can be found in Specialist Findings and  if you add in the code   CGDIS5   at the checkout you will get an automatic discount on your purchases.

The video is the  Acetate Front Card  and it will give you a very pretty card at the end. You will need to make a box to send it in because of the bevel in the Acetate ... but it is well worth it.

Blender tools

Because of the popularity of these little Blenders I have decided to give away TWO packs of them.  The draw will be completed tomorrow and so you now have two chances to win a pack of five Blenders.
 
If you still haven't added your name to the list then here is the link again ....Blender Give Away
 
Hugs xx

January 24, 2013

Jewel Box Saga ...Pt 2

Hi Everybody,

How are you getting on with sand papering your jewel boxes ???

I did most of mine by hand and then I remembered that years ago I bought one of those Black & Decker Mouse sanders and so off I went to search it.

I found it lurking away at the back of my cupboard and hastily dragged it out and dusted it off... and it worked beautifully.

Luckily there were some fine grade sand papers still in the box and  I set too and sanded the rest of the box with my Mouse

So now that I have it all stripped down and sanded the next thing to do was give it all a coat of paint inside and outside.

The first coat of white Acrylic paint looks awful and streaky ...  but don't be put off. Let it dry thoroughly and we will come back to it tomorrow.

In the meantime here is another card to tempt you with the Grand Decorative Ovals again.

this one is done in Orange and  Peachy colours and it is not one of my favorite colour schemes.

This is the Grand Decorative Ovals Card 3  and it is made in a somewhat different way.  Click the link for the video tutorial

The gorgeous  flowers are from Wild Orchid Crafts


The beautiful "Bling" is from Want2Scrap  for the finishing touch around the ovals.

Hope you enjoy the video ...

The Blenders are still on offer and if you want to add your name click here

Hugs xx

January 23, 2013

Jewel Box Saga ... Pt1

Hi Everybody,

Lots of you were just as excited about the Jewel Box as I was.

And it seems that many of you have the same, or a similar box and  you are wanting to alter yours too.

The first thing is to take it all apart.

I have removed all the hinges, door  handles and drawer knobs and put them in a safe place.

And then I set too with some 120 grit sandpaper and rubbed all the shine off the varnish.

You don't have to be too precious about this because all you are doing is preparing the surface to take the next step.

The inside is going to be the tricky bit because all the material is stained and I don't really want to start pulling it apart.

So I will take some time and think about that bit and let you know what I come up with.

But for now .... get all those hinges and handles off and get rubbing the wood down for a nice keyed smooth finish.

Watch out for the ...  Jewel Box Saga Pt 2 ... coming soon to a cinema near you    (Joking)

If you're still looking for  the Give Away then click  Blending Tools  and add your name to the list.  The winner will be announced on Saturday 26th January ..... Good Luck 

Hugs xx

January 22, 2013

Look at this little treasure

Hi Everybody,

I visited my daughter over the weekend and I said in conversation that I was going to start going to the Car Boot sales and looking for items that I can alter

I said  I was looking  in particular for  old Jewelry boxes that I can alter into something really pretty  

And would you believe this is what she was throwing away because the hinges at the top are broken and the lid won't close properly.

My little eyes lit up when she said ... "You can have this if you want it " ... do I want it !!!

Now I ask you which Crafter wouldn't want this little treasure ????  

 It's gorgeous and oh what I am going to do to this.

It stands about 11" tall and has pewter handles and knobs

The mirror in the lid is in tact and all the linings  in the cupboards and drawers are there and will need cleaning.

The cupboards have holders for chains and necklaces and  the bottom drawer has a ring slots in it.

The top drawer doesn't open but under the lid there are compartments for earrings.

So I am going to take all the hinges off it and strip it all back to create something really lovely ..... and then..... she will want it back again  .....   NO Chance 


As I progress with this I will show you the stages it goes through and at the moment I have all sorts of ideas whizzing around my head.

Hugs xx

January 21, 2013

Another Ovals - Card 2

Hi Everybody,

Did you like the Ovals - Card 1 yesterday???   Well here is another to keep you interested in the coming draw.

This is Card 2 in Blue and I just love this one.

The verse inside is from Clarity stamp  and I have used the Big 'n Juicy Waterfall Inkpad.

The Diamante is from Want2Scrap and I have trailed it along the right hand side of the gatefolds.

The flowers are from Wild Orchid Crafts and are a mix of roses and cherry blossoms with added Glamour Dust.

The tutorial for this card is Grand Decorative Ovals Card 2  

Hope you like 

If you are looking for the Blending Tool draw it is here ...   Blender-give-away   Just add your name to the box and your done 

Hugs xx

January 20, 2013

Spellbinder treat ...

Hi Everybody,

I am sorry to say that the winner of the Grand Decorative Ovals has not come forward and so I will be re opening that draw and giving some one else the chance to win them.

I can hear you all "Whooping" for joy now at another chance to get these beautiful Nestabilities. 

But it will a couple of weeks away yet as I have other things planned.

So just to wet your appetite for the Spellbinders here is a card I have made using the Ovals and it is in a Video Tutorial  for you to see.

Spellbinders Grand Decorative Ovals Card 1

Here is one in the ever popular White on White and the dies I have used along with the Ovals are  Labels 20, Belle Rose and the Floral Flourish

The Diamante to match the Label 20 is from Want2Scrap

The Hatpin is covered in the video   Decorating Hatpins


For this card I have used flowers from Wild Orchid Crafts  and I have added some Glamour Dust to the petals for extra sparkle.

They are a mix of roses and cherry blossoms and carnations to make a very pretty bouquet

The Gingham  ribbon is from my "Stash" and blended with my colour scheme perfectly.

This is another White on White with just one coloured rose.

It was shown in a video that I did a long time ago  Paper Roses  and shows you how to make them with out the aid of dies, punches or a safety net !!

Then once you have made them you can go one step further and make them look like glass with another one  ... Enameled Rose Tutorial

And there you can see another Hatpin.


At present the Give Away is  for the  Blending Tools  and it you are looking to add your name then  click the link.

The problem over adding your name is now sorted.  

If you don't have a Blog leave the URL Box BLANK  but  please add your name and email so that you can be notified if you are the winner.

Hugs xx


January 19, 2013

Blender Give Away ...

Hi Everybody,

Click for a better look...
Well here it is the
Give Away
you have been waiting for.... the one with Blending Tool

So here's what you will get if you win...

There are five blending blocks in the pack and each comes with a foam pad.

The Foam Pad  is the one to use to blend all your water based ink  ...  for an aged look around the edges of your card and papers.

Because they are removable for you to clean or replace I am also including five felt pads.

There is a short video that you may like to see if you are new to them ... How to use a Blending Tool.

The Felt Pads  are the ones to attach if you are wanting to use Alcohol Inks.

I write the names of the inks to the knobs.

 Then I always know which one goes with which ink and I store them in  a basket.

But  my "Film Crew" is working  on some kind of holder for  storage ... so watch  this  space.

We are also working on selling these soon.

So if you would like to win a set of these handmade Blenders then add your name to the list.

As always  no duplicate entries please  and if you see a red cross at the side of your name .... don't worry ... it just means that YOU can delete it if you wish.... especially if your name is there more than once.

If you don't have Blog it is not a problem .... just leave the URL box BLANK ... but add your name and your email so that you can be notified if you win.

Please leave me a comment and if you would add your name to the growing band of followers that would be lovely
 
Hugs xx


Good Luck ....

January 18, 2013

Just have to show you ...

Hi Everybody,

I just have to show you this .... and then I promise I will leave dress forms alone ... well for a little while at least.


This is one I have been  asked to make for a Mothers Day gift and I love, love, love it.

The dress form had to be black and silver.  I  painted the stand and hat peg in matt black and the skin has had two coats of a "Flesh"   acrylic paint.

I painted the dress shape in white for a base coat and then  I add Silver Gilding flakes to it.

The straps to the dress are Diamante  from  Want2Scrap

I even added in a necklace with some fine silver chain.

The skirt is black taffeta ruffles and along the side opening I added in some lace.

The braiding at the top of the waistband is black and silver.

The large silver flower hides the Velcro that holds the skirt together.

You can see the silver under layer in this photo.

And I added an even larger silver flower to the stand.  And then came the hat ...

This has the same black lace around the brim and lovely feathers with another silver flower in the centre.

It even has a small hat pin in there too.

And I am really pleased with this one and I know that the person it is going to will treasure it

Hugs xx

January 17, 2013

Valentines Day ...

Hi Everybody,

Are you making Valentines Day cards yet ???

I have designed many cards for    Making Handmade Cards and this is one I have done this week using the Sweetie Pie Kit.

There are a lot of papers, elements  and sentiments in this kit.

If you sign up for Claires' newsletter you will be able to download the lovely Floral Doodle kit.... for free

This kit has some really pretty papers in it that will go with just about anything.

The colour of these papers are so fresh and I love pale pink and pale green together.

For my card I have cut a paper doily in half and placed it behind a central strip and wrapped two pieces of Organza ribbon around the middle.

The flowers are from Wild Orchid Crafts  and I have added a little Glamour Dust to the petals to sparkle them up.

Hugs xx

January 16, 2013

Little Black Dress...

Hi Everybody,

This is the LBD that I started to paint in the video Painting Your Dress Form  ... and of course I had to leave it to dry and so it was never finished in time for the film.

 I thought I would take this opportunity to show you what I did to complete the dress form.

I made this a one shoulder style.

When it was dry I added some really beautiful Diamante and Black Pearl "Bling" from Want2Scrap  along the shoulder line and the hem of the dress.


Then the next thing was to give the form a skirt.

 It doesn't matter what material you use you can still follow the steps in the video I added yesterday 

I am pleased with this but I have yet to add in the hat peg and the hat.

But the little skirt is all fringes and silver balls and it looks much better in real life.
This is the back of the dress and for this one I painted the top part of the form with a Flesh coloured Acrylic paint.

With all the exposed skin I thought it would look better.

This is another one that my family have claimed as theirs so once the hat is done it will be going to a new home 


Now although my "Film Crew" has been kept busy he did arrange for us to go out to the cinema and for tea afterwards.

I told you we were going to see Les Miserables

What a film ... I cried most of the way through it and then had to go out to tea with blotchy cheeks, red eyes and a runny nose and sit there and order food.

Griff said to me .... "You just want to go into a corner and cry don't you?" and all I could do was nod.

Hugs xx


January 15, 2013

I'm very surprised....

Hi Everybody,

After all the entries for the Spellbinders Grand Decorative Circles and all the congratulations that went out to the winner  .... I am very surprised that Cara B has not come forward to claim her prize

 It was such a fantastic Give Away and one I know that many of you wanted ..... badly.

But sadly there was only one ... and Cara was the one drawn randomly by InLinkz.... but where are you ???

The Spellbinders are waiting patiently to be posted to their new owner but you are nowhere to be found.

So all I can say is ...  that to be fair I will wait for one week from the announcement of the win ... which will take us up to Sunday the 20th January.

If they have not been claimed by Cara by  that date then  I will add them again to a "Give Away" and give someone else the chance to win them.

Does that seem fair to you??

P.S. The Blenders are being given away this weekend too so pop back and add your name if you would like to win these ... all hand made by my "Film Crews" own fair hand ... It goes live on Saturday.

Hugs xx