Beautiful Card Designs Made Easy

February 28, 2015

The Card is Yours ....

Hi Everybody,

Busy morning for me and only just got the time now to announce the
Friday Freebie winner
 Then later it's off to play with Isabella at her Nana's house for a few hours before settling down for Saturday night TV.

The draw has been done by my "Film Crew" and the winner of the beautiful pink card is ...

Trulyblessed ...

so if you would like to email me please 
christina@card-making-magic.com
with your postal address I will get the card in the post to you straight away.

Please let me know when it arrives with you and I hope you will like it.

Tomorrow I have a brand new  "Give Away" going live with the chance for you to win some lovely Goodies  to play with. So I hope you will pop back then and add your name to the list but  please become a follower if you want to enter for that prize

And I forgot ...

to tell you that I have a new tutorial on Spellbinders Blog  to view and here is the link ... 
 Especially For You 

More tomorrow ...

Hugs xx

February 27, 2015

Friday Freebie 048

Hi Everybody,

This is another card that is much prettier in real life and it is in a beuatiful shade of pink

The wings on the butterfly will need fluffing out again but the background is all glittered.

I have used the Sue Wilson  French Collection Background  and it is quite a substantial die.

The ribbon is from Mei Flower  and it is tied in a double bow.

The bows centre is from Wild Orchid Crafts

The verse is from Sheena Douglass  and there are several on the stamp sheet.  I have stamped it in black and clear embossed it.

If you would like to win this card then all you have to do is leave me a comment ... and please become a follower too

A name will be drawn in the morning and the winner announced in the blog post.  You will then have 48 hours to claim the card and I will send it to you wherever you live

More tomorrow ...

Hugs xx


February 26, 2015

Birthday Card ...

Hi Everybody,

I like the shade of teal in this card as it is very pale and subtle.

The card is from Anna Griffin - Lovely Layers  and there are lots in the pack to choose from

I have used   Bracket Edge Borders Two  and created layers as I showed you in the Tuesday Tutorial on the 17th Feb

There are other tutorials with other types of border dies on Card Making Magic

The bottom of the card is created with Lonely Hearts  and I have used the inner piece to leave the design in the card

The inside of my cards is lined and created in the Hinged Card Style

The buckle and pearl centrepieces are from Wild Orchid Crafts 

The ribbon is some that I bought in  Lidl  and it is excellent quality in several colors too.  I have a little tutorial to show how I got the   Ribbons and Buckles   look for my design

And to finish the card I have added the Happy Birthday which is Spellbinders Sentiments Three

More tomorrow ...

Hugs xx

February 25, 2015

Heartfelt Thanks ...

Hi Everybody,

Here is another card done with yellow and I must admit that this color is growing on me the more I use it.

The card is a 6" square and I have teamed it with black for a dramatic look.

I have layered parchment over the dark floral card to subdue it a little and it is held in place with eyelets in each corner

For the centrepiece I have used  Labels 42 - Decorative Accents 

This set has a plainer Labels 42  to match as well as Labels 42 - Decorative Elements  and these dies will all play nicely together

There are four dies in the pack and number one (#1) is always the smallest  so with that in mind I have cut the #4 from Black and #3 from yellow

I have hand cut the sentiment .., which was free with this months copy of Simply Cards and Papercrafts  magazine ... and layered it on to more of the yellow.

The flowers are pale yellow from Wild Orchid Crafts  and I created a matching box for the card too.

"Yes !!"  the more I look the more I like it

More tomorrow ...

Hugs xx


February 24, 2015

Tuesday Tutorial - Gold Majesty Circles

Hi Everybody,

When Spellbinders introduced the concept of the Imperial Gold dies it was a completely new idea to the world of die cutting.

With these dies you had not only the ability to cut and emboss but now you could also deboss the design into the card for a really special look.

For this card I have used mirror card and placed a matching hatpin into the bow.

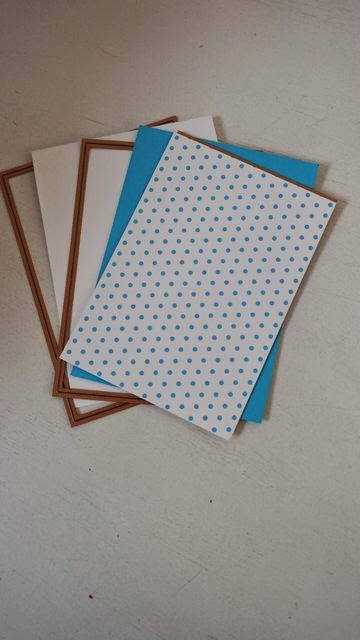
For the base  cut two #7  5x7 Matting Basics A   in white (#1 being the smallest)

In the color f your choice cut 1  #7 5x7 Matting Basics B  and between this layer and the base card I hand cut another really thin edged layer in mirror card

In a patterned card cut one #6 5x7 Matting Basics A ... I used the spotty card

This video  tutorial explains why I like to make my cards in  this particular way ...  Create a Hinged Card


With  Gold Majesty Circles  #6  cut  and emboss the base layer from Mirror  card

Then  place the dies #4  #5  #6  together on your card and cut and emboss.

You can use  a magnetic sheet to hold these dies in place as you need to make sure that they  will not slip and cross each other or you will ruin the cutting edge

These three will create the frame shown and will give you a lovely deep impression in your card

Place foam pads on the wrong side of this frame and use the wider areas so that they wont be seen.

Add this frame to the mirror card base you cut previously
Layer up the mirror card, colored card and patterned card and use foam pads between the bottom layer and the base card.

Now before I add mine I wrapped ribbon around them so that it will be hidden inside the layers.

I added foam tape to the shaped layers and then added them to my base.

I inked the edges of a sentiment that has been cut into a plain circle and then added it to a Scalloped circle.

I used foam pads behind this and placed into the centre aperture onto the mirror card.

Then with a neatly tied bow with a Hatpin and some gemstones around the edge of the frame I think this is a really pretty card.

The large dazzler has been added to the knot and some flowers are my finishing touch,

More tomorrow ...

Hugs xx