Beautiful Card Designs Made Easy

November 20, 2015

Friday Freebie 094

Hi Everybody,

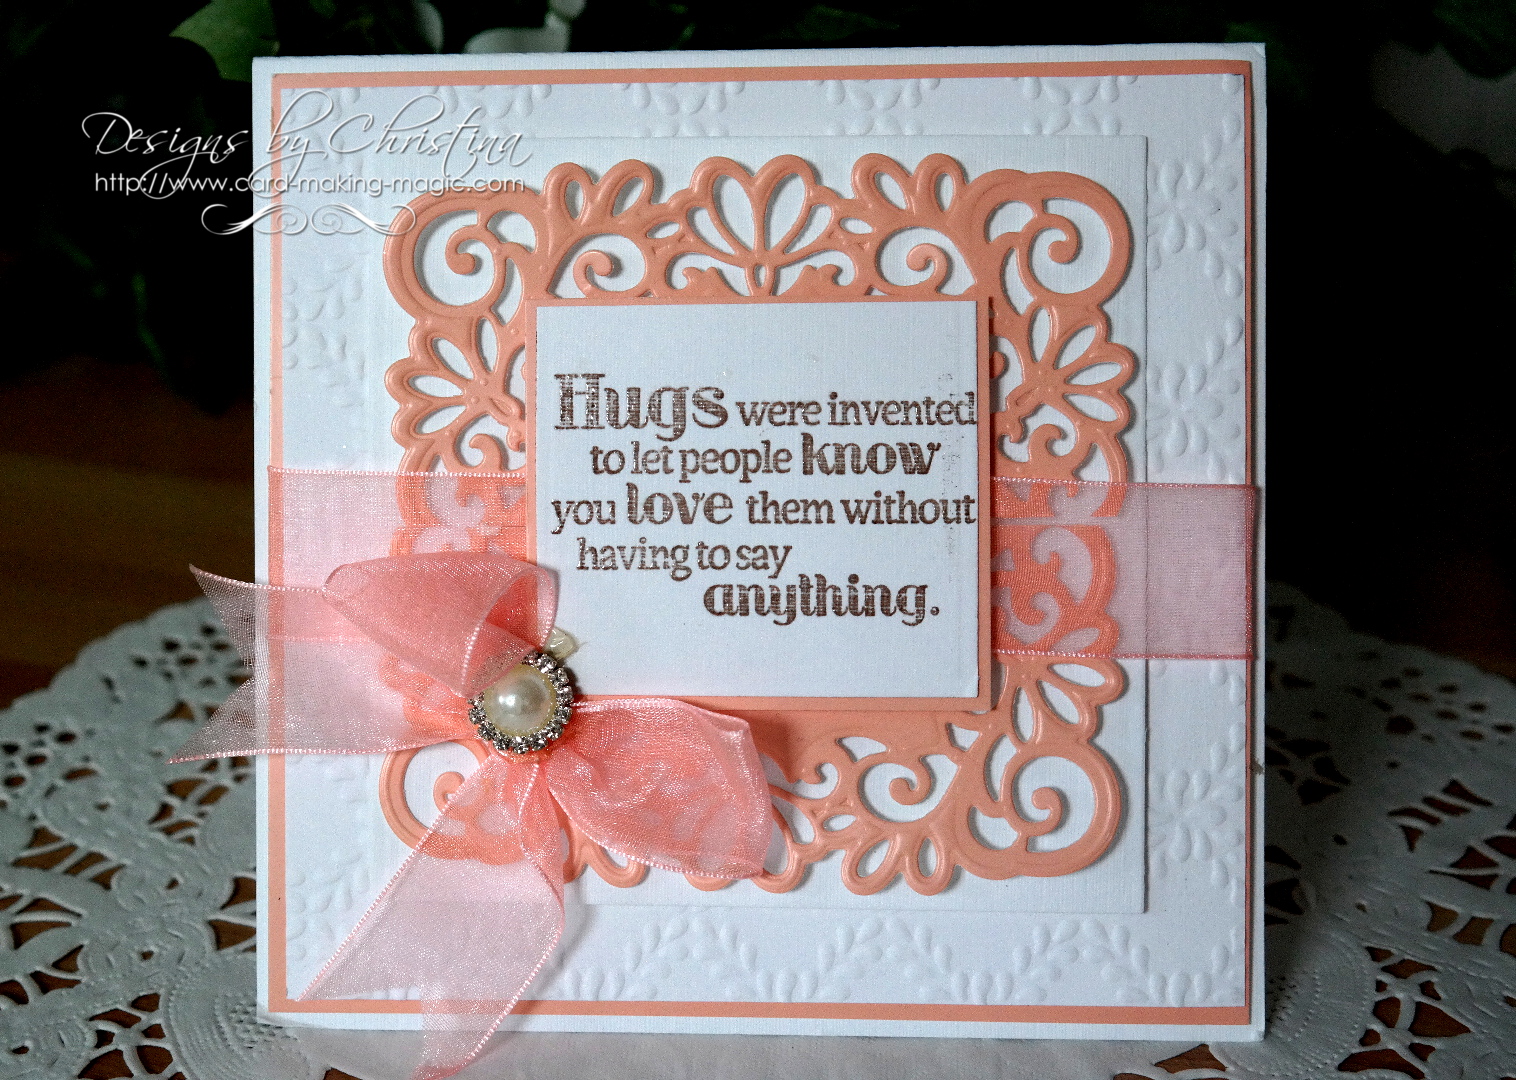
Todays card is created in Peach and White with some pretty matching organza ribbon from Mei Flower

The peach background is the large die Heirloom Rectangle that I have cut down to create the square

All the layers have been added with foam in between to give height and dimension to the card

The sentiment is from Crafters Companion and I have stamped it in brown and heat embossed it with clear powder, then added it to a peach mat

The embossing folder is sadly no longer available to buy,  but you can use any that you have in your own collection to give added texture to the background layer

If this is a card that you would like to win then all you need to do is leave me a comment at the bottom of the post and then come back tomorrow to see if your name has been chosen as the winner.

More tomorrow ...

Hugs xx

November 19, 2015

Thank You Cards ...

Hi Everybody,

Here is an idea for a really inexpensive boxed gift set to give to some one and all it will cost you is a bit of ink, some card and a little time.

But think of the joy that some one will get when you give them this  as a gift for any occasion.

I made them in one batch session and they are all alike apart from the colours.

I used Distress Inks and the flower stamp from Spellbinders is called  My Friend

The sentiment is from My Favorite Things  and  there are four stamps on the sheet called Grand Greetings 

I have stamped them in Black and then  heat embossed it with clear powder for a shiny effect  ... and this is less messy than embossing with black powder.

I used a new tool called the MISTI   ... Most Incredible Stamping Tool Invented  ... and it is a fabulous new toy.

I am in the process of putting together some video tutorials on the new Misti to show you some of the things you can do with this tool.

It is not cheap and it flies out of suppliers the minute it is back in stock so you need to be quick if you want one.

At the moment Oyster Stamps are taking pre orders for deliveries of the  MISTI   later this month so click the link to go to their website and take a look for yourself

I have made a box to hold the cards and included the envelopes to go with them and you could even include the stamps too for your recipient to send the cards to others

 I think this is a very useful as well as pretty gift to give

More tomorrow ...

Hugs xx

November 18, 2015

2-4-1 Christmas Card (Video Tutorial)

Hi Everybody,

Todays card is a little special and will take some measuring from you to get it centred

It is well worth the effort if you do and you will get two cards for one by using the positive and  negative of the die cut

Let the video show you how I did this and then maybe you would like to try it for yourself.


This is the second card and it is really pretty with the diamanté studded around it and I am really pleased with the way both have turned out.

Make them in different colours and send them to your special friends this year.  I used Faded Jeans Distress Inks as it blends so well

The letters I have used are from Donnas' Alphas from Spellbinders and I have had this set for a long time.

I am trying to re use the older dies as I know that many of you may have them and if you do then we may as well make use of them.

The background to the second card is Grate Effect  and it makes the loveliest back drop to the words.

You can use any alphabets  that you have as they will work using the same method.

These two are created using Spellbinders Font One Uppercase and it is a finer font than the other.

The colour is Salty Ocean and I have used a Splodge Mat  to help me blend my inks ... and this company now do many stencils that you can blend with
This the same die set and the card on the left has been made into a shaker card.

The stamp set was free with Simply Cards and Papercrafts  and it has proved to be really useful 

So there you have some pretty ideas to make some of your cards and with an alphabet you can add any name or occasion that you wish.

More tomorrow ...

Hugs xx


November 17, 2015

Tuesday Tutorial - One Word Wonder

Hi Everybody,

Todays card is just a little bit of fun and shows you that you don't need a lot of dies to be creative. This one uses just one word but the effect is quite good and the sentiment says it all.

Spellbinders Supplies:
Other Supplies:
  • Distress Inks - Salty Ocean, Victorian Velvet, Milled Lavender
  • Black/ White Card from Papermill Direct
  • Baked Ikea Dots
Instructions:
Cut a panel of smooth white card to about 4 1/4 x 5 1/2" and create your blended effect with Blenders to get a pretty finish.   Other colors will give you another look so use any Distress Inks that are in your "Stash"
With the die "Hello" from the phrases set cut it as many times as you need in white to fill the front of your inked panel. 
I added mine at an angle and cut  up the words as I needed to fill the gaps along the sides. When you are happy with the position glue them in place and trim off the overhang to neaten the edges
With the same die cut the word again in black card and I have also cut it in craft foam and glued the two together for a thicker look
Stamp any appropriate sentiment onto black card and heat emboss in white.
Trim the end into a little banner shape
Add your word panel to some black card and leave the tiniest of borders around the edge. Add it to a white  Hinged Style  base card
Add in the banner,  with foam pads underneath to raise it up, where you want it to sit on your card and  glue in place the black Hello over one of the white ones
Highlight with some black dots for a really simple card.

More tomorrow ...

Hugs xx 

November 16, 2015

International Ambassadors Informal Blog Hop - Woodland Collection

Hi Everybody,

It's that time of the month  for the International Ambassadors to host another informal Blog Hop and we hope you will hop along with us again this month.

We have chosen Spellbinders  Woodland Collection 
this month and there are some really cute dies in this set to help you make some beautiful cards.

I have used several dies from the whole collection and worked them all together to build up the scene for my card

First I have used the Woodland Owl   and added large Googly Eyes to the shape, and I have him sitting on the Wreath

At the bottom of the card I have added in some of the Mushrooms  and added in some of the Grass

I  placed a couple of large Leaves  behind after inking them through the die. And the embossing folder behind the scene is Bricks and Bark folder also from Spellbinders

Start here in the UK with me and then pop over to visit

Linda Lucas  in Australia
Yvonne van der Grijp   in the Netherlands
Christine Emberson   back in the UK

All these ladies are so talented and they will have some wonderful designs to share with you. They will be happy to see you and please leave them a comment to let them know that you visited.

And if you have come to visit from one of the others then a big Hello and Welcome to you I hope you will pop back regularly

Happy Hopping !!

More tomorrow ...

Hugs xx


November 15, 2015

Spellbinders Lonely Hearts Strip Box (Video Tutorial)

Hi Everybody,

The following video is one I was asked to do by a lady who saw me make it on Create and Craft last year and so always happy to oblige here is the tutorial.

I have used the Spellbinders  Lonely Hearts Strip  die to inlay the pattern into the box sides and the video will take you step by step on how I did it.

But you can use this idea with any strip die in your "Stash" that has a separate cutting edge

It is just the right size to add perfume, cookies or a pretty scarf too ... or chocolates ...  well anything is the right size for chocolates !!

For mine I have used scented candles and wrapped them in red tissue paper and I must admit it smells lovely.

They are really cheap from Ikea but you can get them anywhere


The card I have used to make the box is White Hammered 255 gsm from Papermill Direct and it is plenty strong enough for the job.

The Acetate that I lined the box with is from Crafters Companion

Decorate the box any way you wish and be happy to give this small and inexpensive gift to some one you know.

The die is in two parts so that you can create a solid separate layer and  once layered with the two cut together and glued on top  it is perfect for making Book marks to give as another small gift.
Hope you enjoy the video 

More tomorrow ...

Hugs xx

November 14, 2015

Another Winner ...

Hi Everybody,

I hope you have had a really good day today. It has been cold and windy here in the North West but now we are snuggled up at home with the central heating on and waiting for X Factor to be on a little later.

In the meantime the draw has been done for the winner of the mint green card and the name drawn from the hat is you ...

Marion ...
can you email me please 
christina@card-making-magic.com 
with your postal address and the card will be on its way to you straight away
I hope you will like it when you get it and please let me know when it arrives with you.

I have a video tutorial planned for you in the morning so please pop in to take a look 

More tomorrow 

Hugs xx

November 13, 2015

Friday Freebie 093

Hi Everybody,

The  photo does not do the card any justice as it is much prettier in real life

It is in a lovely shade of mint green and the white sets it off nicely.

I have used the Mary Border Strip   and this die is in two parts.

The satin ribbon is from Mei Flower  and is tied into a large single bow.

The flowers are some that I had in my "Stash" and I really don't know where these flowers are from.  The pearls are self adhesive ones from Want2Scrap

The sentiment is stamped and embossed in silver and it is one I bought at the craft shows.

So if you would like to own this card then all you need to do is leave me a comment and a name will be chosen in the morning and announced in the days Blog post.

More tomorrow ...

Hugs xx


November 12, 2015

Pink Floral

Hi Everybody,

Todays card used more digital paper but these are some that I have had stored on my PC for years and I cannot remember where I got them from.

But there are spots, stripes and flourishes in many many colours and they all work together. I use them time and time again as they go so well with lots of things.

Here I have used spots and stripes and covered the join with ribbon and lace.  The card topper is from the Floriography CD that I showed you a few days ago.

It seems that many of you also have this CD and are frantically digging it out again to use it.

The die  I have used is Spellbinders  Lotus  and it has been around for years

Sadly this pretty die is no longer available to buy,  but you may find one that someone no longer uses and is selling it on.

The sentiment is from Phrases Two  by Spellbinders and the pretty flourish is the Flourish Trim and this is a really useful piece to add that little extra to your cards ... for about a fiver !!

More tomorrow ...

Hugs xx

November 11, 2015

Thanks ...

Hi Everybody,

The background to this card is created from a two part stamp made by My Favorite Things

It is the Candy Stripe Background 

One stamp is the thicker stripes which I have done in pink and the other is the thinner triple stripes in black

It would look really good in other colours too, and it is the perfect  way to create your own backgrounds, to match your designs, when you don't have a suitable paper on hand.

Play with the stamp ...  use just one part of it for a simple look.

Stamp it one way and then turn it around to create some checks. Try it diagonally too for another look. I am sure that you can come up with many more ideas as you play.

The "Thanks"  word is a small die from  AlteNew  and it has the  matching stamp set  to go with it, and from that set I used the other part to the sentiment.

I cut the word twice from black card and black craft foam and layered the two together

Another that is not my usual style and I don't profess to be a stamper ... but never the less I enjoyed making this card and playing with some of the new and different items I have been buying

More tomorrow ...

Hugs xx


November 10, 2015

Tuesday Tutorial - 6x6 Matting Basics

Hi Everybody,

For this card I have stayed with a simple design that is easy to do and is ideal for those occasion when a quick card is needed. 
 Have an evening where you sit and die cut lots of different shapes or embellishments so that you always have some on hand for such a time.
Spellbinders Supplies:
Other Supplies:
Instructions:

With die #8 from Matting basics A cut two panels and Create a Hinged Card for your base 
With die #8 from Matting Basics B cut one panel from Silver 
With die #7 from Matting Basics A cut another panel in patterned card
( Please remember that die #1 is always the smallest)
Stamp and emboss your sentiment and layer it with Lacey Circles cut in Silver for a pretty edge
Cut the butterflies from any butterfly die that you have in your collection and layer the two shapes together with glue along the body line only.
Curl the wings upwards slightly 
I have hand cut another smaller layer in purple to go between the patterned card and the Silver and wrapped all the layers together with my cord.
I splayed the cord out along the card for another look and glued the ends on the back.
Add all these layers to your base card with foam tape to add dimension.
Add your sentiment also with foam tape to the centre of the card and arrange the butterflies around it just gluing along the body line so that the wings can still curl upwards
Add in the butterfly trail with Diamanté 

I added in some Diamanté Teardrops and the card is ready to send with your love 

More tomorrow ...

Hugs xx 


November 09, 2015

Gorgeous in Green ...

Hi Everybody,

Another offering with digital papers from the Floriography CD  and this one has large daisies on the paper.

For this card I have matted and layered it with a paler shade of green but cut the sentiment in a darker shade so that it stands out more.

Along the bottom I have used a pretty technique with ribbon and there is a video tutorial to show you what I did.

Ruffled Ribbon is a really old video tutorial that I did so my apologies if it looks a little dated ... but the effect is still a pretty addition to your cards.

To the ribbon I have added in a row or pearls and used one of the Mother of Pearl Buttons from Spellbinders called Grandmothers Buttons.

More tomorrow ...

Hugs xx


November 08, 2015

Card Winner ....

Hi Everybody,

This is very late post for me and it's now 11pm and I have just watched the last episode of Downton Abbey.  It was happy and sad all in one go and I am sorry it has ended. It was undoubtedly the best series on TV.

What am I going to watch on Sunday nights now ???

We arrived home from the NEC safe and sound this afternoon and I must admit I enjoyed my day there. It was lovely to meet those who stopped by to say hello and I hope I get the chance to do it again in the future.

 The draw for the card that was offered last Friday has been done and the name selected is ....
 
  Jean Bullock ...
Can you email me please with you postal address to
christina@card-making-magic.com
and the card will be in the post to you straight away
I hope you will like it and please let me know when it arrives with you

More tomorrow ...

Hugs xx

November 06, 2015

Friday Freebie 092

Hi Everybody,

Todays card is back to my favorite colour Pink and for this one I have turned to Spellbinders Lace and Frills Texture plate

I have Letterpressed  the pink ink onto the card and the link is to a tutorial to show you what I did.

The video uses an embossing folder but the principal is exactly the same

If you would like to have this card winging its way to you then all you need to do is leave me a comment. From those comments a name will be drawn and the winner announced in a Blog post.

But that won't be until Monday as I am away this weekend. I will be at Birmingham NEC  and this time I will be demonstrating for Spellbinders.

Now I have never done this sort of thing before so it is all going to be a bit of an adventure

Christine Emberson and I are the two UK Ambassadors and we will be on the Aceville Publications stand. I will be there on Saturday 7th November,  so I hope you will pop along and say "Hello"

Please come back and check the blog though to see if it is your name that is announced as you only have 48 hours in which to claim the card once the name has gone live.

You will need to email me ... christina@card-making-magic.com ... with your postal address and not here on the blog as there is no email address attached to the blog

More tomorrow ...

Hugs xx


November 05, 2015

Friends ...

Hi Everybody,

This little A2 sized card has been stamped with the Vintage Flowers stamp set from Altenew and I got mine from Make the Day Special 

It has a  matching die set  for you to cut the flowers, leaves and branch out perfectly for you each time.

But for this card I stamped directly to card.

Once I had the flowers in place I stamped my sentiment, in black ink,  over the top of them,  and then heat embossed it in clear powder.

The stamped words are  Grand Sentiments by My Favorite Things also from MTDS

I inked around the edges of the card with Salty Ocean Distress Inks fading it in towards the centre for a Vignette look

The white satin ribbon is from Mei Flower  ribbon and a little acrylic flower from Wild Orchid Crafts to the bow are all I have added.

I know this is not my usual style but it does you good every so often to play with other ideas and keep your mind active and fresh.

More tomorrow ...

Hugs xx