Beautiful Card Designs Made Easy

May 03, 2016

Tuesday tutorial - Persian Accents & Motifs

Hi Everybody,

Continuing with the older dies from Spellbinders this week I am featuring another requested set and this one is Persian Accents and Motifs.  
A really pretty group of dies for a lovely intricate look without too much effort on your part. 
Spellbinders Supplies:

Other Supplies:
Instructions:
With die #7 from Matting Basic A cut two pieces of white card to Create A Hinged Card
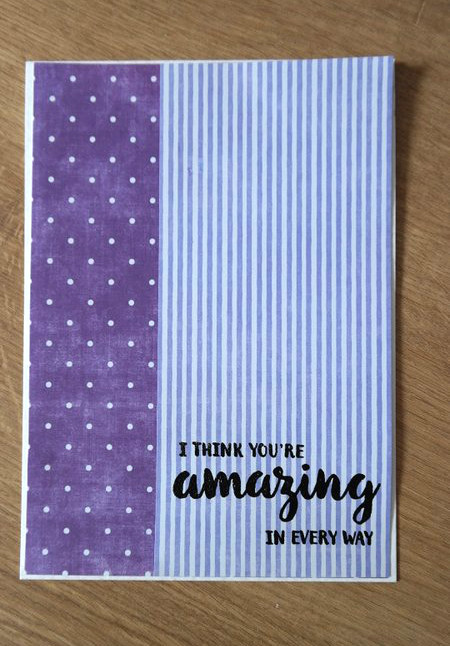
With two blending pieces of paper add them as shown to your card base and stamp and heat emboss the sentiment of your choice to the bottom right of the card
With the border strip from Persian Accents cut one piece in white and two pieces also in white from the square die #5
With die #4 from the Motifs cut two pieces in Lilac card 
(Please remember that doe #1 is always the smallest)
Add the border strip to cover the join and trim as needed at the top and bottom.
Then layer up the Lilac pieces with foam tape ... off setting them as you add them to the card
Add the two white shapes in the same way and add small pearls to the end of each point
Curl the edges up slightly to look like petals
Add in your floral display to the top of this centrepiece and dot the petals of the flowers with glue that dries clear.
Sprinkle the flowers with glitter for a sparkly effect 

More tomorrow ...

Hugs xx


May 02, 2016

Cherish The Moment-Tonic Studios

Hi Everybody,

Todays card created with a beautiful Tonic die and this one is called Cherish the Moment  and it comes in four parts

It is featured in a video that is "Live" on YouTube   today so I hope you will pop over there and view it.

I have given you two variations with the same die but the larger one uses some beautiful flowers from Wild Orchid Crafts

The lace is also from WOC and I think it adds a really feminine touch to any card.  I added some trimmed lace as leaves with the flowers on the left

And rather than throw away the bit that I trimmed off the lace I added them into the top right and bottom left corners with a little diamante centre.

My blog posts for the rest of this week will all be scheduled because today I am flying off to Portugal with my youngest daughter and her Granddaughter the wonderful Isabella (My Great Granddaughter)

We thought it would be good fun for the three generations to have a girly week away before Isabella starts school in September.  A week with a four year old should be fun (????) and I will take some photos while we are away.

So I hope you enjoy the blog in my absence and I have lots more planned when I get back

More tomorrow ...

Hugs xx


May 01, 2016

Birthday Blue ...

Hi Everybody,

This pretty blue card is created in the Shabby Chic Style and is full of flowers from Wild Orchid Crafts  I have added white Gesso to the petals to make them appear more shabby and then added the Dries Clear glue and sprinkled it with Glitter.
The card is 5x7 and the base is a 255 gsm White Hammered Card from the Papermill Direct
They are a UK company and as buying card is so heavy you will need to check for yourself if they ship to your part of the world.

The papers are digital ones that I have printed from my PC and I have had them for a long time and use them often. The sentiment is the same and I have added that with foam tape behind to raise it up.

The flourish is from Spellbinders and is the Foliage Flourish it makes a really pretty addition to any of your floral displays

The Honeycomb die is also one that I have had a long time ... and it is one of those that have been sat at the back of a drawer and not used ... so I had to dig it out and make it work again. But I cant remember where it is from 

The little polystyrene balls are from AnnaMarie Design   and if you have watched Anna Marie on Create and Craft then you will know the wonderful work she creates and you will be pleased to know that she has started her own YouTube channel to show you what she does.

More tomorrow ...

Hugs xx


April 30, 2016

Todays Winner ...

Hi Everybody,

After an early start going to Slimming World weigh in for 8am ... and finding that I have gained half a pound !! it was in to town to buy some last minute goodies for my holiday.  I have had lots of good wishes for a safe journey home ...
 and I haven't gone yet. 

We fly out early Monday morning to Faro in sunny Portugal. So today I have bought my self some new clothes to take with me and some sandals as it is quite warm out there. 
 Griff is not coming with us, just a girly week away,  but he has done the draw for this weeks 
Friday Freebie card.

The name drawn from the hat is you 

Ruth M 

so if you could email me your postal address please to
christina@card-making-magic.com 
the card will be on it's way to you 

I hope you will like it when it arrives and please let me know when it does. 

If you could email me as soon as you can the card will be on its way to you on Monday. But is it is after that then I can't post it till I get back home.

I have lots of blog posts all scheduled for next week and tutorials on here and YouTube 
So this is my last "Live" post until I get home. 

More tomorrow ...

Hugs xx

April 29, 2016

Friday Freebie - 116

Hi Everybody,

Todays card is in deeper colours and I have added in a "Thank You" tag but you could change this to what ever you wanted

It has a lovely floral display from Wild Orchid Crafts  that have the sparkly treatment on the petals.

It is very textured and is much better in the hand than the photo.

So if this is a card that you would like to have then all you need to do is leave me a comment at the end of the post.

Have a look at the Winners Page  and tomorrow blog post to see if it is your name that is shown and follow the simple steps on that page to claim the card

More tomorrow ...

Hugs xx


April 28, 2016

Shabby Chic ...

Hi Everybody,

The cards that I have been making in the Shabby Chic style have gone down a real treat with many of you and I have had lots of emails and comments about them. So today it is my pleasure no tell you that there is a new video on YouTube showing how I made this
I really enjoy making this style as I can go to town with all the bits and bobs I love to add.
Some one has said that they really like all the "Frippery" that I add and I thought that was a lovely word to describe the cards.

The flowers, leaves and lace are all from  Wild Orchid Crafts   and are a mixture of pale blue and beige. The pearls are from  Want2Scrap and the frame is cut from white card from Papermill Direct using the Die D-Lites Reflections from Spellbinders


Thank you for all the positive comments and I am happy that you like the cards too ... I have many more to show you and also to make on video

And over on Card Making MagicI am going to add a special section where I can add all the Shabby Chic Videos together I will tell you all on here when it is done and hopefully then you will pop over and visit the page.

More tomorrow ...

Hugs xx


April 27, 2016

Water Colour Wednesday - Feeling Sheepish

Hi Everybody,

Todays cute image is from Clearly Besotted and this is the Feeling Sheepish stamp set.

For this card I have stamped them direct to water coloured card and used Gansai Tambi water colours to paint them.

There is a matching die set that will cut the sheep and the grass out for you but you will need to purchase them separately

I kept the layout simple but it was fun to do and I quite liked the card once it was finished.  I like to try different things from time to time as this keeps the card making block away.

More tomorrow ...

Hugs xx

April 26, 2016

Tuesday Tutorial - Parisian Accents & Motifs

Hi Everybody,

The other week I asked if there was any particular die that you would like to see in a tutorial or video and the most requested one was for the Parisian Accents and Motifs. This die is no longer available on the Spellbinders website but I know that many of you have this set and still love and use it often.
I have used a soft cream and Kraft card today for this really pretty floral card
Spellbinders Supplies:
Other Supplies:
Instructions:
With die #7 from Matting basics A cut two and Create a Hinged Card from cream card
With the small square die from Parisian Accents cut the shape six times from Kraft card and link them together on two sides using the little knobbly areas on each piece.
With Matting Basics B take dies #5 6 & 7 to create the frames ...
Using #7 and #5 will create the wider frame 
Using #6 and #5 will create the thinner frame
Once you have cut the wider frame you can add the linked squares to it by gluing just around the edges and then adding foam pads to strategic areas to raise the patterned panel.
Hand cut and emboss another cream panel making it slightly larger than your patterned frame work
Make sure that this is leaving a small border around the base card and and it in place
Add foam pads to the thinner frame and add this to the top of the wider one to give you a double frame around the filigree panel
Cut your word several times and glue them together to make a sturdy sentiment and with foam pads add it to the front of your card.
I decorated my card with a large pearl flourish and then added the word over the top.
Have a dry run with your flowers to see where you would like them before gluing them permanently in place. Dot with glue and sprinkle on the glitter for a sparkly effect.
And here is another idea using the same colour combination but other dies from the Parisian Accents and Motifs.
Next Week:  Persian Accents and Motifs

More tomorrow ...

Hugs xx  

April 25, 2016

Baby Cards with Tonic-Gold

Hi Everybody,

I wanted to show some more ideas for beautiful baby cards using the Rococo Baby dies from Tonic-Gold and they are always such a pleasure to create.

But these are featured in a video that I have and I hope you will enjoy it.

It is available to view on YouTube from today and here is the link for you  New Baby Cards

I have used the Baby Balloons  and the Adorable Elephants from the Rococo Collection  and teamed them with the New Baby Sentiments 


These dies are really good to work with and cut easily through most die cutting machines

As always I enjoyed making the pink one the most and adding in all the little finishing touches.

Both cards are reasonably flat enough to go into an envelope as there are no deep flowers on them ... but I can't promise that that will last for long

More tomorrow ...

Hugs xx

April 23, 2016

Card Winner Today ...

Hi Everybody,

Here we are with another Saturday .. another weekend and another card give away winner. 

Aaaand another weigh in with Slimming World and this week I have stayed the same.

 I am surprised at that, as I have been somewhat naughty this week. 

 The reason is I am winding down into holiday mode because my youngest daughter and I are taking Isabella on holiday to Portugal on the 2nd May, before she starts school in September. 

 This will be three generations all going away together and it should be a lot of fun.  So that's me ... Great Gran, my daughter Vickie , who is Isabellas Grandmother and is called  Nana Vickie, and Isabella the mischievous four year old.

 But all my blog posts and  Tuesday Tutorials have been done this week and they are all scheduled to go out on the designated days. I have even added lots of videos tutorials on YouTube too.

The name for the winner of the card has just been chosen by my trusty "Film Crew" (Husband Griff) and the winners name is

Tina Gray ...
please email me with your postal address to 
christina@card-making-magic.com
and the card will be on its way to you.

Please let me know when it arrives with you and I hope you will like it.

More tomorrow ...

Hugs xx

April 22, 2016

Friday Freebie 115

Hi Everybody,

Todays Freebie is a floral creation made with the dies from Spellbinders Victorian Garden Collection and is in white and silver

It is prettier in the hand than the photo shows and could be for any occasion.

The centre panel is cut twice in white and silver from the  Majestic Oval

The flowers are from Wild Orchid Crafts  and are different sized Roses and Gypsophilia

Over on the right hand side of the oval is a tiny organza butterfly and the whole lot is surrounded in pearls from Want2Scrap

So would you like to have this card?

Then all you need to do is leave me a comment and a name will be drawn from those comments and added to tomorrows blog post.

If you should miss the blog post then all the winners names are added to the Winners Page  which is always available in the side bar to the left along with some simple guidelines

And there is a new video to view on YouTube with the  Heirloom Rectangles  and this was a request in response to my asking what you would like to see ... so thank you for the request

Good Luck everybody 

More tomorrow ...

Hugs xx 

April 21, 2016

Baby Card in Pink ...

Hi Everybody,

Todays beautiful baby card is one that my daughter asked me to make for her friend

I was happy to oblige as I love to make this type of card ... especially for little girls

For this card I have combined some of the Rococo Baby dies kindly sent to me by Tonic-Gold

The focal point on the card is one of the  New Baby Sentiments   "Welcome to the World"  and I have added it onto one of the layered Art Nouveau Ovals 

The  Baby Balloons  I have cut several times and glued them together and added it with foam pads

I have created it in the Shabby Chic style and I really love this card.

And of course it had to have a box to match it and to this I added another sentiment from the Baby set

The paper pack that I have used is one that I have had in my cupboard for a long time and it is the 12x12 New Arrival from Forever Friends.

More tomorrow ...

Hugs xx