Beautiful Card Designs Made Easy

Showing posts with label AnnaMarie Designs. Show all posts

January 17, 2017

Tuesday Tutorial - Ovals & Rectangles

Hi Everybody,

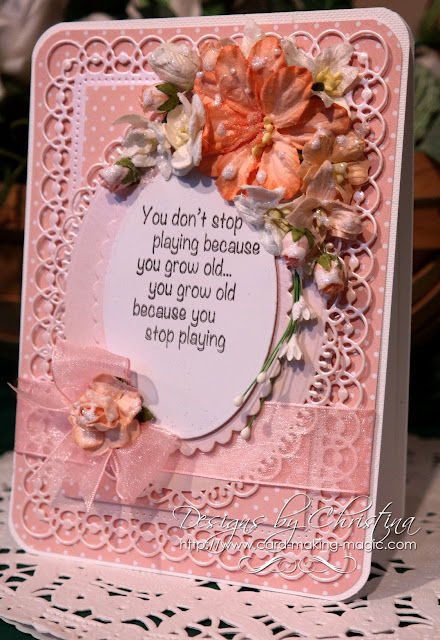
I thought for todays card I would dress it up with some pretty peach coloured flowers and use some of the older Spellbinders die sets. This card is a 5x7 and I have used the dies that will create a card that size without any measuring from me.
Spellbinders Supplies:
Other Supplies:
Create a base card with the largest die #7 from Matting Basics A
Hand cut another layer, with peach patterned card, to leave a really thin border around the edge
Round the corners
With the largest dies from the Ovals and rectangles sets cut panels in plain peach coloured card
Add foam tape to the back of each of these panels
With the ovals cut a scalloped layer in peach.
Stamp and heat emboss a verse onto white card and cut with the oval to match the scalloped one
Layer together with foam pads between the layers
Layer everything together and wrap with ribbon before adding to the card base
Add the oval sentiment to the top 
Choose a selection of flowers in peach and white varying the styles and sizes
Add these to the top right of the card. I use a hot glue gun to add my flowers as I don't want them to fall off the card once given
Dot the flowers with glue and sprinkle with glitter to finish

More tomorrow ...

Hugs xx

January 12, 2017

Tonic Studios - Numbers

Hi Everybody,

Numbers are always a useful addition to your crafting stash

These are from Tonic Studios and they are quite large.

They can make a complete focal point on your cards to celebrate that special birthday or anniversary.


This is the complete set of numbers from 0 - 9 and of course the number 6 can be turned up side down for the 9

Each number is in two parts to help you create different looks


In the picture below count the shapes from left to right  1 - 5...

Cutting the solid one alone from designer papers can give you a really pretty look (1 &2)

Cutting the patterned one alone will add some interest for you.(4&5)

Cutting the two together will give you a really thin frame that you can add to the number (2,3 & 4)

For my card I have cut the solid number from beautiful Blissful papers from AnnaMarie Designs

Then I cut the patterned die from white card and added it the top. I dressed it with flowers and stamped the other sentiments from various sets onto some white card and added them with foam pads

More tomorrow ...

Hugs xx

January 10, 2017

Tuesday Tutorial-Sapphire Basic Set A

Hi Everybody,

This little starter set of small dies are designed to be used with the Sapphire, but they can be used in any of the small die cutting machines that are on the market.  

These little machines are so handy to keep on your work top to cut sentiments, tags or even some flowers. They take up no space at all but are just as strong as the bigger die cutters

You may have been lucky enough to get your Sapphire from C&C and this is the set of dies that came with the machine at that time. That machine is exclusive to C&C but the Prizm is the same concept and both are by Spellbinders
So here is a really quick and simple card idea for those little dies

Spellbinders Supplies:

Other Supplies:

Cut two panels with die #7 from Matting Basics A and create a hinged card
With die #7 from Matting Basics B cut another panel in dotty blue card
With die #6 from Matting Baiscs A cut another white panel and emboss in the folder that you have
(Please remember that die #1 is always the smallest)
Add the embossed panel to the dotty card with foam pads between the layers
Cut all the square dies together to create two frames and the other pieces as you need
Stamp your sentiment onto the small oval and layer it onto the tag die
Add the tag with foam pads to the embossed panel
Add ribbon through the loops on the tag and secure behind the panel
Layer up the frames to overlap each other with foam pads were needed
Layer up the butterflies along the body line and add the flourish as the butterfly trail
Add all this to the base card

More tomorrow ...

Hugs xx


January 03, 2017

Tuesday Tutorial - Floral Trellis

Hi Everybody,

This is the first tutorial to start off the New Year and I thought we would make this one in lilac and add those beautiful flowers to it.  I even used the same die to create the box and I have many tutorials on boxes of different shapes and sizes on Card Making Magic
Spellbinders Supplies:

Other Supplies:

With white card create top folded base card measuring 41/4 x 6"
With the Dotty card create another mat slightly smaller to leave a thin border around the edges
With both oarts to the Trellis die cut one panel in white and add small pieces of foam tape around the edges and onto the floral parts 
Add this to the Dotty card and trim around the edges
Wrap these panels with ribbon and add to the base card with foam pads
With the sentiment die cut twice in white and once in silver glitter card and layer them together with the silver glitter card on the top 
Add this to the  trellis just above the ribbon 
Tie a neat bow and add to the ribbon
Dress with flowers as you like and sprinkle them with glitter.
Use the inner portion of the Trellis die to make the panel in the top of the box and line with acetate
Use the Dotty card for the lid and white card for the box base
Dress with flowers to match the card if desired.

More tomorrow ...

Hugs


December 01, 2016

Magazine Freebie from Tonic

Hi Everybody,

With the December issue of Die Cutting Essentials there is a really useful tag set that comes free and in the new video I have tried to show you some ways in which to put it to work for your creations

The magazine will be in your shops on the 8th December so if you like the look of this free gift then place your order now ... or order it direct from Moremags

This one is truly feminine with pretty designer paper from AnnaMarie Designs as the background and blending flowers from Wild Orchid Crafts

Then with the next card I have gone for something really contemporary that would suit a teenager

I have used just the two smallest tags for this card and really bright block colours.

 You could use coloured card for this or simply colour white card with your marker pens to the colours you require

Either way it is a quick and simple card to make with your free gift and the video will show you more ideas that you may like to try....

More tomorrow ...

Hugs xx

November 28, 2016

Tonic Studios - Zip & Buttons

Hi Everybody,

This pretty baby card is created with the dies from Tonic Studios and it is such an innovative little die set that you can have loads of fun with

It is called Zip and Buttons  and I really enjoyed playing with this set.

 I used card some of the Spotty card from AnnaMarie Designs and created a little jacket with the zip and Wild Orchid Crafts Guipure some lace

The sentiments is also from Tonic and is one of the New Baby Collection and I have cut mine in silver to add to the card

I am sure that you can come up with even more ways to use this simple concept  on your own cards and have lots of fun in the process

More Tomorrow ...

Hugs xx


November 16, 2016

Water Colour Wednesday - Boy with Teddy

Hi Everybody,

Today cards is using an image from the CD Pretty Tuff by Polkadoodles.

This CD has been around for some time but there are some really good images and they are all for boys.

You can print them off already coloured for you or just the line drawings for you to colour in yourself

Through your printer you can also resize them to suit the card or project you are  making

Here I have used Gansai Tambi water colours and add buttons along the side as decoration.

The blue spotty and striped card is from AnnaMarie Designs  and I have layered them all up with Kraft card onto a White base

  More tomorrow ...

Hugs xx

October 31, 2016

With Love in Pink ...

Hi Everybody,

These pretty papers are from the Blissful Paper Pads from AnnaMarie Designs 

This is obviously the pink but there are other colours for you to choose from and sentiment tags to match also

I have used Circular dies to create an aperture and then filled the gap with Floral Trellis

Each of the petal shapes has been dotted with tiny pink pearl from Want2Scrap

The flowers are a mixture of stamped images, die cut flowers and leaves from the  Quite Contrary stamp and die set  by Spellbinders with paper flowers from Wild Orchid Crafts

More tomorrow ...

Hugs xx

October 25, 2016

Tuesday Tutorial - Labels 56 Decorative Accents

Hi Everybody,

Todays card is a really easy simple layered card and I have used some white cream and red spotty card for mine. I have separated the layers with foam pads and for those of you who are asking where I get my foam tape and pads from they are £££ shop buys and I buy loads for them every time I go in to the shop
Spellbinders Supplies:
Other Supplies:

With Matting Basic A die #7 cut two panels in white and create a hinged card
With #7 from Matting Basics B cut another panel in cream
With #6 from Matting Basics A cut a patterned panel
From Labels 56 cut each piece in cream and add foam pads to the back of them
Stamp and emboss your sentiment and layer it on to some matching cream card and add the foam pads to this also
Add the red dotty card to the cream layer and wrap with red ribbon
Layer all the Labels 56 together  and add on top of the other layers
Glue a bow in place and add the bows cetnre piece
Decorate with flowers and pearls as you like and sprinkle the petals with fine glitter.

More tomorrow ....

Hugs xx


October 18, 2016

Tuesday Tutorial - Lavish Vine

Hi Everybody,

For todays card I am using one of the new dies from Spellbinders and this is called Lavish Vine. It is quite a long strip die and it can be added to your cards in lots of different ways. This is a quick short tutorial to make cards that you can keep on hand for those emergency moments.
Spellbinders Supplies:
Other Supplies:

With die #7 from Matting Basics A cut two pieces in white to Create a Hinged Card
With die #7 from Matting Basics B cut a layer in gold card
With die #6 from Matting Basics A cut another layer from the Blissful Paper Pad
(Please remember that die #1 is always the smallest)
Cut the Lavish Vine three times from the Gold Card and glue them together 
Stamp and emboss the sentiment in Gold and cut to fit in between the holding parts of the die cut
Layer all the panels onto the base card and add the Lavish Vine with foam pads place in the solid parts so that they cannot be seen from the front
Add the sentiment so that it is held in place with the vine leaves and add a touch of glue if you prefer.
Dress the card with the flowers and pearls of your choice

More tomorrow ...

Hugs xx

September 12, 2016

Not A Card !!!

Hi Everybody,

The other day I was cleaning and tidying my craft room and I found several canvases tucked away in a cupboard.

It seemed such a shame to have them sitting there doing nothing.

And so I got out the paints and sprays, embossing pastes and stencils and set to work.

The intention was to video the making of this but I got a bit carried away with myself and before I knew it hours and gone by and the canvas was finished .... Ooooops!

It now hangs on the wall in my craft room and the size of it is 9" x 13 " so quite a good size and I have to say that I am very happy with it

Aaaand I still have several canvases still to use


I used a lot of  Wild Orchid Flowers  flowers  and leaves on this.

The string of pearls, metal embellishments and the organza butterfly in the top left corner are also from WOC.

The chalk paints I have used on the base coat, the natural fibres and the cheesecloth are all are from AnnaMarie Designs

There is also an abundance of glitter sprinkled around from Glitter Magic

More tomorrow ...

Hugs xx