Beautiful Card Designs Made Easy

April 29, 2012

Cream and Gold

This is another wedding card I was asked to make and the remit for this was precise. It had to be cream and gold with flowers and a lacy look, and  a wediing day sentiment on the front.

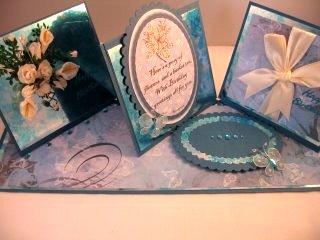
The card had to be large,  but flat enough to go into an envelope ... as it was to be placed in a suitcase to be  taken abroad.
The names of the Spellbinders used will be  BOLD  so that you will be able to see what has been used to create this card.

This is what I did to make this card to an A4 size and I bought A4 envelopes to use with it.

I embossed all the base background layer with Butterfly Garden Grand Impressabilities and then layered it onto gold card.

I cut a piece of cream card and embossed it with Paisley Embossing Folder and the cut it into three pieces and added each one to some gold card. These three panel were equally spaced out on the Impressed base.

Gold and Cream organza ribbon was then wrapped around all these panels, a bow attached and a pearl added to the centre to the knot.  The lacy edge was placed under these panels and was created with the Persian Accents border.

I then added it  all to another piece of cream card that has piercing  around the edge and  layered them onto the cream base card.  The  largest Floral Oval  was cut in gold and the sentiment was stamped onto cream card, and  heat embossed in gold,  onto the second smallest  Lacy Circle

Because the flowers had to be kept reasonably flat I decided to make them with the Anenome Flower in the gold and add a pearl to the centre of each one.   I tucked the flourish and leaves from the Belle Rose underneath for a little extra decoration.

I also added the same flourish and flowers to the envelope to match the card.... and it was very well received by the lady who commisioned it.

Hugs xx


April 28, 2012

Wedding Card

I wanted to show you this card that I was asked to make for a wedding later in the year.

This card will be going all the way to Australia and I hope that the Bride and Groom like it when they eventually get it.

I wanted it to be really special and I took a long time to get everything correct.

I used a good quality white card for all the layers,  flowers and the matching box.

I added the  Ruffled Ribbon along the left hand side,  in white satin, and glued it with strong tape to an embossed panel that I surrounded with Diamante.

The border edges are from the Morrocan Accents.

All the flowers are created with Spellbinders Bitty Blossoms, Spiral Blossom 1 and Spiral Blossom 3 .

Each of the larger blooms has had a Diamante added to the centre and the petals are sparkled with Glamour Dust.

The names have been added to the Floral  Ovals .

The background is embossed with the Paisley M-Bossablities 


I created the box from Centura Pearl from   Crafters Companion   and it has a beautiful sheen to it.

I added acetate to the aperture and decorated with the same flowers and Diamante. 

The butterflies are  an added extra touch to the card and the box and in the last photo you will see that I added an extra trail to each of them.

So now I have fingers,  toes and eyes all crossed that the couple will like the card I made to celebrate their special day. 


Hugs xx

April 27, 2012

Frugal Crafting ...

Did you enjoy a chocolate egg over the Easter holiday? 
And did you then throw away all the acetate  packaging that the egg was in ????
 Big mistake.      I can't throw anything away and this is what I did with mine.

My husband says that I am a hoarder ... I prefer to say I am being cautious... as you never know when you may need it.     But this is how your "Stash" grows larger and larger !!

I made full use of the M-Bossablity folders that I have to decorate the backgrounds... and if you click the photo it will enlarge for you so that you can see the detail that these folders give. 

I have added another video to the Spellbinder Series of tutorials and this one is  Spellbinders Oval Frames

The link will take you to the page but I will also add it to the Tutorials on this Blog for future reference.

The dies used for the frames are the Classic Ovals and the Scalloped Classic Ovals

Both of these are very pretty cards that would be ideal as a Wedding card.

 Just add the Bride and Grooms names and the Wedding Date ... make a stunning box to put them in and away you go. 

I hope you enjoy the video ... it's only short so you won't have time to go to sleep.


Hugs  xx

Spellbinder Blossoms...

I have had lots of emails asking me about the flowers that have been added to my cards over the last few days and I promised several ladies that I would do a video on how I get the look.

There are many ways to create these beautiful blooms,  but this works for me and many people seem to like the result .... maybe it could work for you too.


So here is the link to the video and I hope you enjoy it.  Spellbinder Blossoms 
I will also add it to the Tutorials page for future reference.

Some of the previous cards show these sprays of flowers and the Altered Notebook from yesterday has a long trail of them along the notebooks cover.

I am sure that I will be adding more to my cards in the future as they certainly make an impact when they are added.

The added "Bling" is from  Want2Scrap  and this a self adhesive pearl in the flowers centre and a piece of the flourish for the butterfly trail.

Hugs xx

April 26, 2012

Altered Notebook

Sometimes when we want to give a small gift it is hard thinking of something suitable.

This Altered Notebook with Spellbinders is  something that could be decorated as you like and given to anyone.

The flowers are all created from Spellbinders and because I have had so many emails asking me about them I have done a complete video on the subject which I will add later.

For this project you will need a spiral bound notebook but they are so cheap to buy I bought a whole pack of them and decorated them up in different ways.

And  they were well received  by those I gave them to as a stocking filler at Christmas.

The "Bling" on both of the books is from Want2Scrap and they are self adhesive pearls in long flourishes.

I have cut them down to use as they were too big for what I needed.

But by doing this I get a lot more for my money from each piece.

The Pink one has lace, silver net and diamante on the front cover, and it looks so much prettier in real life.


This Black and White one is full of my favorite things ... Flowers, Ribbons and Pearls ... so it's no wonder that I named my Blog the same way...


Hugs xx

April 25, 2012

Belle Rose...


This is a new Spellbinder die that I bought a few weeks ago and I know it is back to flowers again ... but for me they make such a beautiful focal point that I find very hard to resist.
This one is the Belle Rose and it is from Heartfelt Creations, a company that Spellbinders make dies for.
There is a lovely stamp set that accompanies the die and with them you can create the most gorgeous roses for your cards,  that you can colour in yourself.

I used an M-Bossablilty folder to create the background panel and this one is the So Trendy.
I embossed the top part of the card first and then the lower, so that I had the plain space in which to add my sentiment.
 I stamped that with ink that matched my colour scheme and then matted it onto the same card used for the flower and flourish.

The glitter strips have been done with double sided tape and sprinkled with Glamour dust.
But the die produces the most gorgeous flourish and it is quite large and I sat it under the blossom.
The card itself is an A5 so that will give you some idea of how large the die is, as it almost covers the bottom part of the card.

A large white pearl for the centre of the flower and some Glamour Dust around the edges and there you are... a quick and easy card to create and only one flower...

Hugs xx


April 24, 2012

Look No Flowers ...

I am adding these cards to day just to prove to myself that I can make a card with out the aid of some flowers and I now need to go and  lie down in a darkened room to get over it....

I couldn't make one though without  using my much loved Spellbinders.

They always have such a dramtaic effect on any card and they never let me down.

As always the name of the Spellbinders used will be BOLD to help you with any purchase you may have as you add to your collection
Both of these cards have been created with the Layered Scalloped Posy from Heartfelt Creations.
The central border is mixing two sets of Edgeabilites,  Classic Postage Stamp Insert  with theTriple Scallop cutting edge.

The sentiment is onto  two sizes of Lacy Circles.  Both have embossed backgrounds from the M-Bossabilities folders

This is one of my favorite ones and is the SoTrendy folder which is double sided ... with a unique pattern on each side.
So twice the value and twice the fun. And  there we are  ... cards with clean and simple lines, for any occasion ... and not a flower in sight.  (Sigh!)

Hugs xx


April 23, 2012

More Flowers...

The names to all the Spellbinders dies that I have used will be  BOLD  so that you will know what has been used should you wish to add them to your collection.


Here are those Bitty Blossoms again and they have been combined with the Damask Motifs  from Spellbinders.
I have layered them over the Romantic Rectangles with one of the Fancy Tags 3 at the front, and the leaf shapes tucked behind the flowers are from the Damask Accents. 

The buckle on the ribbon is from the Ribbon Buckles and there are lots in that set for you to use.

This card is going to be for a wedding and so the name and date have been left off and will be added later.

The pearly flourish is fromWant2Scrap and I have coloured them,  the butterlfy and the pearl flower centres with Promarkers to match my colour scheme.
I have added Cosmic Shimmer around the edge to create the look of pearls

Hope you like....

Hugs xx


April 22, 2012

Playing with Spellbinders...

I love, love, love my Spellbinders and I use one set or another on almost every card I make.

I will add the names of the Spellbinders that I use BOLD so that you will know which sets they are should you wish to purchase them to build up  your own collections.

It is also no secret that I like to add flowers to my cards too.

I just love the effect they give to a card and I openly admit to being a "More is more...." kind of a card maker.

I know it is not to everyones taste and I do love the elegant looks to a more simple card ... I make them that way too ..... but if I can make a card were I can add the "Bling" then I am happy to add it.

I have bought a lot of my flowers from Wild Orchid Crafts   in the past, and the look they give is so beautiful.

But my latest love is the Bitty Blossoms and the Spiral Blossom 3   from Spellbinders

When combined together they make the most beautiful floral spray to grace any card.

On this card I have added the Floral Flourishes behind the flowers and the blue background  is glitter card.

I have also added some Nestabling around the sentiment
The purple colour with pure white make these flowers really pretty and I have sprinkled them with Glamour Dust.

The organza ribbon and the flourish set off the Lacy Ovals and the trail from the butterfly is a left over piece of the pearly swirl.


The Nestabling is from  Want2Scrap and always makes a card look special what ever the style. 

Here I have used them with the Spiral Blossom 1 ... which makes the most gorgeous roses ... and the Floral Flourishes again.     The lovely sentiment is from                                   Clarity Stamp     

The Hatpin is tucked into the flower spray and can be removed by the recipient so don't forget to tell them.

It makes a lovely lapel pin for them to wear.

      
Hugs xx

April 21, 2012

A Fun Card

This is the latest addition to the tutorials and there are both written and video instructions for this fun card.

It is one that kids really enjoy ... and hopefully you will too.

The  Magic Slider Card is very easy to create but because of the way it is designed it will have children fascinated with how it works.... but  keep  'em guessing!

This is how the card will look when it is given and it can fit into a standard envelope if you keep the height of the flowers low.  
 I have added Poppies to the front to match the theme of the card and they are from Wild Orchid Crafts  I have mixed them with some Ivy leaves and  red gingham ribbon.

The Poppy stamp is from Clarity Stamp and I have coloured it in with Spectrum Noir Pens  from Crafters Companion

As the card is pulled from the sleeve this is what will be seen and the result is quite amazing.
So I hope you will take a look at the short video tutorial on how to get this look and if you are new to cardmaking don't be put off and think it is too hard to do,  it really isn't.

And you will be pleased with the result especially when the children that receive it plead with you to tell them how you did the magic.

Hugs xx


April 20, 2012

And last but not least ...

Having covered lots of variations on the Easel cards over the last few days this is one that combines two different folds.

The  Gatefold Easel Card  is another easy card and  if you are new to this lovely hobby it is one that will have the recipients saying   "How did you do it ...."

Trying out new ideas is what will keep your interest going and stop you getting into a rut.


And the whole point of the Website was to show "Newbies" how to get these looks for themselves in easy steps.

There is no point in having all this lovely card in your "Stash" if you are too scared to cut into it  ... and so it was my plan to help folks build that confidence to get started.

Once again I apologise to any one who is a more experienced card maker ... it is not my intention to talk down to anyone.

If you already know about all this then that is fine but please remember that many people don't ... and to them it is all a learning curve and I only want to offer any help that I can.


So over the last few days I have brought to you some really easy ways to make your cards stand out from the ordinary and I hope, if you are new to cardmaking that you have enjoyed them.


There is a permanent link to the Website at the top of the Blog since it has had it's make over and I would be honored if you would pay me a visit.... either there or on FaceBook.


Hugs xx

April 19, 2012

Quad Easel Card

This one is really special and it is the card that was actually mentioned on Create and Craft TV by Hunkydory.

The demonstrator  (Ruth)  said she had got the inspiration for the  Quad Easel Card card from "Christina"

It certainly created a stir as people were emailing me asking if I was the Christina that had been mentioned, because they had seen the card on my website ... and at that time I didn't know.
So of course I had to find out and spoke to Ruth herself and she said she had got the inspiration from Card Making Magic.

I explained that it was my wesbsite and I went down to meet Ruth later in the month.  I often go into the shop in Preston for some of the lovely goodies that they have in there.

Cardcraft Plus  is the name and they  will send you  a  catalogue that is well worth browsing through.

So here is the card and the link at the top of the page will take you through to the written instructions ... 
but on there is also  a    video tutorial    that is very easy to follow, and I hope you will enjoy it.

There has also been added a "Tutorials" title at the top of the Blog and there you will find a list of some of the tutorials that I have on the website.

None of them are long so why not get your favorite brew and take a look and see if you woud like to try some of them for yourself.

Hugs xx

April 18, 2012

Triple Twisted Easel

Now that's a bit of a tongue twister on the quiet but the card isn't .... it's very easy to do and there are full instructions if you are new to this kind of fold.

The Triple Twisted Easel Card   has step by step instructions and you can add the twist in whichever way you want.
Have them all going one way,  or one of the easels straight while the others are turned.  But whatever you do the card will look different each time. 

I have used Mirror card on my base and some lovely turquoise paper that was free with a magazine, and there is a mixture of flowers on one of the easels and some silk ribbon on the other side.

Spellbinder ovals have been used as the stop on this card and gemstones dotted aound the shape.  You can just make out the small organza butterfly resting on the base.

Another version tomorrow

Hugs xx


April 17, 2012

Triple Easel Card

Now after a few days of creating Easel cards in several different variations we are starting to get a little more daring.

This one is the Triple Easel Card  and now we are getting adventurous.

This one is very pretty in pink and the flowers on this are from   Wild Orchid Crafts  and they are trailed down the card to act as a stop for the easel.

The leaves are from the Ash Branch punch from  L-Em

A lovely wide organza organza ribbon is tied in a bow.

Once again I have featured the Butterfly from Marianne Creatables, with a large oval gemstone for the body

The lovely sentiment is from     ClarityStamp  and is one of many that are on the website.

Another variation tomorrow.

Hugs xx


April 16, 2012

Double Twisted Easel

To continue with the making of Easel cards this one is the   Double Twisted Easel 

Again if you are a seasoned cardmaker then my apologies for the basics, but not everybody knows how to create these different folds and it is for those folk that I add these steps.

 These cards were made quite a long time ago and it is interesting for me to see how I have progressed in card making.

I don't make them quite the same anymore and my flowers are much more elaborate these days.

But the Spellbinders are still in use although now I have learned how to make them work harder too.

But the method to making the card is the same whatever standard you are at.

I really don't remember where the flowers are from but I tell you what.... I am glad I have none left as they seem so flat and boring.

The image though is still in use and is one of the adorable Tilda characters and she  has been coloured in with Promarkers.

More tomorrow with the Triple Easel Card

Hugs xx