Beautiful Card Designs Made Easy

August 26, 2015

Pre Loved Items ...

Hi Everybody,

Not all crafters have a die cutting machine and dies and many crafters don't want one. But they do like to add the pretty shapes to their cards that make them stand out from the crowd.  If this is you and you are new to crafting then maybe you are looking for another way to get those shapes ... and this could be the answer.

These are embossing boards that you lay your card onto and then by running a stylus into the channels  on the board you can create the pattern on your card. Once you have cut it out you layer the shapes onto your base card for a really pretty effect

You don't need a light box and it is another way to get pretty shapes and patterns into the card if you don't have a die cutting machine and dies.

I have several Glitter Girls Embossing broads that are looking for somewhere new to live and they are complete with an ideas book for you to read.


This one is Celebration and the Ideas Book shows the steps you need to take to re create the look for your self.

The Majestic board can create some lovely flowers for you and beautiful shapes to add them to as the focal point for your cards.

There are Scalloped Ovals and a scalloped border along with a pretty bow to add to the top of the oval frame and the Ideas Book will show you more
The Ultimate  has some lovely candles and Christmas baubles along with delicate corners to make your cards look different

There are mats for to layer up or even create the whole base card shape from them.

You will never be short of ideas with the Ideas Book that is with the board as it is full of things for you to create

Elegance Fantasy  can create a lovely butterfly shaped card and decorate the wings any way you wish

There are borders and petals and on the other side there is a really large fan that would make a beautiful wedding card.

The  Ideas book  will show you even more that you can do with this one

This one is the Bookatrix and the Ideas Book will give you lots of ways to dress up this card.

It is the first one I bought and I have used it many many times with beautiful results.


Sold


And this board Dress To Impress comes with the DVD and it will create the most fantastic characters for you.

You choose the character  you want as they appear on the catwalk,  and the clothes you want him/her to wear and then print it off.

Then with the board you create the outfit and add it to your character and there are many  cute ones to choose from.

Children will love this and they can choose everything for the clothing them selves, as well as the texture of the animals fur.

Each of these boards,  complete with the book or DVD  is  £12.00 + P&P 
(The cost will depend on where you live and I have just sent one of these boards to Australia and the cost of postage was £10.75)

Please email me christina@card-making-magic.com if there is something that you are interested in.

But I only have one of each so first come first served.

Once you have emailed me I will invoice you through PayPal and the board will be on its way to you once payment has cleared.

More tomorrow ...

Hugs xx 

August 25, 2015

Tuesday Tutorial - Scalloped Pop Up Box

Hi Everybody,

Todays tutorial is a request for the beautiful Pop Up Box from Spellbinders  The page is photo heavy as I take you through the steps you need. So make yourself a cuppa and sit enjoy the photos as I show you how to make this pretty gift for yourself


Spellbinders Supplies: 
Other Supplies:
  • Want2Scrap pearls
  • White/pale pink/pale yellow/deep pink/green card
  • Lace
  • Forest Moss/ Picked Raspberry/Wild Honey Distress Inks
Instructions:


With the largest die cut four panels from white card.

Cut three or four strips to fix into the centre of the box.

Cut  as many of the Lattice elements as you need to decorate your box.

For mine I used ten of the largest and six of the smallest
Cut the butterflies out of white card and ink through the die with Picked Raspberry before removing the card. 

Cut as many leaves as you wish to add to your card and ink with Forest Moss.
Using all the flower and leaf  sizes from Flower Play die set cut as many flowers as you wish to add to your card.

Keep any flowers and foliage that you don't use for another project. 


Ink the flower centres and the edges of these leaves  with a co responding ink. 

Build the flowers up into complete layered blooms and attach two leaves behind each flower.

You can stagger the sizes of the petals as you build ... and also create some smaller and medium sized blooms to add to your box.

Using the same card as the leaves to create some stems  means that they will not be prominent once added to the box.     So Now lets build the box !!

Fold three of the panels by folding the tab one way and the top score line the opposite way as shown in the photo.

On the panel you are using for the back of your box just fold the tab.
Glue the tabs and attach the panels together to form the box by layering one panel on top of the glued tab.

The unfolded panel will be the back of the box.
Fold each of the centre strips on each end and add these to the middle of the box just slightly down from the rim.

I added four strips to mine as I am going to fill it with lots of flowers.

Once you have these strips in place you can decorate the outside.
I have cut patterned card to add to the sides and the flaps so that it leaves a small border around the edge.

I have also cut two long panels for the back of the box and glued one inside and the other outside to reinforce it
Add in the lattice panels as you wish. I have put the larger ones around the top of the three flaps and four around all sides of the base

 I have added one at the top of the back panel and two on the other side to decorate the back making ten altogether

I have used the smaller ones to add as uprights and glued three to the edges of the top rim.  I have used three more around the bottom edge of the flaps

I have also added some lace around the bottom section.
Start to decorate the inside of the box working, from the back to the front.

Adding lots of leaves will disguise the inside and make a pretty frame for the flowers.

Add the flowers into the centre as pleases you.

Place the butterflies where you want them and add a sentiment of your choice.
Adding the long panel and some of the Lattice work makes the back of the box as pretty as the front and can be viewed from all angles.


Designers Tip:

Pushing the side of the box will make it lie flat and it will go into an oversized envelope.

But if you add as much depth as I have then you will need to make a separate box to send it through the post.

Once it is received by your recipient it will then open out into the beautiful free standing box you have created.

More tomorrow ...

Hugs xx


August 24, 2015

Clean Craft Room ...

Hi Everybody,

Yesterday was Formula One Day and Griff was glued to the telly, so I thought it would be an ideal opportunity to have a clear out in my craft room.  You would be amazed at the the things I came across up here and now that I have banished some to the trash can there is more room.

But I have several items that are excellent and I will be offering them at a good price as pre loved crafting goodies. I only have one of each item though so it's first come first served.

Today I am offering for sale some of the Glitter Girls embossing boards.  Some are the boards ... others have the book that tells you how to make the cards pictured and one has the DVD that creates the characters to fit the clothes on the board.


The first one is called  Framey  and this will help you to create frames and apertures on dark card as well as light.

You can create mats to layer onto your base and there are borders as well as a star that can be added once cut out.

The instruction sheet is with the board
This one is called Illusion and this one will help you to make boxes for your cards.

There are letters and numbers on one side so that you can monogram your projects. And there is a scroll that you can add the monograms too if you wish.

Add the bow to make the card extra pretty.  And this also comes with the instruction sheet.

Here we have Celebrations and on this board there are Champagne flutes and several borders for you to create.

There are entwined hearts with scalloped edges and  two horseshoes... and a really large centrepiece that can be embossed and layered onto your card base with places for you to add pearls or gemstones if you wish.

 This is the board called  Embellisher 

With this one you can create beautiful Ovals and Hearts that you can add flowers too as a centrepiece for your cards.

Or create an aperture, borders and a Christmas tree and the instruction leaflet will give you some extra ideas

These are an excellent way to start if you are new to cardmaking as they are ready to use straight away ... and a perfect alternative to die cutting.

You don't need anything extra other that a stylus and a craft knife to get busy making those lovely shapes to add to your designs.

All the boards are cellophane wrapped and are offered to you for £7.50 each + P&P  and that depends on where you live   (I would estimate about £3.50 for UK)

If there is one of these that you would like then please email me christina@card-making-magic.com  and the board will go to the first one.  I will then invoice you and once the payment is received the board will be on it's way to you.

Tomorrow is Tuesday Tutorial and so the next sale will be Wednesday when I will be showing you the boards that are for sale complete with the booklets .

More tomorrow ...

Hugs xx


August 23, 2015

Holiday Day Ten - Bruges

Hi Everybody,

On the 11th August we had our last port to visit and this is Bruges.

Another really pretty city with trees and canals running through it.

Yesterday was a day at sea and after all the excitement of St Petersburg it was nice to just relax
This was a lovely day and a real pleasure to wander the streets and look at the gardens and the water.

Once again the weather was  kind to us and it was very warm.
We walked towards a park where the request was for silence ... but of course the hum of voices could still be heard.

In the park there are tree houses way up above us  and there are lots of them. Children are not allowed to climb the trees.

Below is the explanation of the tree houses ...


 Little cafes dot the streets inviting you in for lunch or coffee and cake and later on in the day they got very busy.

There are also lots of horse drawn caragies and our guide told us they are very well cared for.

They work for eight hours in one day and then have four days off to rest.

This tower is open to the public and all the people waiting at the bottom are going to climb the 300 or so steps to the top.

I wouldn't have the energy to do all that climbing ... plus my knees won't let me any more, but I bet the view from the top is wonderful.

This is a small selection of the lace that Belgium is famous for and it is very beautiful.

There where tablecloths, cushions, clothing in fact all sorts of things that had lace added to them.

And of course no trip to Belgium would be complete without some Belgium chocolate.

We went in to buy some and samples where being offered so it would have been rude to refuse ...and it was delicious.

This lady was coating fresh strawberries in chocolate and we managed to resist these delicacies.

But we did buy some to bring home.

So today we set sail for home, sailing overnight to reach Southampton at 6am.

It has been a wonderful two week holiday and we have enjoyed every city that we have been to, but it seems to have gone by so quickly

I hope you have enjoyed my Travel Tales over the last few days ... but next week it is back to normal and back to card making.

I have managed to keep the Tuesday Tutorial going while I have been away and  there will be a Friday Freebie added again so keep a look out for that.

Thank you for all your lovely comments

More tomorrow ...

Hugs xx


August 22, 2015

Holiday Day Nine - Warnemunde

Hi Everybody,

Germany is the port of call for this day and this was the view from our balcony as we sailed into the port of Warnemunde

The port is right beside the town and you can see how close it is.


We walked to the Ferris wheel in the picture and from there we went on a boat trip to Rostock.

This is how it is written but it is pronounced Varnemunday ... mind you we heard lots of different ways that people were saying it and some were quite amusing.

Thank goodness we are going to Rostock ... it's much easier to pronounce !!
For four days there had been a sailing regatta going on and this was the last day.

The ships that were in port were beautiful and there where hundreds of them ... some with the sails unfurled as they floated past

There was a fairground at the side of the river and that was very loud and very busy

 This lovely fountain was in the centre of town and has figures around it that are playing in the water.
These brick built boots caught my eye outside a shop and they are huge.

The whole place was lovely to visit but because it was Sunday most of the places are closed, and that kept it reasonably quiet.

This was another hot and sunny day

In fact the only cloudy day we have had was the day we where at sea and there is so much to do on the ship that it didn't matter.

I hope you have enjoyed Rostock with me and at about 5.30pm we sailed again for Belgium

This will be our last port and we visit Bruges which we have been told is very pretty.

More tomorrow ...

Hugs xx


August 21, 2015

Holiday Day Eight - Helsinki

Hi Everybody,

On the eighth day we are off to Helsinki and this beautiful building is in Senate Square. It sits atop wide steps and overlooks the large square

There was an older man singing at the top of his voice as the tourists passed by and it was quite hot today

It was bustling with activity because there are four ships visiting Helsinki today and we all seem to be visiting the same places at the same time.

This photo taken at one of the ports looks like a parking lot for cruise ships and they are all different sizes.


Our guide took us around the city telling us the history of the place and then it was time to hop onto the coach and head off to a woodland village.
This village is now a museum piece and covers a lot of woodland. It was so peaceful to walk through here.

There are several houses that you can go inside and take photographs and we took full advantage of that opportunity.

This is the inside of one and have you noticed the wood burner in the corner.

Not quite the same as those in the palaces but necessary none the less.

The walls look as if they have columns but they are totally flat. The effect is created with paint and is very realistic

We wandered into an old church and saw a beautiful windmill in the forest.

Then we stopped at the cafe in the centre and had a Cinnamon bun and some Finish coffee which was very nice and very welcome.

Heading back into the city we stopped at the monument to the composer Sibelius
 To me this monument looks like a tree ... to others it looks like organ pipes

Every one of the tubes is engraves and it is really very lovely as it glitters silver in the sunlight.

Many many people where there all taking their snap shots and it was a very warm day.
This is also near the Sibelius tree and lots of us wanted a photo of this mask and it is quite large.

 But a woman was sat on the top of it for a long time ... until somebody shouted to her to "Get off" ... which she did promptly


We had some free time in the afternoon and we wandered around Helsinki on our own for a few hours

Then it was time to find the shuttle bus to take us back to the ship and get ready to sail away at 5.30pm

Tomorrow is a sea day and the chance to relax for the day. It has been a hectic few days ashore but we have some wonderful memories of the places we have seen.

The next stop is Germany and we are going on a tour around Rostock ... I hope you will join me

More tomorrow ...

Hugs xx


August 20, 2015

Holiday Day Seven - St Petersburg

Hi Everybody,

St Petersburg is such a fabulous city and everywhere you look there is gold.

On the buildings .. on the furniture ... on the paintings ... on the statues in fact almost everywhere you look

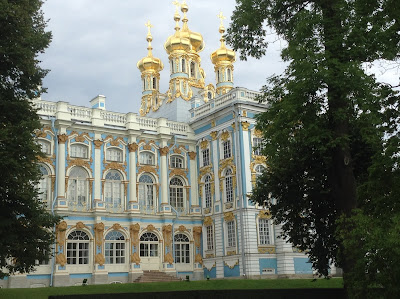
This photo is of Catherine Palace and it is in a place called Pushkin

To visit here you go through large ornate gates and on the way a Russian band was waiting to greet us.
It is awesome and was built by Peter for his beloved wife Catherine.

It is reputed to have had over 100 kilograms of gold to cover the front and the domes of the palace

A lot of the palaces are painted in bright colors.  Green, Pink, Blue, Orange and it gives a really pretty effect as you look around. This one is a kind of Sky Blue and White

The gardens in front are also beautiful and it would take you hours to walk around all of it.

When Catherine died this beautiful Palace was abandoned and it has been destroyed and rebuilt many times in its history

But let me take you inside to see some of the wealth that was around in Catherines day.

 This white staircase has gold in the panelling on the walls and the doors have perspex panelling over them so that you don't brush against them

Everywhere you look there is grandeur and finery and it must have been a magnificent place to live.

You would need a map to get round it it's so big
Walking into this room you are immediately attracted to the walls as they are covered in gold leaf ... but let me tell you what the large blue objects are.

They are wood burners and they are in many of the rooms ... several placed at intervals around the sides of the rooms as Russia gets very very cold

They are huge and the picture does not indicate their size ... but I bet it took a lot of wood to keep them going

This is one of the dining rooms laid out as it would have been for a banquet.

The table was set with lovely ornaments and of course the gold is on them and on the chairs too.
The floors throughout the palace are gorgeous and a different pattern in each room.


Catherine Palace was well documented as it was built and it became invaluable when the whole building was intentionally destroyed during the war.

An empty shell was all that was left but a large amount of the restoration has been completed.

The Grand Hall has been used to hold concerts to attract funding and Elton John appeared there in 2001 to a private audience

In one of the rooms we were not allowed to take photos and so we had to stand in the doorway and get what we could around the crowds.

This is the copy of the Amber room and the walls are covered in Amber and gold. It is beautiful and very ornate

During the war the original  mysteriously disappeared and has never been found and so this copy has been painstakingly reproduced.

The final part of our visit to Catherine Palace was a visit to the Amber workshops.

Here we could watch the craftsmen at work with the amber as they created pieces to fit this beautiful frame.

Amber is very light and is a fossilised tree resin that can be carved with really small tools.

The process of getting the different shades was explained and as we left we all received a piece of amber as a gift.

I hope you have enjoyed this trip to Russia with me and we have a few more stops along the way yet.

More tomorrow ...

Hugs xx