Beautiful Card Designs Made Easy

Showing posts with label Wild Orchid crafts.. Show all posts

July 19, 2016

Tuesday Tutorial - Naples Medallion

Hi Everybody,

For this tutorial I am using the Naples Medallion and this is a large die set. 
You can make your base cards in this shape or just add it to a card but for this one I am taking my scissors to the shape and cutting it up.
The pictured card is 8x6"  because it is a baby card that will be signed by lots of workmates for their colleague 
Spellbinders Used:
Other Supplies:
Take one sheet of A4 card and fold in half along the short side, and keep the fold at the top to create the base card. 
With the pink card hand cut a panel that is slightly smaller then the base and leaves a small border around the edge
 Emboss this layer with any folder that you have
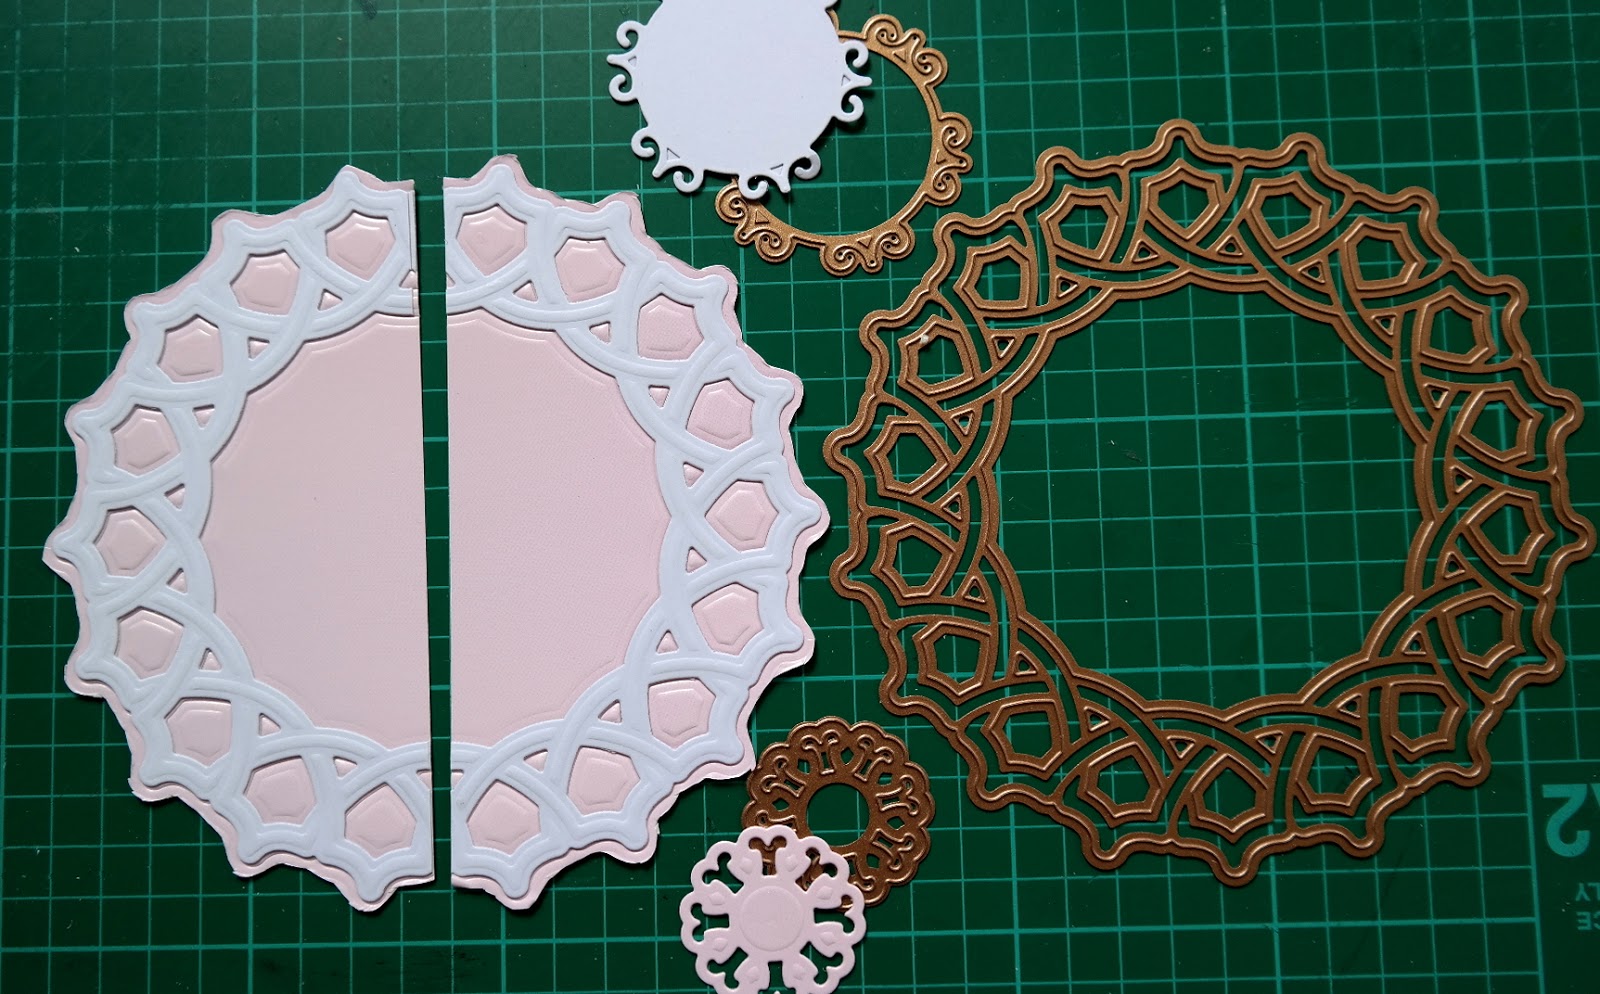
With the Naples Medallion cut the largest one in white and lay it onto some pink card and faux Nestie cut the pink layer that will sit underneath.  Cut this circle in half
Off set the two halves and add to your base card with foam pads to give some depth
Wrap the panel with ribbon to hide the join. I have used double ribbon for mine with white at the bottom and pink on top
Secure on the back and then add this panel to the base card
I decided to cut this chain circle from the Naples Medallion set and cut this in half and add to the cetnre circles. You can see this in the main photo  
I stamped a sentiment and used the Classic Circles to cut it out and then layered it onto the Scalloped Circle.
 I cut two of the smallest dies from the Naples Medallion and cut them both in half.
With some foam pads I added all four pieces to the back of my sentiment and added it to my card 
I dressed it with glittered flowers and added glitter balls to the centres
Notice the little pink butterfly nestled in with the flowers !!

More tomorrow ...

Hugs xx


July 14, 2016

International Ambassadors Informal Blog Hop

Hi Everybody,

Its that time of the month again when some of the Ambassadors go hopping around and we really hope that you will join us again.

This month we have chosen Tags for our theme and each one of us would like to show you what we have created

I made mine in the Shabby Chic Style that I really enjoy making and for this I created my tag from Labels 28

I cut this three times and glued them all together for extra strength.

Then I added different elements to create the background and added in some torn paper.

The die cut under the flowers is Victorian Medallion One

The flowers are from Wild Orchid Crafts and they have been sparkled with fine glitter

To see what my colleagues have designed please pop along to ...

Linda Lucas Australia
Yvonne van de Grijp  Netherlands
Christina Emberson  UK

Please leave us a comment so that we know you have visited and Thank You so much for taking part

More tomorrow ...

Hugs xx

June 14, 2016

Tuesday Tutorial - Labels 33 and Lonely Hearts

Hi Everybody,

The Lonely Hearts set was one of the dies introduced in the Laced With Love Collection by Spellbinders last year and it comes in two parts.  
Each can be used separately to cover different things that you may wish to do, or they can be coupled together to give you a complete panel to add to your cards
Spellbinders Supplies:
Other Supplies:
With die #8 from matting basics A cut two pieces and  create a hinged card
With #8 from the B set cut one panel in Ivory Card.
Hand cut in gold a panel that will sit between these two
(Please remember that die #1 is always the smallest)
With the inner patterned section of the Lonely Hearts die decide which side of the  Ivory panel you want the pattern to be and then die cut  ... no need to emboss at this stage 
Once cut add it to your folder and then emboss the panel. I used the Happy Birthday folder
Once it has been embossed the card may  have spread a little and you will need to trim it to fit on top of the gold panel that you have
With die =4 cut one panel out in gold and then on some Ivory card draw on the inside of the die to create a smaller panel.
If you are not quite sure what to do the the video  Faux Nesties   will show you 
Add foam pads to the back of the die cut and embossed ivory layer and add it to the gold panel
Wrap both of these with cream ribbon and glue on the back then attach them to the base card with more foam pads  
Add the bow into the centre of the patterned panel as shown and add a pretty centre over the knot
Add the largest of the Label 33 to the plain side of the card front and layer with the smaller panel to leave a small border around the edge.
Vary the side where the patterned panel will be, vary the colour choices, add in different flowers, vary the sentiment and each time the card will be fresh and pleasing for you to send to your recipient

More tomorrow ...

Hugs xx


May 30, 2016

Peachy Rabbit ...

Hi Everybody,

Peach is a lovely colour to use for card making as it is soft and warm.

Here I have used it for a pretty floral card with a water coloured Bo Bunny rabbit as the focal point.

I have coloured her with Gansai Tambi paints and added in flowers that blend with my theme

It was relaxing it to do some water colouring and I quite like the card too.

I used a white Sakura gel pen to add polka dots to her dress, but they don't show up very well on the photograph

The flowers are from Wild Orchid Crafts along with the bows centre piece. I have sparkled the petals with Glitter Magic  The organza ribbon is from Mei Flower

 I have had the stamp for a long time and if my memory serves me correctly it was free with a magazine many moons ago.

More tomorrow ...

Hugs xx

May 06, 2016

Friday Freebie 117

Hi Everybody,

Todays card is pretty in pink and has lots of lovely Wild Orchid Crafts flowers attached.

The lighting on the photo makes it look all pink but it is actually on a white base card

It is a 5x7 card and you can swap out the sentiment and use it for any occasion if you wanted to.

If this is a card that you would like to have then all you need to do is leave me a comment at the end of the blog post.

My "Film Crew" will draw  a name from the hat and the winner will be notified in tomorrows blog post.

The names of past winners are all added to the Winners Page in the side bar to your left

More tomorrow ...

Hugs xx


May 03, 2016

Tuesday tutorial - Persian Accents & Motifs

Hi Everybody,

Continuing with the older dies from Spellbinders this week I am featuring another requested set and this one is Persian Accents and Motifs.  
A really pretty group of dies for a lovely intricate look without too much effort on your part. 
Spellbinders Supplies:

Other Supplies:
Instructions:
With die #7 from Matting Basic A cut two pieces of white card to Create A Hinged Card
With two blending pieces of paper add them as shown to your card base and stamp and heat emboss the sentiment of your choice to the bottom right of the card
With the border strip from Persian Accents cut one piece in white and two pieces also in white from the square die #5
With die #4 from the Motifs cut two pieces in Lilac card 
(Please remember that doe #1 is always the smallest)
Add the border strip to cover the join and trim as needed at the top and bottom.
Then layer up the Lilac pieces with foam tape ... off setting them as you add them to the card
Add the two white shapes in the same way and add small pearls to the end of each point
Curl the edges up slightly to look like petals
Add in your floral display to the top of this centrepiece and dot the petals of the flowers with glue that dries clear.
Sprinkle the flowers with glitter for a sparkly effect 

More tomorrow ...

Hugs xx


April 18, 2016

To My Friend ...

Hi Everybody,

Staying with the Shabby Chic theme for  this card and I have to say I really love this card in the soft and gentle pale pink and green.  It is a 6" square top folded base and I have covered this with some pretty flowery paper that has had the edges distressed.
I have used  Medallions Three   for the pink layer  and added more floral paper to the centre.

The flowers, Cameo and frame are from Wild Orchid Crafts  and they have some beautiful new items in this month that are perfect for this type of look.

The leaves are from Foliage and then I have tucked in some Romantic Vine to the display.  This is a really useful little die to have to help dress out any of your floral arrangements and is one I use quite regularly

To the side of the flowers I have dotted here and there some pink pearls and the petals have a dusting of glitter to make them sparkle.

More tomorrow ...

Hugs xx 


January 27, 2016

Water Colour Wednesday - The girl in Pink

Hi Everybody,

It's water colour time again and this one has been done with a digital image from Make It Crafty

There are eight images in the  Carefree Women Collection  and you can colour them to suit any occasion that you want.

(There are also some excellent tutorials on their website to teach you how to get the most from these or any other images you may have either  digital or stamped)

They are a lot of fun to colour and I am really enjoying all the practise that I am putting in to make myself better with water colours.

The flowers are from Wild Orchid Crafts and I have used the mini glitter ball in the centre of the largest flower.

All of them have been sparkled with Glitter Magic

The rectangle shapes that I have cut the image out with are some of the oldest and very first Spellbinders I ever bought and they are now retired from their website.

More tomorrow...

Hugs xx


September 27, 2015

Product Review - Eazi Score (Video Tutorial)

Hi Everybody,

Having a Score Board in your crafting tools is not a luxury but something that is really essential if you want to fold good looking cards.

It will help you to get the professional scoring and folding in all your card bases with out any of the untidy lines and cracked card that can happen when you try to fold the card yourself.

The  Eazi Score   is made by a UK company called  Diamond Card Craft and there is also a larger board that will help you to make boxes of different shapes and sizes

Click the link above to see for yourself ...

This is the project that I made in the video and it is a box envelope that is ideal for you to add a money gift or gift vouchers.

The flowers and lace are from Wild Orchid Crafts  and the chipboard word that I put silver embossing powder on  is from Want2Scrap

Click the square in the video below to watch the tutorial

I made this one into a Baby Gift Envelope and the ribbon and baby carriage are from Mei Flower

Alter the colours and the trimmings it is perfect for any person or any occasion.

The video will show you how I made the box envelope and it is very easy to do.

Get out your pretty card and let the Eazi Score take all the hard work out of making it. No measuring just perfect results every time

More tomorrow ...

Hugs xx 


September 16, 2015

International Ambassadors Informal Blog Hop

Hi Everybody,

Here we are again with another IA informal Blog Hop and this is the ninth one that we have done.

The International Ambassadors are based around the world and we thought it would a good idea for you to get to know each of us and our individual styles.

Please pop along and visit the others as I know they would love to get comments from you all.

And I hope you enjoy your journey around the globe to see ...

Linda Lucas - Australia
Yvonne van der Grijp - Netherlands
Christine Emberson - UK

Our theme for this month is to recycle/upcycle an item and for my project I chose to alter an inexpensive notebook from a local stationery store

I covered the book in dark blue paper and then add a patterned layer to the top and rounder the corners.

I added in the Petite Monarch border strip and then covered the edge with ribbon and pearls.

I cut the Interlocking Love  three times in blue, with the two pieces to the die set ,and backed them onto white with the solid die

One of them I punched a hole at the top and threaded it with ribbon for a bookmark.

The other two I staggered onto the front of the card and added  Just A Note ... across the panels.  For my floral touch I used Pretty Petals B  and combined it with Foliage

The ribbon is from Mei Flower and the pearl centres to my flowers are from Wild Orchid Crafts

More tomorrow ...

Hugs xx

June 26, 2015

Friday Freebie 065

Hi Everybody,

After the ten blue cards I offered in last weeks freebie I thought I would go back to pink with flowers, ribbon and pearls for this Friday Freebie

So this one is layered up and used  Tranquil Moments from Spellbinders and  Napa Valley   from Creative Expressions dies and I have used lots of foam tape to give the card dimension.

The background is Pink Centura Pearl card from Crafters Companion  that has been embossed and the inside is lined in the same card

The flowers are as always from Wild Orchid Crafts and are a selection of Roses, Tulips, Cherry Blossom and Cosmos Daisies

If you would like to own this card then please join the group of followers and leave me a comment to let me know that you have visited.

You will need to come back in the morning to see if your name is listed and then you will have 48 hours  in which to claim the card.

I need your full postal address please,  complete with Country and Zip/Postcode,  to be able to send you the card


More tomorrow ...

Hugs xx

May 06, 2015

Back to Cards ...

Hi Everybody,

After all the excitement about Isabellas' House I thought I would return to a card.

This is in a lovely shade of burnt orange and I have used the Heirloom Ovals  from Spellbinders

This is a large die and makes beautiful cards either as part of another like this ... or as a free standing card with a lovely shape by using the outer cutting edge

I have used the verse from JustRite Stampers  and stamped it in black then clear embossed

The flowers are from Wild Orchid Crafts  and are a lovely collection of Tulips, Roses, Cherry Blossom and Lilies

The pearls are from Want2Scrap  and I have added them to some lace.

Maybe not a color to every bodies taste but it does look quite pretty in the hand

More tomorrow ...

Hugs xx


April 23, 2015

Waste Not Want Not ...

Hi Everybody,

A few weeks ago I showed you a card that used the negative part from die cutting and this is the bit that usually is tossed in the trash can

I was also asked if I could do a video showing how it was created and so that is what I have done

This card is the negative from cutting out the large  Butterfly from Spellbinders ... and that can be used on another project so nothing is wasted.

And don't forget that if you carefully position any of your dies then you will be able to make use of all the card that you have with some really pretty results.


The video will show you how to get the look you want and this is the second card that was created from those pink butterflies

So two cards for the price of one can't be bad and all it takes from you is a little careful thought about where you place that die

The flowers are from Wild Orchid Crafts  and the diamante trail from both butterflies is from Want2Scrap

The sentiment is the one that was free from Simply Cards and Papercrafts  and is such a useful stamp


More tomorrow ...

Hugs xx

February 15, 2015

International Ambassadors Blog Hop

Hi Everybody,

The International Ambassadors are hopping again and we hope you will join us on another informal trip to see what is going on this time in other parts of the world. It is a great way for you to get to know us and see our individual styles


Our roles as Ambassadors are to introduce you  to some of the beuatiful new designs that are coming onto the market

And to show you what you can do with the dies that you buy and help you to get the most from each and every one.

There are only five of us but we are based all over the world with Christine Emberson and I based here in the UK.

I hope you will vista Linda in Australia, Yvonne in The Netherlands and Ursula in Germany.

Leave them a comm-net to let them know that you popped by and maybe you will visit regularly once you get to know them

We had so much fun last time  with the Victorian Collection that we thought  we would like to inspire you again.

This time around we are featuring the Spellbinders Laced with Love Collection
and as it is Valentines Weekend we thought it a very appropriate  set of dies to use

So this time I have the honour of starting off the Blog Hop and here are the other stops along the way ...

Christina Griffiths ... you are here
Linda Lucas  ... your next stop
Yvonne Van De Grijp
Ursula Langhammer ... not participating this time
Christine Emberson


My choice for this blog hop is  Lonely Hearts  as I just love the versatility of this die

I have a couple of photos to show you of the cards I have made and there will be more as the year goes on.


Have fun 

More tomorrow ...

Hugs xx

February 09, 2015

Card from the show ...

Hi Everybody,

This bright card is one from the Create and Craft show and it will certainly wake you up.

I have used a very deep yellow ribbon and teamed it with the black of the floral paper.

I toned it down a little with the pale yellow flowers but I have to say that I do like it

It seems to grow on you after a while.

So the  paper that I used is from Anna Griffin and there are some lovely designs in the paper stack

The ribbon is from my "Stash" and it is all tangled up with other colors in a bag that I just have to cut off what I need each time.

The die is Labels Forty Six and has a Decorative Element to it also. It was featured last week on C&C and I did several demos with this die set

It may not be your cup of tea but once the colors are to your liking it makes a really unusual centre piece for any of your designs.

More tomorrow ...

Hugs xx

October 01, 2014

Three more shows to go ...

Hi Everybody,

Well I am down to the last three shows .... I think !!

Today there are two at 1 pm and 7 pm and then one more on Thursday at 6 pm and then off to Bristol.

I have a Spectrum Noir "Workshop" there on Saturday and that class is fully booked.

Then I am ready for home and the one thing I am really looking forward to is ..... a long hot bath !!

Hotels only have showers and I long to soak in a bubble bath and just relax .... heaven.

So here is another card from the C&C shows and I really like this one.  It is created with the  Delightful Foliage which is now sold out

It is pretty and girly with my usual pink, flowers, ribbons and pearls.  The flowers are from Wild Orchid Crafts 

The pretty gingham ribbon is from Mei Flower and blends with the design

And so I will close now and just add ...

More tomorrow ...

Hugs xx


September 02, 2014

Grand Decorative Ovals

Hi Everybody,

I have had a couple of emails this week asking me about the Grand Decorative Ovals and so what better time to show you a card made using those very items.

This is another example of making the most of your dies and using them in ways other than their intended purpose.

This is in video format so that you can see how I made the card and on the page on the website you will find links to two other ways to use Grand Decorative Ovals     giving you even more scope with these large dies.

Here is the tutorial for you and I hope you enjoy it and for the others just click the link above (the pink words)  ...


The pearl flourish is from Want2Scrap  for a really luxurious touch to the card.   The flowers I have used on all three cards are from Wild Orchid Crafts

The butterfly on this card is made by me and I have tutorial on how I made them ... Making Butterflies   from flower petals.

More tomorrow ...

Hugs xx

August 18, 2014

Pretty in blue ...

Hi Everybody,

This pretty card is created from a pale blue and layered up with several sets of dies from  Spellbinders.

I have used foam pads in between each layer to give more depth and I have inked through the oval layer with Faded Jeans Distress ink.

The pearls are from  Want2Scrap  and they surround the sentiment.  It is from a set that is made to fit the Labels Twenty die but who says that is the only way it can be used ??


The ribbon is from my "Stash" and the single flower is from Wild Orchid Crafts

The sentiment is from  JustRite Stampers   and contains many words that can be mixed and matched to say many things

Click the links to take a look at the mentioned products

More tomorrow ...

Hugs xx