Beautiful Card Designs Made Easy

April 01, 2016

Friday Freebie 112

Hi Everybody,

This striking black and white card is on offer as todays Freebie and would really suit a teenage girl with it's modern style

It is the card that was featured in the video tutorial for Black and White Cards  and you can see it being made if you click the link.

If you would like to own this card  (plus one more in the pack)  then all you need to do is leave me a comment at the bottom of the post.

Under my signature you will see "Comments" and all you need to do is click that link and it will open another window for you to add yours   From those comments a name will be chosen at random and the winners announced in tomorrows blog post.

I will also add it to the Winners Page   and that is always in the side bar to the left so that you can go back and check the names listed.  You will then have 72 hours in which to email me your postal address and the card will be yours.

More tomorrow ...

Hugs xx

March 31, 2016

Aperture card

Hi Everybody,

Here is the second card to be on YouTube this week and I hope you will enjoy this simple idea using circle dies.

This is the Circle Cut Out Card  and if you click the link it will take you to the video

I have used  two dies from the  Standard Circles   to create the frame

The sentiment is from Sevenhills Crafts and  is Painted Inspirations  from Altenew. There are lots of quotes on the stamp sheet.

The ribbon is from Mei Flower and the dotty card in dark blue is from AnnaMarie Designs

The buckle to the ribbon is from a selection at Wild Orchid Crafts

This is a quick and easy card to make and one that you could keep on one side as a stand by for those unexpected request for cards

More tomorrow ...

Hugs xx

March 30, 2016

Water Color Wednesday - Sketched Elephant

Hi Everybody,

This delightful stamp is called Sketched Elephants and it is from Whimsy Stamps  It is a matching die and stamp set and I fell in love with it the minute I saw it.  Here I have just stamped the image and water colored it for a soft and pastel look to my card.
I have added in lace and  flowers ...  kindly donated to me  from  Wild Orchid Crafts  ... The flowers are pale pink, yellow and lilac and I have made them even paler with the Gesso that has been brushed onto the petals. Then they have been glittered up with Glitter Magic

I distressed the edges of the card with my scissors and I love the look. Adding in the pearl spray and the Pink  twine was the finishing touch. I dotted in small pearls in the same colors to blend with the card and they are from Want2Scrap

I partially cut the around the balloon with  Pierced Hearts  from Spellbinders and then raised the balloon with foam tape underneath it.  I added some Wink Of Stella clear glitter pen to make the balloon  glisten

More tomorrow ...

Hugs xx

March 29, 2016

Tuesday Tutorial - Victorian Bow

Hi Everybody,

Todays pretty card is a Gatefold card with the addition of the Victorian Bow and some beautiful flowers. It is a bit photo heavy but it will give you all the steps you need to make the card. 
Get yourself a cuppa and enjoy the tutorial.
Spellbinders Supplies:

Other Supplies:
For my card I have chosen A4 blue and white to create a fresh looking card. 
Using a score board I have scored along the A4 Gate fold lines on the short side of the card and then turned it round to score the other side on the same mark
Fold them into the centre and press neatly with your bone folder.
Line the inside of the card with mats and layers 
I have chosen a dark blue to leave a small border around the Happy Birthday Card
Flat Glue in place
Make mats and layers to fit each of the front panels on your Gatefold with the same blue card but use the spotty card for the top.  Leave small border around the edges again and make sure that each of these front panels is equal
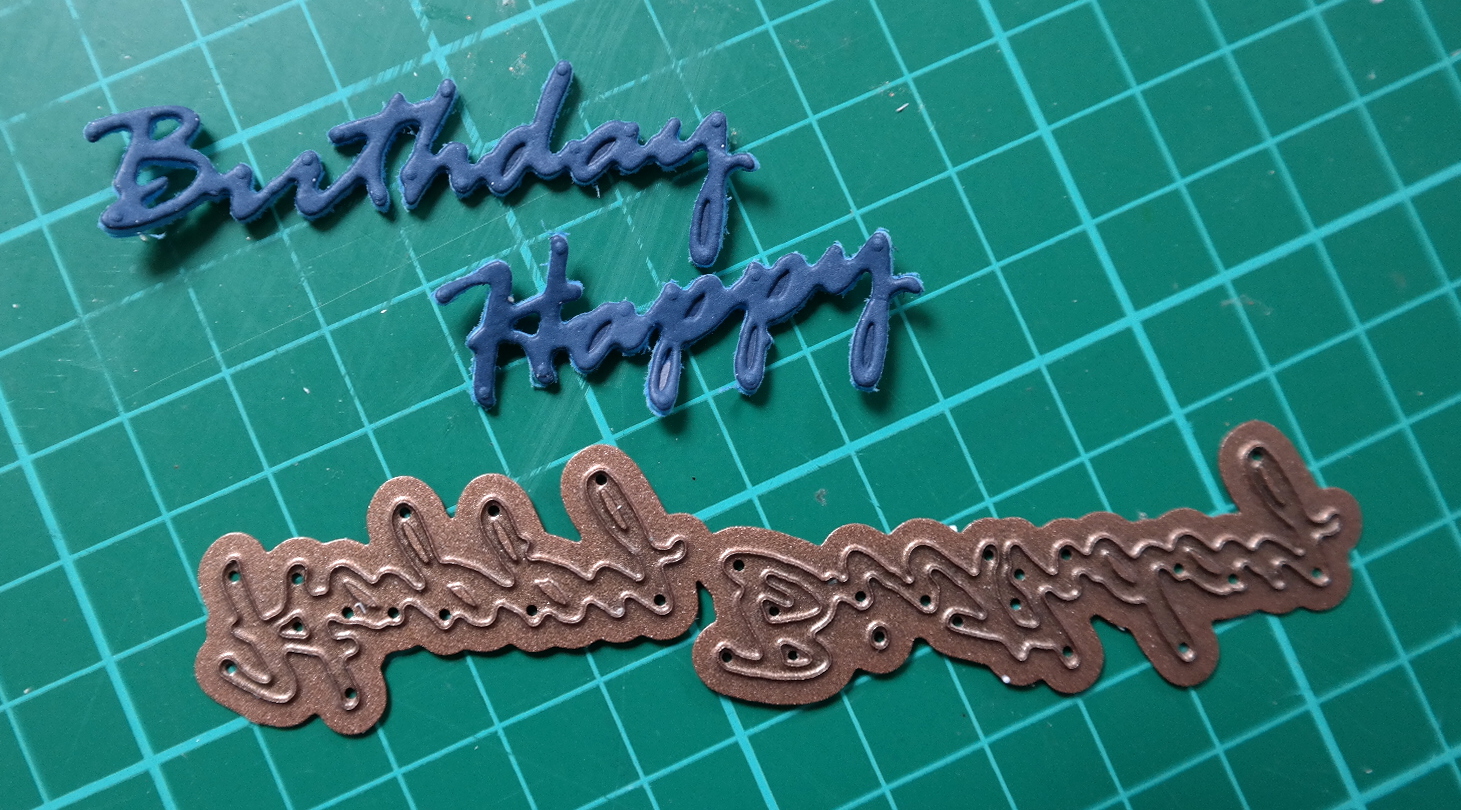
Cut the largest Victorian Bow four times in white and glue them all together and cut the smallest one once to hold the sentiment
Cut the sentiment from the same dark blue card several times and layer them together.
Cut the Flowing Floral six times and layer two of them together in twos for strength and leave the other two as cut.
  Add these two single ones to the inside of the back panel and add small pearls to each of the flowers
With layered Victorian Bow add foam tape to one side and added it to the left panels on the front of the card. Take care not to add the adhesive too far over or you will glue the card front shut 
.... Not a good Idea !!
Add the small die cut with the sentiment attached to the front panel with foam tape in between the layers 
Add the Flowing Floral to the side panels so that it will sit under the flowers. I have cut mine apart so that I can add them above and below the floral display.  I have added small blue pearls to the flower part of the die cut.
I have arranged the flowers on either side of the large focal point taking care that the flowers on the right of the card do not interfere with the opening of the Gate Fold and sprinkle them with glitter

More tomorrow ...

Hugs xx


March 28, 2016

Making Shaker Cards

Hi Everybody,

So todays video that is "Live" on YouTube is this pretty shaker card made using the Classic Hearts and Scalloped Hearts from Spellbinders and the Curved Borders to create the shape along the bottom.

I have also used some Acetate and craft foam to help make the shaker element

If you have these dies in your personal collection then it is time to get them out again and play.

The spotty card is from  AnnaMarie Designs  and it is really good quality card.

The sequins are some that I have had in my "Stash" for some time. The pearls and the chipboard word are from Want2Scrap

The embossing at the bottom of the cards is with a new folder called  Ripple  and is one of several that have been added to Spellbinders shop

The video is titled   Heart Shaker Card   and I hope that you will enjoy it


Friday Freebies & Give Aways

In the side bar to your left I have added in a "Winners Page" and each time I do a Friday freebie or a Give Away I will add the winning names to that page. You will always be able to come back and find it to see if your name is there ... simply click the photo to go to the page


 I have also extended the time in which to claim the card to 72 hours simply because I don't want these cards sitting around waiting to be claimed.  If the card is not claimed then it will be offered again at a later date.
The winners name will still be posted in the next days (Saturday) blog post so you will need to come back and check if it is you

More tomorrow ...

Hugs xx

March 26, 2016

Card Winner today ...

Hi Everybody,

Yesterday when I said it was a nice day and spring was on the way I spoke too soon because today it is throwing it down and blowing a gale.  Still I am tucked up at home nice and warm and going to settle down with the latest Slimming World magazine bought this morning at SW Club.

I have lost another pound this week and after the club I went to buy myself the next size down for trousers as the ones I was wearing have become so baggy they look awful. I am so pleased with myself.

I know that some of you have been encouraged by my little stories to go and join your local own local Slimming World groups and I really wish you all the very best with your own journey. It is an excellent way to eat and you WILL lose weight if you follow the plan (and it is not hard to do) ...guaranteed. Thank you for writing to tell me of your weight losses, I am really happy for you.

The draw has been done for the winner and the name this week is ...

Yvonne Nicholson
please email me with your postal address to 
christina@card-making-magic.com
and the cards will be on their way to you straight away.
I hope you will like them and please let me know when they arrive with you.

No post tomorrow but I hope you all have a really good Easter.
Two new videos next week on YouTube and a lovely Tuesday Tutorial and Water Colour Wednesday

Hugs xx


March 25, 2016

Friday freebie 111 - Two Orange Roses .

Hi Everybody,

These two cards are on offer today and each one has a different verse. The back ground and roses are coloured with Brush Crystal colours but are not finished on the insides so you can use them however you wish
They are about an A2 size so will fit into a standard envelope. They are created in the same way that the blue pair from last week and the video tutorial is Brusho Crystals Background  

If you would like to win these two than all you need to do is leave me a comment at the end of the post and from those comments a name will be drawn and announced in tomorrows blog post.

I urge you to come back and check if you are the winner as you will have 48 hours in which to claim them.

More tomorrow ...

Hugs xx

March 24, 2016

Distress Ink Stripes

Hi Everybody,

The featured card is the one that is going "Live" on the YouTube today so I hope you will pop across and take a look.

It is titled Ink Stripes and shows you how to get this pretty look for your self with Distress Inks and some masking tape

I have used the Classic Bracket edgeabilities die to create the heart pattern in the card but sadly this die is now retired See what you have in your collection to recreate the effect.

It needs to be a die that keeps the pattern in the card and not cut it out completely.

It is a very simple and easy card to make and I am sure that you will make it your own with the embellishments that you add to it.

I stamped and heat embossed  my sentiment onto parchment and wrapped it around the panel then added in some enamel dots .

More tomorrow ...

Hugs xx

March 23, 2016

Water Colour Wednesday - Birthday Bears

Hi Everybody,

Today I have a few water colour cards to show you using the Birthday Bears from My Favorite Things

For the first two I have used the stamp as it is to create a one layer card.

The grass was hand drawn in the first card
The sentiment stamp for the first one is  That is All   from WPLUS9

The second one has used the words from "Blessed" by Mama Elephant and there are many ways to create the verse or saying that you want

The reason I am showing you these first two is because apart from colouring them I have done nothing else to them

But for the third card I have used the Birthday Bears matching die set to cut them out and add them to the front of my card.
I have also added clothes to them with a fine liner pen and then coloured them in

Just a fun effect that is easy to do and can help you to get even more from your stamps

You can see how different the Bear with the parcels looks once I added in a pretty top for Mama Bear

I bought all my stamps and the die from Sevenhills Crafts  for excellent service and a good price

More tomorrow ...

Hugs xx

March 22, 2016

Tuesday Tutorial - Decorative Labels Eight

Hi Everybody,

Todays tutorial is a really quick and easy card to make and uses one matting basics and one Decorative labels to complete the look.  The thing that makes the card look interesting is the layers, and the height to each of those layers gives depth to the card.
Spellbinders Supplies:
Other Supplies:
Instructions:

With #8 from Matting basics B cut two panels in white and create a hinged card
With #3 and #4 dies from Decorative Labels Eight cut one of each in white
(Die #1 is always the smallest)
Hand cut another layer for each of the fancy ones in the color of your choice
I have used pink Polka Dot card
Add foam tape to the back of each of these layers and wrap them with ribbon before adding them to the base card
I stamped my sentiment  in silver onto some yellow parchment and added the glue so that it will be hidden by the ribbon
Adding in the foam tape raises each of the layers up and gives depth to the design, so if you haven't tried adding in foam tape/pads or sheets then give it a try and see what a vast difference it makes.
I buy mine from the £££ shop and get three rolls for my £1
I added in a mix of pink and yellow flowers and doted them with glue and sprinkled with glitter 

More tomorrow ...

Hugs xx

March 21, 2016

Believe ...

Hi Everybody,

Thanks you for all the lovely comments for yesterdays Pink Romance Card. 
Here is another in the same vein and this time in lilac.  It is a 5x7 sized card in a soft and gentle color and the flowers all blend in with the scheme. 
The flowers, lace and pearl embellishments are all from Wild Orchid Crafts  and they have the added sparkle from Glitter Magic

The die I have used is a sneaky peek from the new Contour collection from Spellbinders being launched later this month. This is Bye Bye Birdie and it creates a good sized bird cage. It is not on the SB website yet but I will link to it once it is

 I have cut it out six times,  and the top layer is in white glitter card,  and then glued them altogether to make a really solid bird cage

I have added in Guipure lace and cut leaves from the Foliage set also from Spellbinders. 

This is another card that I have enjoyed making and adding all my pretty bits to it.  I feel like a Magpie collecting all these sparkly "Blingy" pieces.

I will be adding a new video to the Inspirations page today and I hope you like this selection for you to view 

More tomorrow ...

Hugs xx

March 20, 2016

Pink Romance ...

Hi Everybody,

Todays card is a real romantic one and I thoroughly enjoyed making this one.  It has all the elements that I like to add and some more as well.  I have used several different dies to create my look and the finished card is 5x7.
Th centre piece has been cut with the Decorative  Fancy Diamonds  from Spellbinders and is one of the Victorian Garden Collection that was launched last year. I cut this out five times and then glued them all together to create a really solid piece for my card.

I have used some of the leaves  from the  Stack and Fan Flowers  and the Flourishes from the  Cinch and Go  Flowers

The beautiful flowers and the green leaves are a mixture from Wild Orchid Crafts The floral lace and the silver corners are also from WOC  The silver leaves I have had in my "Stash" for a long time and I can't remember where I got them from.

I used the edge of my scissors to roughen up the edges of the paper for a shabby chic look and then once the card was completed I added some white Gesso and glitter to those edges.

I am pleased with the result and this is definitely on the same street as me ...

Don't forget to check out YouTube this week as I have two videos going "Live" one tomorrow and the other on Thursday.
More tomorrow ...

Hugs xx


March 19, 2016

Card Winner ...

Hi Everybody,

Hope you are all having a good weekend so far. It's grey here today but at least it is fine. I went to my Slimming World weigh in this morning and I have lost another pound. Not a lot but at least it is better off than on.

To anybody thinking of joining Slimming World I would really encourage you to do it. It is a way of changing your life style and the weight will come off quite quickly if you stick to the eating plan.  I have lost 32lbs since I joined them last year and not once have I felt hungry or deprived.

Onto the card draw for the two rose cards from yesterday.  The name chosen this week is you. ...

Margaret Rogers 
please email me your postal address to 
christina@card-making-magic.com
and the cards will be on their way to you.

Please let me know when they arrive and I hope you will like them when they do.

Enjoy the rest of the weekend 

More tomorrow ...

Hugs xx

March 18, 2016

Friday Freebie 110

Hi Everybody,

Two more cards on offer this week and these have a beautiful Rose added to the front. They both have the Brusho background and they are "Thank you" cards.  They are not finished on the inside so you will be able to customize them as you wish.
If you would like to win BOTH of these cards then all you need to do is leave me a comment at the end of the post.  The name will be announced in tomorrows blog post and then you have 48 hours in which to claim it before it is offered to someone else.

Please come back to check if it is your name that is shown

More tomorrow ...

Hugs xx

March 17, 2016

Art Deco - Fairmont Collection

Hi Everybody,

This pretty in pink card is using another new die from Staceys Art Deco Collection and this one is named Fairmont.  There are some beautiful dies in this collection and it is well worth you taking a look as there is sure to be something that catches your eye. There are some really large dies that can create the whole card base and then you can decorate it from there.
There are three sets in the Fairmont dies that can be used as stand alone dies or they will all work together to give you a beautiful look.

Art Deco Fairmont Labels  is the plain label shape that has been used to create this base card in pink and it has been hinged together with the fold at the top.

The white layers have been cut with Art Deco Fairmont Decorative Accents  and added to the card with foam pads.

I haven't used the other set but it is  Art Deco Fairmont Decorative Element but it is just as stunning as the others and I love to work with these large and distinctive dies.

The flowers, pearl string and flower centre are all from Wild Orchid Crafts and they have been sparkled with Glitter Magic. I have added in some white enamel dots from Want2Scrap as an extra highlight

There is also a new video over on YouTube with more of the dies from the Art Deco Collections  ... and for the next two weeks there will be two videos each week on Monday and Thursday covering various techniques. I really hope you enjoy them

More tomorrow ...

Hugs xx