Beautiful Card Designs Made Easy

April 14, 2024

Bejay Roles - Winner

 Hi Everybody,

It has been a lovely weekend so far and I have got a lot done. I had a lot of help though from daughters and their husbands who came to help me clear out the garage on Saturday. It was full of stuff that is no longer used and it needed to go. So now it is clear and tidy again with lots of room in there for me to move about in, and I may just start my painting again in the warmer weather. 

I also took Ruby to the park yesterday for her favourite pastime ... a good sniff about ... and she had a good time playing with some of her pals that where also in the park.

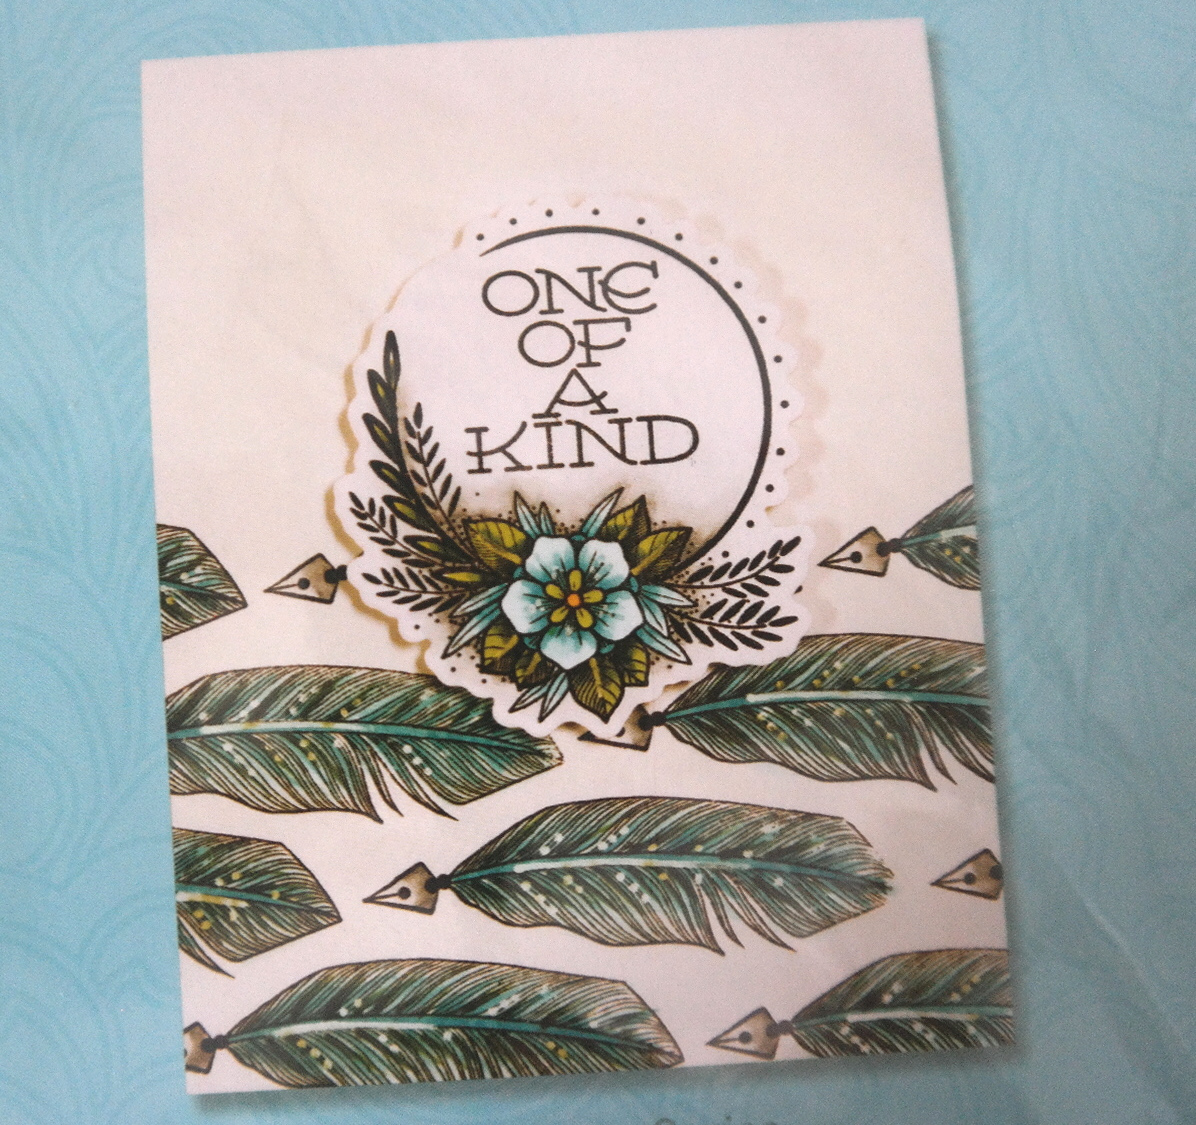
But now the draw has been done for the second of the Spellbinders die and stamp sets and the winner today is 

Bejay Roles

so could you let me have your postal address please to

christina@card-making-magic.com

and I will get it in the post to your straight away.

Please be sure to let me know that you have it safely and I hope you will enjoy playing with it. 
I will also include a handmade Pokey Tool for you to use and I hope you will make good use of it.

More tomorrow ...

Hugs xx

April 12, 2024

Spellbinders Die & Stamp Set 2

HI Everybody, 

Todays offering is another die and stamp set from Spellbinders. The sets that are being offered are very old as I have had them in my collection for years.

But the chance to win one is now open to you and all you need to do is leave me your comment with your 
FULL NAME
at the end of this post. 

There are different designs each week and one of them may just be what you are looking for. 

So why not give it a try and you may be the lucky winner and be sure to come back and see if it is your name that is listed as the winner over the weekend. 

The one offered this week is a beautiful feather that could be used to create the whole background

The sentiment can be added to the top or used separately as suits you.

Please leave your full name as it easier to identify the correct winner if you do, and you will have 72 hours in which to claim it.

More tomorrow ...

Hugs xx


April 11, 2024

CD Paper

Hi Everybody,

The papers for the card shown today are from a CD that I had years  ago when that style of crafting was popular., and now I no longer use it

I prefer to make my own backing papers from ideas that have been around for a long time, and most of them are using inks or paints

They are unique and different every time I make them plus it makes me use items that I have had for a long time and will forget about if I don't get them out regularly.

I am sure you are the same and have lots of things at the back of a cupboard that you have forgotten that you have.

Its like Christmas when you find them all again.

This paper was printed off so long ago that I don't remember which CD it was from., or even what I have done with it. It probably went to the Charity Shop

But there where some very pretty paper on it and I did use it quite a lot back then.

The flowers on this card are Mulberry ones and I have added a dot of white paint around the edges of them.

The card is a 5x7 with the fold at the top and this is my preferred size and orientation for card making.

What is your favourite size ???

More tomorrow ...

Hugs xx


April 10, 2024

Parchment Pocket Card

Hi Everybody,   

Todays card is a shaker card that is created from a parchment pocket .

 I have shown this idea in a video before and I have added it in below in  case you missed it.

The shaker pocket has been filled with green sequins and enough room left for them to shake around.

The purple background has been done with ink smooshing and then dies used to cut out the frame, the flowers and the sentiment.

The white base panel has been embossed and the aperture removed using square dies.


The same nesting dies have been used to produce the frame

The leaves, sprigs and flowers have been added with a mixture of glue and foam pads.

I have used Glossy Accents to pick out the flower centres.

The berries on the sprigs have been coloured red and then covered in the Glossy Accents also  and then I have left them to dry thoroughly

The finished card is a 5x7 with the fold at the top and the sentiment is added to the bottom of the card.

More tomorrow ...

Hugs xx


April 09, 2024

Panel Card

Hi Everybody,

Todays card is crated from the Fleur card by Anna Marie Designs and this is one I have used a lot. 

It comes in many different colours and is really good quality and thick so makes an excellent card base.

For this card I have cut it into panels and added them to some white card 

. They have then been added to the base with foam tape to raise them up.

 It was part of a video I did a while agon now that mixed up patterns from the same colour family to create many cards 

And in case you missed it , or you are new to card making, I will add it here again. 

                
If you are purchasing any of the items that are listed then please consider going through the links at the end of this post, or on YouTube,  as this means I get a small commission at no extra cost to you. 

This means that I can bring you more articles , videos and blog posts.

More tomorrow ...

Hugs xx

April 08, 2024

Playtime Cards

 Hi Everybody,

This card is created with a die that must be at least 15 years old . And it is one I used a lot in the past.

It is the Tied Together die and it has an embossing folder to go with it. Every time it came into stock it sold out almost immediately.

I was fortunate to get both die and folder but as I say it was many, many years ago and I don't know if it is still available.  

For this card I have used the embossing folder on the white background and cut the top die cut in black and layered them together.

The layers have been wrapped with parchment and stamped in black then clear embossed.

 The YOU has been cut from the same  matt gold card I have used to mount the layers onto. 

The butterfly has been cut in black and then gold wax applied through the actual die to bring out the pattern. 

It has been added to the card with glue just along the bodyline which allows the wings to flutter free.

 Tiny diamante have been added to the bodyline and the finished card is a 4x6" with the fold at the top. 

More tomorrow ...

Hugs xx


April 07, 2024

Doris Shawcross - Winner

 Hi Everybody,

Sorry for the delay in announcing the winner of the lovely Spellbinders die and stamp set. I took advantage of the weather and went out with Ruby before the rain started. It was very windy though and we were glad to get home again.

So now the draw has ben done and the name this week is ...

Doris Shawcross

Would you email me your postal address please to 
christina@card-making-magic.com
and I will get this lovely gift in the post to you straight away.

There will another set on offer next week so be sure to come back and se what it is.

More tomorrow ...

Hugs xx

April 05, 2024

Spellbinders Die & Stamp Set 1

 Hi Everybody,

I have been giving away the magazines with the attached gifts as my Friday Freebie for years now but at the moment I have run out of them.

And so instead I am offering you the chance to have something else that you can add to your crafting collection. 

Over the next few weeks I am giving away a Spellbinders Die & Stamp Set that is brand new and unopened. 

Each one consists of  a stamp, which is sometimes a sentiment and others floral or a border, but there is always a matching die to go with it.

This week it is sentiments and there are six dies in this collection, and they wild make a lovely addition to your cards. 

If this is something that you would like to have then all you need to do is leave me a comment at the end of the post with your FULL NAME.

Then be sure to come back and check if it is your name that is shown over the weekend as the winner.
You will have 72 hours in which to claim the pack.
Good Luck 

More tomorrow ...

Hugs xx

April 04, 2024

More Everyday Items

Hi Everybody,

Items that we often discard in our homes can be repurposed to create backgrounds for our cards.  .

Over the last few videos I have tried to share some of the ways in which I make these work for me and they are ideas that you may have tried for yourself.

I have used tin foil and kitchen towel as well as shaving foam and baby wipes for all different kinds of textures and features on my designs

If you are new to card making then maybe they will give you some inspiration to try these out and see what you come up with.


Using different shapes to add to the design can also make a difference. Both these cards are featured in the video

I have created a playlist on YouTube that has all my ideas in one place and it is well worth browsing if you are stuck for ideas,  or at times when cash is low but you have some of these things already in the home.

This time I am featuring Bubble Wrap for another addition to your Everyday Items.


So grab a cuppa and sit back to relax as you view the video using this idea.

More tomorrow ...

Hugs xx

April 02, 2024

Playtime ...

Hi Everybody,

While browsing through YouTube the other night I spotted a video that showed me how to create a card with this look and I was very impressed,

The card was beautiful and the demonstrator made it look so easy to do. So of course I had to go to the craft room and give it a try from myself.

I had to search for all the small Christmas themed stamps that I had and I cut the bauble from some Mylar to make the stencil for the design. 

It is no where near as impressive as the one I saw made and I am adding the video here in case you wanted to give it a try too.


There are bits I have omitted from making my card but I will be doing this again with other bauble shapes and I will get better in the process, but I have to say I enjoyed making it even if it is  not perfect,

More tomorrow ...

Hugs xx

April 01, 2024

Easy Peasy Sponging


 Hi Everybody,

When I have got out my crafting supplies out it is always easier for me to make more than one card. 

That way I always have some on hand, and they may only need a sentiment on them, or they go to fill up my charity shop box.

And these two cards shown are already in that box, complete with a matching envelope in a cellophane bag.

These have both used the sponging effect from the other day and are really easy and quick to do and yet make really pretty cards.


The video was another one to add to the 
on YouTube that is full of simple ideas using things you probably already have.

I have several more videos to add to this section and they are not difficult to re-create. but can help you to expand your repertoire. 

Non of the techniques are new and they have all been done many times by others over the years. 

But if you are new to cardmaking then they may be something that you had not thought about and may like to try for your self.

Click the link above to look at the playlist as there maybe something there that takes your fancy.

More tomorrow ...

Hugs xx


March 30, 2024

Everyday Items - Sponged Backgrounds

 Hi Everybody,

A really cheap and easy way to vary the look of your cards is to use items that you are sure to find around the home.

This card has been created with an everyday household sponge that I have cut into pieces to use with water based inks.

Quick, easy and very effective and if you change the colours you will vary the look.

I have used the pre printed and foiled sentiment strip that came with the  most recent paper packs that have been released and there are such a  lot in each of the packs.


The video is not too long but will give you time to relax with a cuppa and hopefully a new idea.
You may have already tried this in the past or you would like to do so now. 

More tomorrow ...

Hugs xx


March 27, 2024

Inked Embossing Folder

Hi Everybody,
 
This pretty card is done with an embossing folder and I showed you some of the others  a few days ago. 

I added a video to Craft Stash that shows a slightly different variation to this one.

But in this video I show you that you can use any embossing folder that you have and any water colours that will blend together. 

This card has been created with Brushos and a little parchment to diffuse the background

I also used any card that I had to add the colours too, and any black ink in my stash. 

I always have the gold wax, flowers and parchment on hand but you can leave them out if you prefer.


On this card to the left I have added in a light dusting of the wax and the butterflies are cut from gold card.

It gives such a pretty look and it will be different each time you do it.

You could also try a colour other than black to the infill and that would give you another look to your designs. 

It really is playtime with this technique and you are sure to enjoy the process.

For the card to the right I used pinks and purples to create the base and then added Villainous Potion to the embossing folder for the other colour.

I highlighted the design in gold gilding wax with my fingers and added the decoupaged flower and leaf to the card with foam tape.

I hope you enjoy the video and be sure to let me know if you try this for yourself.

More tomorrow ...

Hugs xx

March 26, 2024

Lace Stamped Background

Hi Everybody,

This was a technique that I covered a few years ago now and I may have shown other cards from the idea but I don't think that this was one of them.

The background has been inked with an Ombre colour scheme going from dark blue to a paler shade at the top. 

Then once that was dry I stamped at the bottom of the card the lace border in Versamark. 

It uses a stamp that I bought at a Craft Show and I have had this for many years and I don't know if it is still available

Once stamped it was sprinkled with white embossing powder.

The powder stands out much more once it is heated and is slightly raised from the card too. I added self adhesive pearls to each of the points on the lace

The sentiment is stamped in black and then clear embossed to give it the shine.

The flower display has been added to trail down the left side of the panel and as usual I have dotted it with glue and sprinkled it with glitter.

Smaller pearls have been added around the display and then that panel has been added to a top folded 5x7 card base.

It is a very pretty card and the techniques is easy to do. Take a kook at some of the stamps in your collection and try using them in this way for spectacular results.

More tomorrow ...

Hugs xx 

March 25, 2024

Altenew & Parchment

Hi Everybody, 

Today it is pouring down and quite cold so not a lot being done outside in the garden.
But yesterday I managed to get some of my very big plants re-potted  and some of the new plants used to fill out the other pots so they look pretty again. 

Then the whole garden ... back and front ... was jet washed to get rid to the grim that has collected this year, and now it all looks clean again and ready to face the world. And that's another job off my list of things to be done, and it is going down steadily.

This card is using another stamp and matching die set from Altenew and these have ben coloured in with the layering stencil.

Once these have been die cut I have added it to a piece of parchment that I have torn into shape and add to another panel that has  also been coloured with stencils.

The parchment diffuses the background and allows the flowers to show up more. 

Then the whole lot has been added to some knitted card with foam tape between each of the layers. 

The little sentiment is from a Card Making Magic paper pack and I added that to some white card for strength.

The card looks prettier in the hand than it does here and it is one that I am not unhappy with

More tomorrow ...

Hugs xx